Kamut Flour Bread Recipe
Kamut Flour Bread Recipe yields a nutty, golden loaf with a crisp crust and open, chewy crumb. This easy artisan style bread combines high hydration and long fermentation for deep flavor and bakery quality texture, making it a standout for easy weeknight baking or relaxed weekend baking sessions. Try it for a reliable, crowd pleasing loaf that rewards patience with complex taste.
Equipment
- Dutch Oven
- Large container
- Proofing basket
- Kitchen Scale
Ingredients
- 650 grams bread flour Provide structure and gluten necessary for a strong dough network; supports rise and crumb development in combination with other flours. Perform sifting if needed to ensure even hydration and incorporate air for a lighter loaf; contributes most of the recipe's texture and chew.
- 250 grams kamut flour Add a nutty, slightly sweet flavor and boost protein content while lending a denser, heartier character to the bread. Absorb water differently than modern wheat, so allow adequate autolyse or resting time to ensure full hydration and even crumb.
- 150 grams Ivory wheat flour Contribute mild, wheaty flavor and additional gluten to balance the kamut's texture while smoothing overall dough behavior. Blend thoroughly to maintain consistent hydration and to help create a tender, cohesive crumb structure throughout the loaf.
- 880 grams water Hydrate all dry ingredients and activate yeast to form the dough; control final dough consistency and influence fermentation rate. Adjust temperature and distribution during mixing to ensure even absorption and proper gluten development for optimal rise.
- 25 grams coarse salt Enhance flavor complexity and control fermentation by strengthening gluten and seasoning the bread; help regulate yeast activity and dough handling. Dissolve thoroughly to avoid pockets and distribute evenly so each slice has balanced taste and mouthfeel.
- 4.5 grams active yeast Leaven the dough by producing carbon dioxide during fermentation, creating volume and open crumb structure. Dissolve or disperse evenly to ensure predictable rise and consistent texture throughout the loaf.
Instructions
- In a large container, mix together 550 grams of bread flour with 396 grams of water at 80° to 82° and 0.5 grams of yeast until combined. Cover and let sit at room temperature for 10 to 24 hours or until tripled in size.: Warm water at 80° to 82° feels slightly hotter than body temperature, and when you stir it into the bread flour with the tiny pinch of active yeast , the mixture will come together into a shaggy, sticky mass. You should notice the surface becoming smoother as the flour hydrates, and there will be a faint wheaty aroma as the starches swell. This early stage creates a biga that will slowly ferment and develop subtle acidity, which deepens the final loaf's flavor. Avoid overmixing here because vigorous kneading would produce a tighter gluten network than desired for the biga; also, resist adding extra flour which lowers hydration and yields a denser crumb. If the mixture seems dry, ensure your scale reading for water is correct, as scale errors are the usual culprit.
- In a separate large container, mix together the remaining 150 grams of bread flour, kamut, ivory wheat flour, salt, remaining 4 grams of yeast, and remaining 484 grams of water at 100 to 102° until combined.: During this long rest the biga will bubble and smell slightly tangy as fermentation progresses, and visually you will see it expand, often doubling then tripling if the yeast is active. The long, slow ferment encourages enzymatic breakdown of starches into sugars, which improves crust color and flavor complexity. A common mistake is placing it in a cold spot which prolongs fermentation; aim for a steady, warm corner of the kitchen. If it overproofs and collapses, it will have a pronounced alcohol smell and reduced structure, so adjust timing in future attempts based on your kitchen temperature.
- Add the biga to the mixture and vigorously mix it by squeezing, stretching, and folding until thoroughly mixed in, about 3 to 4 minutes. Cover and let rest for 20 minutes.: Hot water at 100 to 102° will feel quite warm and helps hydrate the flours quickly, especially the kamut flour which benefits from more aggressive hydration. When mixed, the dough will appear very wet and glossy, and the salt dispersed in the mixture will temper fermentative vigor while strengthening gluten formation. This technique creates a second mass that, when combined with the biga, balances flavor and structure. Don't let the water be hotter, or it may harm yeast activity; also, be mindful that hands off mixing is fine here because the goal is full hydration not intensive kneading. If your kitchen is cold, this step helps jump start fermentation, but watch timing to avoid overactivity.
- Fold the dough by stretching and turning it 6 to 8 times every 20 minutes for 80 minutes.: As you squeeze and fold the combined masses, you will feel the dough becoming more cohesive, strands of gluten forming between your fingers, and the surface turning springy. The action aligns gluten networks so the dough can trap gas during fermentation, producing airy crumb. You should hear a slight tearing sound as the dough gives way and then smooths out, and the aroma becomes mildly yeasty with a touch of sweetness. Avoid prolonged mechanical mixing which can overdevelop gluten and create a tough interior; on the other hand, under mixing leaves pockets of dry flour. If the dough resists coming together, give it a few minutes rest to let the moisture equalize before resuming.
- Cover and let rest for 2 more hours or until tripled in size.: This bench rest is a quiet interlude where the dough relaxes, and you will notice it become less elastic and easier to handle after the pause. It allows hydration to finish penetrating the flours and makes subsequent folds more effective at strengthening the gluten. You'll recognize the rest is sufficient when the dough no longer bounces back aggressively when poked. A frequent mistake is skipping this rest, which can make the dough tougher to shape and limit oven spring. If you are short on time, extend the rest slightly rather than rushing into folds.
- Divide the dough on a clean surface dusted with flour and form 2 taught dough balls. Transfer each to a floured proofing basket, cover with a towel, and let proof for 60 to 90 minutes.: During each fold you will pull the dough up and fold it onto itself, creating tension and aligning the internal gluten. The dough will gradually become smoother and firmer, and small bubbles should appear under the surface as gas gets trapped. This structured timeline builds strength without aggressive kneading, and the rhythm helps even novice bakers produce consistent results. A common error is folding too vigorously which can deflate the dough and limit rise, so be deliberate and confident with each motion. If the dough tears easily, allow a longer autolyse next time to improve extensibility.
- Place 2 Dutch oven pots into an oven preheated to 500° and let them sit for 30 minutes.: This extended bulk fermentation will be aromatic and active, yielding a dough that has expanded significantly and has a light, aerated feel when lifted. You should see pronounced bubbles and a slightly domed surface. The increased volume indicates the yeast has fermented sugars and produced gas, which is essential for oven spring. Avoid letting it overproof, which makes shaping difficult and weakens the final crumb; you can perform a gentle poke test to check readiness, looking for a slow rebound. If growth seems slow, your kitchen may be cooler than expected and you can move the dough to a warmer spot to accelerate fermentation.
- Remove the pots and place the dough carefully into each Dutch oven. Score it with a bread knife or blade, cover, and bake for 30 minutes, then uncover and bake for another 20 to 25 minutes or until the outside of the bread is dark brown.: When dividing, the dough will resist slightly but still be pliable, and forming taught balls helps create surface tension that supports good oven spring. The exterior should be smooth with only minor flour dusting, and you may hear a silent slip as the dough rounds. Avoid overflouring which can dry the surface and limit crust coloration. If the dough feels too sticky to shape, give it a brief bench rest to relax the gluten rather than forceful handling.
- Set on a cooling rack for 30 minutes.: In the final proof the loaves will gently rise and develop a slightly domed top, and you can watch tiny bubbles migrating under the surface. This stage readies the loaf for the oven by building final volume and tension on the surface. A typical misstep is overproofing, leading to weak structure and poor oven spring; if the dough feels extremely slack and deflates easily, it likely overproofed. To test readiness, look for a slow, soft rebound when gently poked; a quick spring back means it needs more time.
- Slice and serve.: Preheating the Dutch ovens ensures the interior is scorching hot, which creates immediate steam and vigorous oven spring when the dough is placed inside. As you slide the pots in, you will hear a low roar of heat and later a pronounced hiss as moisture meets the hot metal. This step is critical for a blistered, caramelized crust. Be careful handling the heavy, hot pots to avoid burns; always use thick oven mitts. If pots are not adequately preheated, the loaves will have reduced oven spring and a paler crust.
- Remove the pots and place the dough carefully into each Dutch oven: The dough should sit in the pot with a taut surface, and after scoring with a blade you'll see the dough's surface relax slightly. Scoring controls where the loaf expands during baking and encourages an attractive ear to form. Close the lids for the first part of the bake to trap steam, which keeps the crust soft and allows full expansion. A common error is shallow or imprecise scoring which can lead to irregular splitting; aim for confident, decisive cuts. If the dough sticks, sprinkle a little flour or use parchment to ease transfer.
- Score it with a bread knife or blade, cover, and bake for 30 minutes, then uncover and bake for another 20 to 25 minutes or until the outside of the bread is dark brown: During the covered bake you'll hear a low crackle as the crust sets, and when you remove the lid the scent of caramelizing sugars intensifies. The uncovered final bake encourages the Maillard reaction, producing deep color and complex flavor. Look for a dark brown exterior and a hollow sound when tapped on the bottom as cues of doneness. Avoid underbaking which leaves a gummy crumb; if the crust darkens too quickly, reduce oven temperature slightly and extend time to finish internal cooking.
- Set on a cooling rack for 30 minutes: Cooling allows steam inside the loaf to redistribute and the crumb to set, so cutting too early will yield a gummy interior. You will notice the aroma mellow and the crust firm up during this rest, and the crumb will finish cooking as residual heat circulates. A common mistake is impatience, slicing while the loaf is still hot which ruins texture. If you must serve sooner, allow at least some cooling to avoid a soupy inside.
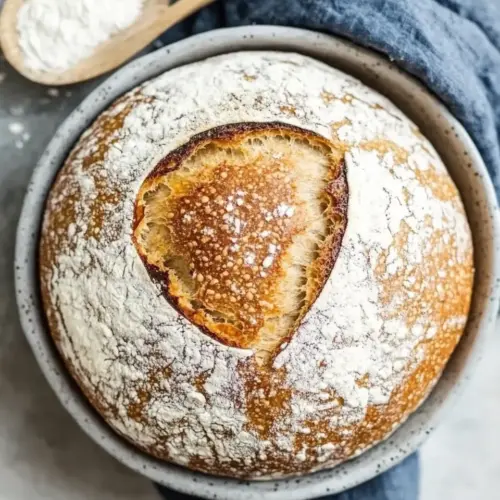
- Slice and serve: The final loaf will present a glossy, open crumb and a richly colored crust, and slicing reveals the balance of large and small holes that indicate proper fermentation and gentle handling. Use a serrated knife and a gentle sawing motion to avoid compressing the crumb, and enjoy the scent and flavor that has developed from long fermentation and hot baking. If slices compress easily, your knife may be dull or you cut too soon; keep a sharp serrated blade on hand for the best presentation.
Notes
- Measure precisely Use a digital scale to weigh all flours and water, this recipe depends on accurate hydration ratios and a scale prevents common errors from cup based measuring.
- Adjust water temperature If your kitchen is cool, slightly warmer water within the specified range helps maintain fermentation schedules without overworking the dough.
- Sift or aerate flours Lightly sifting the kamut flour and Ivory wheat flour removes lumps and helps them hydrate more evenly, improving texture.
- Use a preheated Dutch oven Heating the pot for the recommended 30 minutes creates the steam environment needed for a strong oven spring and crisp crust.
- Watch proofing closely Use the poke test to judge readiness rather than relying solely on time, ambient temperature has a big impact on final proof times.
- Store properly Wrap cooled loaves in a clean towel or a bread bag for short term storage, and freeze extras wrapped tightly for longer keeping.