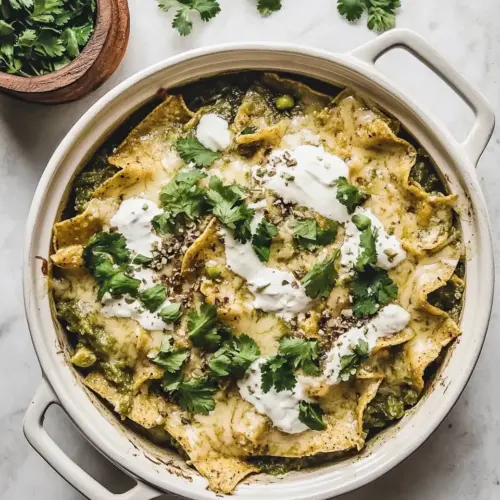
Jorges Green Chilaquiles
Jorges Green Chilaquiles bring bright, tangy charred tomatillo salsa together with tender shredded chicken, creamy crema and melty Oaxacan cheese for an easy weeknight dinner. The contrast of crisp tortilla chips and saucy layers creates irresistible texture, while the fresh cilantro and garlic lift each bite. Make it for brunch or a casual gathering, it is bold, comforting and easy to love.
Equipment
- Large Skillet
- Blender
- Small Saucepan
- 12-inch skillet
Ingredients
- 1 1/2 pounds tomatillos (about 12 to 14), husks removed, rinsed and dried Provide bright acidity and a mild tang that forms the base of the green salsa; roast or boil until softened, then blend for a bright, vibrant sauce that balances heat and creaminess.
- 1/4 onion Add sharpness and savory depth when blended into the salsa; use sparingly to avoid overpowering the tomatillos and to keep the sauce bright and fresh.
- 4 garlic cloves Impart pungent, aromatic flavor to the sauce; mince or roast before blending to mellow harshness and layer complexity in the chilaquiles.
- 1/4 cup packed cilantro leaves Deliver fresh herbal brightness and a clean, citrusy note; chop or pack into the blender to lift and unify the salsa flavors without adding heat.
- Kosher salt Season to taste and enhance all other flavors; sprinkle gradually while blending and again before serving to achieve proper balance and seasoning.
- 1 tablespoon vegetable oil Provide a neutral frying or sautéing medium for softening aromatics and finishing the sauce; warm briefly to bloom flavors without adding competing tastes.
- 1 cooked chicken breast, shredded Contribute savory protein and satisfying texture to the dish; shred and distribute through the chips so the dish is hearty and well-balanced.
- 13 ounces freshly fried tortilla chips or thick cut store-bought tortilla chips Offer the crunchy foundation that soaks up sauce and provides contrasting texture; choose freshly fried for extra crispness or sturdy store-bought chips.
- 1 can(7.6-ounces) full fat media crema (or use heavy cream or sour cream thinned with a bit of water to pourable consistency) Bring smooth creaminess and a tangy, slightly sweet dairy richness to mellow the salsa; pourable crema helps bind the sauce to the chips and temper acidity.
- 8 ounces Oaxacan cheese, shredded (you can also use low moisture mozzarella here) Melt into gooey, stretchy topping that adds savory, milky richness; shred and scatter before baking or broiling to create a cheesy, golden finish.
Instructions
- Add tomatillos to a large skillet over medium-high heat, and cook, shaking the pan occasionally, until charred in spots and juices start to release (10 - 11 minutes). Transfer tomatillos to a blender along with the onion, garlic, cilantro, 2 tablespoons water and a few pinches of salt, and blend until smooth.: The moment the tomatillos begin to blister and brown you will notice a bright, slightly smoky perfume rising, signaling that sugars are caramelizing and acidity is mellowing. Texturally their skins will wrinkle and the flesh will soften, releasing steam and a faint sizzling sound, which tells you to give them a quick flip so they char evenly. This charring deepens flavor and prevents a flat, raw-tasting salsa later. A common mistake is crowding the pan, which creates steam and stops charring, so work in batches or use a very large skillet to ensure each tomatillo touches hot metal.
- Warm 1 tablespoon oil in a small saucepan over medium heat, then add the salsa. Bring to a boil, reduce heat to low, and cook, stirring occasionally for 10 minutes. Season to taste with additional salt (flavors should be bold).: You will see the mixture turn from chunky and rustic to a silky, emerald sauce, and the aroma will shift from vegetal to herbaceous and savory. The small amount of water helps the blades incorporate everything without thinning the salsa too much. Blending until smooth helps the salsa cling to chips and distribute flavor in every bite. Overblending is not a risk here, but under-seasoning is, so taste and adjust salt before cooking; under-salted salsa will taste dull after heating.
- To assemble, place half the chips in a 12-inch skillet (preferably one with a lid!) in an even layer. Top with half of the shredded chicken, then 1 cup salsa. Drizzle Media Crema evenly over top, then sprinkle with a pinch of salt. Repeat the layers again, topping with remaining chips, chicken and 1 cup salsa (you’ll have a little salsa leftover). Finish with an even layer of cheese.: When the oil is shimmering slightly and fragrant, the salsa will sizzle on contact, releasing a deeper, cooked tomato-like aroma. This brief sauté concentrates the tomatillo flavor and cooks off any raw edge from the onion and garlic . Stirring as it heats prevents sticking and helps the salsa reduce, which thickens it so it clings to chips. Avoid high heat, which can burn the sugars and introduce bitterness; keep the pan at a steady medium and watch for light bubbling.
- Cover the pan and place over medium-low heat, and cook just until the cheese melts and the chips and salsa warm through (about 10 to 15 minutes). Serve immediately.: As the salsa moves from a rolling boil to a gentle simmer you will hear a softer bubbling and smell the ingredients melding into a unified aroma. Cooking concentrates flavors and allows the salsa to develop a glossy sheen, which improves texture. Stir occasionally to scrape any fond up from the bottom, that is flavorful, but avoid constant stirring which cools the pan and slows reduction. A mistake people make is not simmering long enough, leaving a thin, underdeveloped sauce that slides off the chips rather than coating them.
- Season to taste with additional salt (flavors should be bold): After reducing, the salsa's flavors will concentrate, so salt becomes more pronounced in balance. Tasting now lets you calibrate the final punch, because chips and crema will mute the salsa slightly during assembly. Aim for a lively, assertive seasoning, but be careful not to oversalt; add in small increments and taste as you go. If you over-salt, a squeeze of lime or a touch more crema can help soften the impact.
- To assemble, place half the chips in a 12-inch skillet in an even layer: When the chips form a single layer they provide a stable base that will interact consistently with salsa and cheese during warming. You will notice the contrast between the dry crackle of chips and the glossy sauce you are about to add. Using a 12-inch skillet ensures even heat distribution, which prevents some areas from becoming soggy while others stay crisp. Avoid stacking too many chips at once, because uneven layering leads to inconsistent texture.
- Top with half of the shredded chicken, then 1 cup salsa: As you scatter the warm, tender chicken , its steam will start to soften nearby chips and integrate with the salsa you pour on next. The first cup of salsa will soak into the top layer and begin to moisten interior pieces, creating pockets of saucy goodness. Distribute both evenly so no section is overloaded, which can make parts overly soggy; the goal is an even marriage of flavor and texture.
- Drizzle Media Crema evenly over top, then sprinkle with a pinch of salt: The crema will form silky ribbons, smoothing the salsa's acidity and creating a luscious mouthfeel. When it hits warm salsa you may see it swirl and thin slightly, which is desirable because it helps coat chips and encourages even melting once cheese is added. A light pinch of salt after crema balances the richness. Use sparingly, because excess salt after this stage is hard to correct without adding more bulky ingredients.
- Repeat the layers again, topping with remaining chips, chicken and 1 cup salsa: Building a second layer amplifies textural variety, creating both crunchy and softened areas across the skillet. The repeated layering encourages sauce to penetrate lower chips while the top remains guarded by cheese. Press gently to settle layers, but avoid packing them tight because trapped steam can make the whole dish limp. One mistake is over-layering which prevents heat from reaching the center during the final melt.
- Finish with an even layer of cheese: When the shredded cheese covers the surface it forms a protective blanket that melts into strings and pockets of molten richness. Visually you will see a pale layer transform into a golden, gooey top as the skillet warms. This cheese not only adds flavor but helps bind components, so pick a melting variety for best texture. Skipping enough cheese can leave the dish structurally loose, while too much can overpower the salsa; balance is key.
- Cover the pan and place over medium-low heat, and cook just until the cheese melts and the chips and salsa warm through: With the lid on you will trap gentle steam that helps the cheese melt evenly and allows the interior chips to soften to the ideal point, while edges stay pleasantly crisp. Listen for a soft, rhythmic simmer and watch for cheese to become glossy and stringy, usually within the time frame given. Keep heat moderate to prevent burning the bottom layer; if the pan warms too aggressively the lower chips may char before the center is hot.
- Serve immediately: Serve straight from the skillet so you preserve the mix of textures you built, warm and inviting. The contrast between bubbling warmth and cooled bites is part of what makes chilaquiles so appealing. Delay can lead to over-softening as residual heat continues to work, so plan to bring the skillet to the table and enjoy right away. A typical error is letting it rest too long, which loses the structural contrasts that make the dish exciting.
Notes
- Char for complexity Char the tomatillos and garlic until you smell a sweet, smoky edge; this deepens the salsa and prevents a one dimensional, overly tart sauce.
- Control moisture If your blended salsa seems too thin, simmer a few extra minutes to reduce it, because overly wet salsa will turn chips soggy too fast during assembly.
- Even shredding Shred the chicken into consistent pieces so every forkful has balanced meat and chip, avoiding large clumps that disrupt textural harmony.
- Crema consistency Thin sour cream or heavy cream with a splash of water until pourable for even drizzling, which helps it spread beneath the cheese and into crevices.
- Skillet choice Use a 12-inch skillet for even heating and enough surface area to layer without overcrowding; this ensures predictable melting and warming throughout.