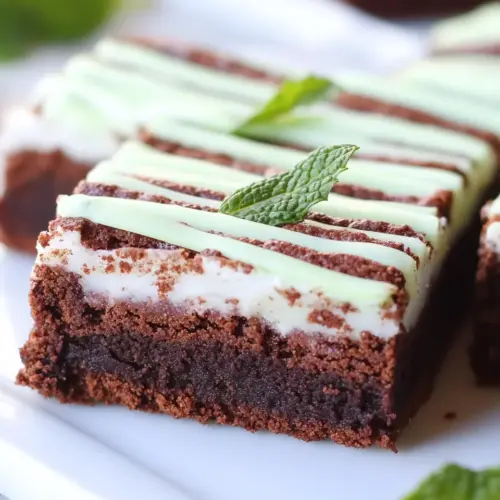
Irish Mint Brownies
Irish Mint Brownies are a fudgy, mint topped bar combining rich dark baking chocolate and a creamy mint filling for a cool finish. These easy brownies offer a velvety texture with a fresh peppermint note, perfect as an easy weeknight dessert or a show stopping treat for guests, making them worth baking soon.
Equipment
- Oven
- 8-inch square baking pan
- Aluminum Foil
- Medium Saucepan
- Mixing Bowl
- Spatula
- Offset Spatula
Ingredients
- 1/2 cup unsalted butter Melted to provide rich fat and help create a glossy, fudgy brownie texture while carrying flavor throughout the batter; use unsalted to control overall seasoning and melt gently to avoid burning.
- 6 ounces baking dark chocolate Chopped or broken down to supply intense cocoa flavor and deep chocolate structure to the brownies; baking dark chocolate adds depth and contributes to a dense, chewy crumb when melted into the batter.
- 1 1/4 cup white granulated sugar Whisked in to add sweetness and aid in creating a tender crumb while helping to dissolve into the warm chocolate-butter mixture for an even, balanced sweetness throughout the brownies.
- 1 cup all-purpose flour Sifted and folded to provide the necessary bulk and gluten structure so brownies hold together; all-purpose flour helps create a balance between cakey and fudgy texture when measured carefully.
- 2 large eggs Beaten with sugar to incorporate air and bind ingredients, giving structure and richness; large eggs provide moisture, leavening, and help set the brownie matrix as it bakes.
- 2 1/2 cups powdered sugar or more Sifted into the frosting mixture to create a smooth, sweet, and thick mint frosting; powdered sugar controls sweetness and consistency and can be adjusted for desired stiffness.
- 4 ounces cream cheese softened to room temperature Beaten until smooth to contribute tanginess and creaminess to the mint frosting while helping create a stable emulsion with butter and powdered sugar for spreadability.
- 4 tablespoons unsalted butter softened to room temperature Creamed to add a silky, rich base for the frosting and to help whip air into the mixture for a lighter texture; softened unsalted butter lets flavors meld without adding salt.
- 1/2 teaspoon peppermint extract Added sparingly to deliver concentrated peppermint flavor to the frosting; peppermint extract gives the characteristic minty note that defines Irish mint brownies.
- Gel mint green food coloring a few drops Dropped in a few drops to tint the frosting a minty green and enhance visual appeal; gel coloring provides vivid color with minimal impact on frosting consistency.
- 2 ounces dark baking chocolate melted Poured over or drizzled to create a glossy chocolate finish or decoration; melted dark baking chocolate intensifies chocolate flavor and can be used to create contrast on the mint topping.
Instructions
- Preheat oven to 350°F.: As the air warms, you should smell a faint warmth from the oven that tells you it is ready. Heating first ensures the brownies begin baking immediately for consistent texture throughout. A common mistake is slipping into the oven too cold, which can cause uneven rise. Use an oven thermometer if your stove runs hot or cool to confirm exact temperature.
- Line 8-inch square baking pan with aluminum foil, extending it on two opposite sides over edges. Grease the foil with a bit of batter or baking spray and set aside.: The foil handles make lifting the finished bars effortless, and greasing prevents sticking. When you press the foil into the corners, smooth wrinkles so batter sits evenly. If the foil is loose, batter can pool; press it snugly to avoid uneven thickness.
- Place a medium saucepan over medium heat and melt 1/2 cup butter and the 6 ounces of chocolate, stirring constantly until smooth.: As the butter and dark baking chocolate melt, you will hear gentle bubbling and see the mixture go from glossy chunks to a unified, velvety liquid, releasing a rich cocoa perfume. Stirring constantly avoids scorching and ensures a satin texture. If the chocolate splits or seizes, remove from heat and whisk in a tablespoon of warm liquid, but avoid excess moisture.
- Turn off the heat and stir in all the remaining brownie ingredients until well mixed.: After removing the pan from heat, the residual warmth helps incorporate eggs and white granulated sugar without cooking them, producing a glossy batter. The batter will thicken and darken as the all-purpose flour is folded in, and you will notice its weight when it falls slowly from the spoon. Mixing too vigorously here can introduce air and make the brownies cakier, so fold gently until just combined.
- Spread the batter into the prepared pan.: The batter should be dense and shiny as you smooth it into the pan; use a spatula to create an even surface so baking time is uniform. Press gently to fill corners, and tap the pan once on the counter to remove big air pockets. Leaving the surface uneven will lead to irregular baking and edges that finish earlier than the center.
- Bake for 25-30 minutes or until brownie just begins to pull away from sides of the pan. Cool completely.: During baking, the top will form a thin, slightly crackled sheen and the aroma of chocolate will fill the kitchen. Test for doneness by gently touching near the center; it should be set but still slightly tender. Overbaking dries the fudgy centre, so watch the minutes and check early. Once out of the oven, cooling fully stabilizes the crumb before adding the filling.
- Combine all filling ingredients (except dark chocolate) in a large bowl and beat at medium speed until creamy.: The mixture will fluff and lighten as the softened cream cheese , softened unsalted butter , and powdered sugar emulsify, releasing a faint buttery and minty aroma when the peppermint extract is incorporated. Beat until perfectly smooth and free of lumps, scraping the bowl often. A common issue is a grainy texture from under beating or cold ingredients, so ensure everything is well softened.
- Spread over cooled brownie.: The filling should go on like icing, smooth and pale green if you used the gel color. Use an offset spatula for an even layer and work quickly so the filling evens out before firming. If the brownie base is even slightly warm, the filling can slide, so ensure thorough cooling to get clean edges when slicing.
- Melt the chocolate and drizzle it on top. Cool completely in the fridge for a few hours.: Drizzling warm, melted dark baking chocolate creates glossy ribbons that set into a crisp accent. The chill in the fridge helps the filling firm and makes slicing tidy, and you will hear the faint snap when the chocolate firms. Avoid placing very hot chocolate directly on the filling, because it can melt the layer beneath; let it cool slightly before drizzling.
- Lift brownies out of the pan, using the foil handles, cut into bars, and serve.: Using the foil handles gives you control and keeps bars intact when transferring to a cutting board. For clean slices, cool thoroughly and use a sharp knife warmed under hot water then dried between cuts. Sawing will crumble the edges, so swipe the blade smoothly for neat presentation. Serve chilled or at cool room temperature based on preference.
Notes
- Swirl effect Mix a little of the mint filling into the brownie batter before baking for a marbled look, but be careful not to overmix and lose the fudgy texture.
- Color control Use just a drop or two of gel mint green food coloring for a soft tint, adding more only if you want a vivid green that stands out on a dessert plate.
- Chocolate finish Temper the drizzle or let it cool slightly before drizzling to avoid melting the filling and to get a firm, glossy streak on top of each bar.
- Make ahead Bake the base a day early and store it covered, then spread the filling the next day for fresher texture and easier scheduling.
- Slicing technique Warm and dry your knife between cuts to get smooth edges and avoid tearing the mint layer.