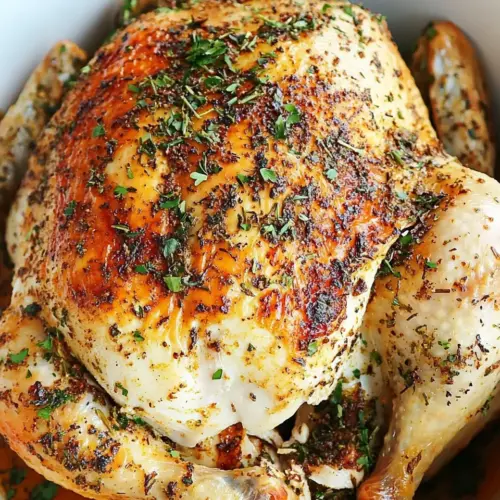
Instant Pot Roasted Whole Chicken
Instant Pot Roasted Whole Chicken delivers tender, juicy meat with bright lemon and garlic notes, and a simple herb crust that can be finished under the broiler for crisp skin. This easy weeknight dinner is comforting, flavorful, and fast, perfect for family meals when you want a roast without the long wait. Make it for a no fuss centerpiece that impresses every time.
Equipment
- Instant Pot
- Trivet
- Baking Sheet
- Paper towels
Ingredients
- 1 whole chicken mine was 4.4 lbs Roasted to add moisture and structure to the dish; a whole chicken provides the primary protein and yields both breast and thigh meat for varied textures. Cooks under pressure to become tender while still developing a crisp exterior when finished with a broil or high-heat sear. Using the whole bird concentrates flavor from bones and skin into the cooking liquid, enhancing the overall depth of the recipe.
- 1.5 cups water or chicken broth Used to generate steam and a flavorful cooking liquid that prevents the chicken from drying out under pressure. Choosing chicken broth increases savory depth, while water keeps flavors more neutral; either helps create a base for gravy or pan sauce after cooking. Adequate liquid is essential for the Instant Pot to reach and maintain pressure safely.
- 1.5 tablespoons olive oil Coated on the skin to promote browning and carry spices; olive oil helps herbs and seasonings adhere and encourages a slightly crisp exterior when finished. Adds subtle fruity richness and mouthfeel to the chicken skin without overpowering other flavors. Small amount ensures effective heat transfer and a glossy finish after roasting or broiling.
- 1/4 teaspoon paprika Sprinkled to contribute mild smokiness and color to the skin; paprika enhances visual appeal and imparts a gentle sweet-pepper note. Works well in combination with other spices to round out the seasoning profile without dominating delicate poultry flavors. Helps create an appetizing golden hue after finishing.
- 1/2 teaspoon Italian seasoning Sprinkled to impart a balanced blend of Mediterranean herbs and aromatic complexity to the chicken. Italian seasoning brings notes of oregano, basil, thyme, and rosemary that complement poultry and garlic nicely. Provides an effortless way to layer herbaceous flavor without measuring multiple individual herbs.
- 1/2 teaspoon celery flakes Added to introduce subtle savory, slightly bitter notes and a hint of vegetal texture that mimics fresh celery flavor. Celery flakes contribute aromatic background and help build complexity in the seasoning mix without adding moisture. Particularly useful when fresh celery is not available, offering concentrated flavor in a dry form.
- 1 teaspoon minced garlic Mixed into the seasoning to provide pungent, aromatic sharpness that infuses both skin and cavity during cooking. Minced garlic releases flavorful oils and creates depth in the pan juices, contributing to an appealing savory backbone. Using minced rather than powdered garlic preserves some texture and fresher garlic character.
- 1/2 teaspoon salt Sprinkled to enhance overall taste by highlighting savory components and balancing other seasonings; salt is critical for tenderness and flavor penetration. Proper salting helps the chicken retain moisture during cooking and improves the aroma of aromatics and herbs. Measured amount should be adjusted to taste or reduced if using salted broth.
- 1/4 teaspoon black pepper Ground to add a bright, mildly biting warmth that balances richer flavors and enhances overall seasoning complexity. Black pepper complements garlic and herbs while providing a gentle heat that wakes up the palate. Freshly ground pepper offers more pronounced aroma and flavor than pre-ground alternatives.
- 1/2 lemon quartered Squeezed into the cavity and over the skin to contribute bright acidity and citrus fragrance that cuts through richness. Lemon juice and aromatics inside the bird infuse the meat and cooking liquid with tang, while the rinds help release essential oils during cooking. Quartering lets steam carry citrus aroma throughout the pot.
- 3 garlic cloves Crushed or placed whole to boost aromatic intensity and deepen savory complexity during pressure cooking. Whole garlic cloves mellow with long cooking, delivering a sweet, roasted garlic flavor to the meat and pan juices. Adding cloves to the cavity or surrounding the bird enriches the overall aroma profile.
Instructions
- Check if your stainless steel insert is in your Instant Pot. To know why I always mention this step, read my Instant Pot Guide for Beginners.: When you place the pot on the counter you should hear a subtle hollow ring as you tap the metal, and visually confirm the smooth, clean stainless steel bowl sits inside the outer housing. This matters because using the inner stainless insert ensures even heat and pressure distribution, and protects the heating element from direct contact with food. A common mistake is skipping this check and starting the pot with no insert, which can damage the appliance. If the insert looks cloudy, give it a quick rinse, and make sure it is centered so the trivet will sit level.
- Remove the giblets from the chicken cavity. Pat chicken dry with paper towel.: As you open the cavity you may feel a slight chill and see the paper wrapped giblets; removing them prevents off flavors and ensures the cavity can accept aromatics. Patting the chicken dry with a paper towel changes the surface from dull to slightly satin, which helps the oil and seasonings adhere and promotes better browning if you broil later. A misstep here is leaving the skin damp, which can lead to an uneven rub and less appealing final texture. Take a moment to check the neck cavity and under the wings for any hidden bits before seasoning.
- In a small bowl, mix the seasonings with olive oil. Rub seasoning all over the chicken, you can insert some of it under the skin, close to the cavity. Place lemon wedges and garlic cloves in the chicken cavity.: As you whisk the olive oil into the spices you should smell the garlic and herbs blooming, and the mixture will turn into a glossy paste that spreads easily. Rubbing some of the paste under the skin lets flavors reach the meat directly, which is why I take this extra step, it increases depth without adding complexity. If you skip inserting aromatics into the cavity you lose that internal perfume, so be deliberate placing the lemon and whole garlic cloves inside. Watch for tearing the skin; do this gently to keep juices in place.
- Add 1.5 cups of water to the Instant Pot insert. Set the trivet inside. Place seasoned chicken on a trivet. Close the lid, make sure the IP is set to cook at HIGH pressure. Switch valve to "sealing" position. Set timer to 27 minutes (6 minutes per pound!). It will take about 10 minutes for the Instant Pot to come to pressure. Once the timer beeps and the cooking is done, press "cancel/off" and DO NOT switch the valve to venting. Let the pressure release naturally to ensure juicy chicken.: Pouring the 1.5 cups of water fills the pot to the right level so steam can build, and as it warms you’ll hear a soft simmer that eventually gives way to the steady hum of the pot pressurizing. Setting the trivet keeps the chicken elevated above the liquid so the skin does not stew, and the timing guideline, roughly six minutes per pound, reliably yields tender meat. Natural pressure release preserves moisture by allowing gentle temperature decline, so resist the urge to quick release, which can force juices out and dry the meat. A pitfall here is forgetting to switch the valve to sealing, check that it is securely set before walking away.
- When the pressure pin dropped, carefully open the lid away from your face. Remove the chicken onto a baking sheet if you want to broil the skin or on a serving plate. Let rest for 10 minutes before slicing.: Opening the lid brings a rush of warm, citrus and garlic scented steam that tells you the aromatics did their work. Transfer the chicken carefully, and if you choose to broil, you will notice the skin tighten and begin to glisten under the heat, transforming into a golden brown sheen. Resting for 10 minutes is crucial, because it allows the juices to redistribute and the meat to firm slightly, making slicing neater and juicier. Cutting too early causes a flood of juices on the cutting board, so be patient and use a sturdy carving knife for clean slices.
Notes
- Make gravy from the pot juices: If you want gravy, strain the cooking liquid, simmer it, then whisk in a cornstarch slurry of two tablespoons cornstarch mixed with three tablespoons water until it thickens into a glossy sauce.
- Use broth for extra depth: Substituting chicken broth for water will deepen the savory base of any pan sauce you make from the juices, adding more body and flavor with no extra effort.
- Broil for crisp skin: If you prefer golden skin, transfer the cooked chicken to a baking sheet and broil for two to five minutes, watching carefully to avoid burning.
- Adjust timing by weight: Use the six minutes per pound guideline but check the internal temperature; a probe thermometer reading 165 degrees F in the thickest part confirms doneness.
- Be gentle under the skin: When you rub seasoning beneath the skin, use your fingers to create a small pocket without tearing, ensuring the meat benefits from the herbs and oil.