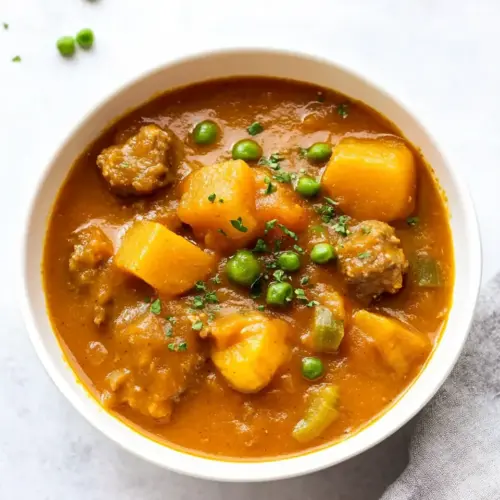
Instant Pot Pumpkin Beef Stew
Instant Pot Pumpkin Beef Stew is a creamy, savory, and easy weeknight dinner that blends tender beef with the silky body of pumpkin puree and hearty vegetables. Rich beef stock and umami notes from Worcestershire sauce create deep flavor while baby potatoes and carrots lend comfort and texture. Perfect for fall gatherings or cozy family meals, this stew rewards you with warming leftovers and simple, satisfying taste.
Equipment
- Instant Pot
- Wooden spatula
- Mixing Bowl
Ingredients
- 1 1/2 pounds beef stew meat Brown and tenderize to build rich meaty flavor; cut into bite-sized pieces to ensure even cooking and sauce absorption. Provide the stew's primary protein and hearty texture that holds up under pressure cooking. Benefit from searing before pressure-cooking to develop deep caramelized notes and a savory base for the broth.
- 2 tablespoons all-purpose flour Coat and thicken stew liquids by helping create a velvety sauce that clings to meat and vegetables. Act as a light dredge for beef to promote browning and to slightly thicken the cooking liquid when combined with natural juices. Distribute evenly by tossing with the meat before searing to avoid clumps.
- 1 teaspoon kosher salt Season and enhance overall savory balance with a clean, crystalline saltiness that lifts flavors throughout the stew. Help to tenderize meat slightly and bring out the natural richness of beef and vegetables. Add according to taste, keeping in mind salted ingredients in stock or sauces.
- 1 teaspoon black pepper Season and add warm, pungent heat that complements the beef and pumpkin; use freshly ground for maximum aroma. Enhance savory depth and provide subtle background spice without overwhelming other flavors. Adjust quantity to personal preference for peppery brightness.
- 1 tablespoon olive oil Sear and provide a medium with which to brown the meat and sauté aromatics, adding a fruity, slightly grassy flavor. Prevent sticking and support Maillard reactions on the beef and onions before pressure cooking. Use just enough to coat the pot surface without pooling.
- 3 cups beef stock Simmer and form the stew's liquid base that carries flavors and cooks vegetables until tender; choose low-sodium if controlling salt. Add depth and meaty undertones that complement the beef and pumpkin while creating a stew-like consistency. Measure to ensure adequate liquid for pressure cooking and to avoid scorching.
- 2 tablespoon Worcestershire sauce Enrich and deepen savory, umami characteristics while lending a subtle tang and complexity to the broth. Balance the richness of beef and pumpkin and enhance overall mouthfeel with a small concentrated boost. Stir into the stock before pressure cooking to distribute flavor evenly.
- 1 pound 16 ounces baby yellow potatoes, halved Cook through to tender bite-sized pieces that absorb stew flavors; choose small potatoes for faster, consistent cooking. Provide starchy body to the dish and help slightly thicken the cooking liquid as they break down. Halve to promote even heat penetration and to match the stew's texture.
- 1 15 ounce can pumpkin puree Add smooth, autumnal sweetness and creamy body that melds with savory elements to create a uniquely flavored stew. Contribute moisture and a velvety texture that thickens and rounds out the broth without adding discrete chunks. Use plain canned puree for concentrated pumpkin flavor.
- 8 ounces sliced mushrooms Sauté and contribute earthy, umami notes and a varied texture to contrast with tender potatoes and creamy pumpkin. Release moisture and deepen flavor when browned, while soaking up some of the stew's savory juices. Slice uniformly to ensure even cooking and mouthfeel.
- 4 medium-sized carrots, ends trimmed, chunked Provide natural sweetness and firm texture that softens yet retains shape during pressure cooking; contribute color and bite. Add nutritional value and a pleasant contrast to the creamy pumpkin and tender meat. Trim and chunk to uniform sizes for consistent doneness.
- 4 cloves garlic, minced Infuse pungent aromatic flavor and savory depth when minced and briefly sautéed to release oils and fragrance. Support the overall flavor profile by layering garlic early in the cooking process for a mellowed, sweet-garlic note. Avoid burning by adding during or after initial browning.
- 1 small yellow onion, peeled, ends trimmed, diced Add a sweet, aromatic foundation when diced and sautéed; contribute texture and savory-sweet complexity to the stew. Soften and mellow under heat, helping to create a cohesive base with garlic and mushrooms. Dice uniformly to ensure even caramelization and distribution.
- 2 cups frozen peas Be stirred in at the end to add bright color, slight sweetness, and a tender pop that contrasts with cooked vegetables. Provide quick-cooking green freshness and nutritional value without needing pressure cooking time. Thaw or add frozen directly; heat briefly so they retain texture.
Instructions
- Add beef stew meat to a bowl.: The moment you lift the chunks of beef into a bowl you should feel their cool weight and notice how the pieces sit separately, not glued together. This easy act creates a staging area for seasoning, making it straightforward to toss them with the flour mixture evenly. A common mistake here is crowding the bowl with other ingredients, which can lead to uneven coating, so keep this step focused and tidy.
- Mix together flour, kosher salt, and black pepper.: As you whisk these dry ingredients you will smell the faint toasted aroma of the flour and the sharpness of freshly ground black pepper , which signals they are ready to season the meat. This mixture is simple but essential, because it promotes browning and begins the flavor building. Avoid using too fine a whisking motion that creates dust clouds, instead combine gently to keep the flour from becoming airborne.
- Sprinkle flour mixture over the beef and toss to combine. You’re not looking to fully cover the beef in flour just enough to help it brown up nicely.: When you dust the flour over the beef , run your hands through the pieces to ensure an even, light coating that will help the meat brown and create fond on the pot bottom. You should see a fine, pale layer rather than a thick paste. One mistake to avoid is overcoating, which can create a gummy texture; just a light dusting is all you need to encourage color and texture.
- Add your Instant Pot to the saute setting and add in olive oil.: As the pot comes up to temperature the interior will begin to shimmer, and adding the olive oil should create a thin, glossy film across the base. The oil is your conductor for heat transfer and browning, so ensure it is distributed evenly. A common error is to skip this step or use too little oil, which can result in uneven browning and stuck meat.
- When the oil is hot add in half your beef and cook until browned.: You want to hear a confident sizzle as the first batch of beef hits the hot oil, and the pieces should develop rich, golden brown edges in a few minutes. Browning creates compound flavors through Maillard reactions, so resist the urge to move the meat constantly; let it form a seared crust. Overcrowding is a frequent misstep here, which causes steaming rather than searing.
- Remove the cooked meat, add in a little extra oil if needed, and brown the second half of the meat.: The contrast between the browned pieces you lift out and the fresh batch you add will be noticeable, and the extra olive oil ensures the second batch gets the same sear. Keep an eye on the pan color and add a splash more oil if the surface begins to look dry. A typical mistake is not adjusting oil for the second round, leading to uneven browning.
- When all the meat is browned, add it all back to the pot, and pour in the beef stock.: Pouring in the beef stock will deglaze the pot, releasing the caramelized bits stuck to the bottom; you should see them dissolve into the liquid, creating a darker, aromatic broth. These browned bits are flavor gold, and incorporating them lifts the whole stew. Avoid pouring the stock too forcefully, which can splash and scatter hot liquid.
- Using a wooden spatula scrape up all the lovely brown bits from the bottom of the Instant Pot.: As you scrape, the sound will change from scraping to a gentle bubbling as those bits emulsify into the stock. This action prevents a burn notice and ensures maximum flavor transfer into the stew. Neglecting to scrape thoroughly can leave burnt residue that imparts bitterness.
- Turn the heat to the Instant Pot off.: At this point you should see a calm surface on the liquid and a faint steam as you pause to prepare the remaining additions. Turning the heat to off prevents further reduction before pressure cooking and makes adding seasonings and vegetables safer. A mistake here is rushing into the sealing step with the pot still aggressively simmering, which can cause foaming or sputtering.
- Stir in Worcestershire sauce, potatoes, pumpkin puree, mushrooms, carrots, garlic, and yellow onion.: When you combine these elements the visual contrast is immediate, from the pale pumpkin puree to the orange carrots and glossy mushrooms. Stirring blends them into the broth so each component begins to absorb flavor. You should notice a change in aroma as the garlic and onion mingle with the stock. Avoid packing the pot too tightly, which can affect even cooking.
- Stir to combine.: A gentle, thorough stir helps distribute the Worcestershire sauce and incorporate the pumpkin into the liquid so it dissolves into a silky consistency. The goal is a cohesive mixture where the vegetables and meat are suspended in a glossy broth. One trap is under stirring, which can leave pockets of concentrated seasoning or unmixed puree.
- Add the lid of the Instant Pot onto the pot, close it tightly, and make sure the vent is in the "seal" position.: As you lock the lid you should hear a reassuring click, and setting the vent to seal is critical for pressure to build. This physical step transitions the pot from open braise to pressurized cooking, so ensure the rubber gasket is seated properly. Forgetting to seal the vent is a common oversight that prevents pressure from forming.
- Set to manual, high pressure, 35 minutes.: Selecting manual high pressure and the timing ensures the beef becomes tender while root vegetables cook through. You should see the display register the cooking cycle and the pot will begin to build pressure, indicated by steam at the vent and the timer counting. A mistake to avoid is setting too short a time which leaves meat tough, or too long which can over soften delicate vegetables.
- After the stew has come to pressure and cooked for 35 minutes allow it to natural release for 10 minutes.: During this natural release phase the pot relaxes and the temperature drops slightly, which keeps the meat fibers from contracting too suddenly, helping retain juices and tenderness. You will notice the pressure indicator begin to descend slowly, and a quiet settling of aromas will follow. Rapidly forcing the pressure release here can lead to splattering or less tender meat.
- After 10 minutes of natural release, release it manually, remove the lid, and stir the stew.: As you manually vent the remaining pressure, a warm wave of stew scent will rise. Removing the lid reveals a bubbling, aromatic pot; stirring integrates juices and tests for doneness. Be careful of steam and use a long handled spoon. A common mistake is plunging in too quickly and letting hot liquid splash.
- Add in frozen peas and allow them to warm through with the heat of the stew, about 2 minutes.: The bright peas will soften quickly and retain a tender bite, adding a fresh pop of color. They should be stirred in gently and warmed until just tender, which preserves their texture and flavor. Overcooking them will make them mushy and dull their color, so keep the time short.
- Taste and season with additional kosher salt and black pepper if needed.: Tasting at the end lets you calibrate the final seasoning, because flavors concentrate as the stew rests. Adjust with small increments and taste between additions to avoid oversalting. A typical error is adding too much salt at once instead of balancing gradually.
Notes
- Adjust salt gradually Start with the recipe amount and then season to taste at the end, because the beef stock and Worcestershire sauce can concentrate as the stew finishes.
- Control potato texture Choose smaller pieces and halve baby potatoes so they cook through in the pressure cycle, keeping them from turning to mush.
- Pumpkin consistency If you prefer a chunkier texture, stir in less pumpkin puree initially and add a bit more after cooking to thicken slightly without making the broth too smooth.
- Protect delicate vegetables Add quick cooking items like frozen peas at the very end to maintain brightness and prevent overcooking.
- Boost umami A splash of the reserved Worcestershire sauce at tasting can bring forward savory depth; add sparingly and taste between additions.
- Make it ahead The stew often tastes better the next day as flavors marry; reheat gently to preserve texture and stir in a little water if it thickened too much.