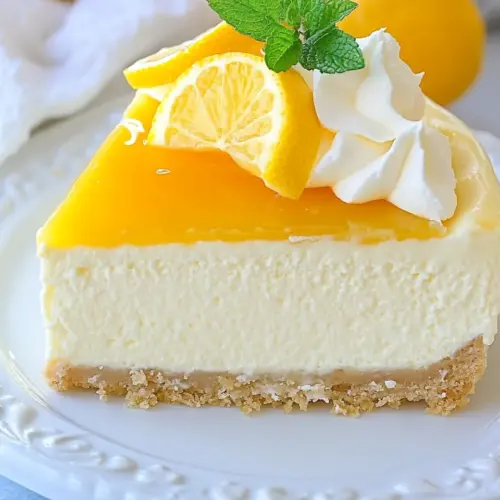
Instant Pot Meyer Lemon Cheesecake
Instant Pot Meyer Lemon Cheesecake is a creamy, tangy dessert with a buttery graham crust and bright Meyer lemon aroma. Silky texture and floral citrus notes make it feel both elegant and comforting, perfect for brunches or easy entertaining. Make it ahead, chill overnight, and enjoy clean slices that taste fresh and indulgent every time.
Equipment
- 7×3-inch springform pan
- Instant Pot 6-qt
- metal trivet
- Hand Mixer
- Mixing Bowls
Ingredients
- 1 1/2 cups graham cracker crumbs Provide a crunchy, buttery base that holds the cheesecake together; press firmly into the pan for even support and texture. Combine with melted butter and sugar to form a cohesive crust that contrasts the creamy filling, then prebake or set as directed to stabilize under the filling.
- 1 tablespoon sugar Add subtle sweetness to the crust to balance savory elements and enhance overall flavor; dissolve into the crumbs for even distribution. Use sparingly within the crust mixture to avoid overpowering the lemon brightness in the filling.
- 1/2 teaspoon ground cinnamon Introduce warm, aromatic notes to the crust that complement the lemon; sprinkle into the crumb mixture for even flavor. Pair sparingly with sugar to create a slightly spiced background that deepens the crust's profile.
- 6 tablespoons unsalted butter melted Bind the crumb mixture and provide rich mouthfeel; melt and mix thoroughly with crumbs to create a compact, sliceable crust. Adjust quantity as needed to achieve a firm base that withstands steaming in the Instant Pot.
- 16 ounces cream cheese at room temperature Deliver a rich, creamy structure and tangy base for the filling; beat at room temperature to ensure a smooth, lump-free batter. Provide primary moisture and fat that set during cooking to form the characteristic cheesecake texture.
- 3/4 cup white granulated sugar Sweeten and help balance the tang of lemon and cream cheese; dissolve thoroughly into the batter for uniform sweetness. Work with cornstarch to stabilize the mixture and prevent cracking during pressure cooking.
- 1 tablespoon cornstarch Stabilize the filling and give a slightly denser, sliceable texture; whisk into the sweetened cream cheese to disperse evenly. Help prevent weeping and provide a firmer set when combined with eggs and heat.
- 2 large eggs at room temperature Incorporate structure and help the filling set as it cooks; add one at a time and mix gently to avoid overbeating. Contribute moisture and richness while working with cornstarch and dairy to create a smooth custard.
- 1/2 cup heavy cream at room temperature Enrich the filling with additional fat for a silkier mouthfeel and creamier texture; warm to room temperature to blend smoothly. Complement cream cheese and sour cream to produce a luxurious, luscious interior that resists cracking.
- 1/4 cup sour cream Add tangy creaminess and slight acidity to balance sweetness; fold in gently to maintain a smooth consistency. Help create a tender texture and brighten the flavor profile alongside lemon components.
- 1 teaspoon vanilla extract Introduce aromatic warmth and deepen the overall taste; stir in with other wet ingredients for even distribution. Provide a familiar vanilla background that enhances both the cream cheese and lemon notes.
- 2 tablespoons Meyer lemon juice Provide fresh citrus acidity to brighten and balance the rich filling; strain if desired to remove pulp for a smooth texture. Combine with zest to intensify Meyer lemon flavor and adjust to taste depending on tartness preference.
- Zest of 1 Meyer lemon Concentrate fragrant citrus oils and amplify lemon character throughout the cheesecake; grate finely and fold into the batter for uniform flavor. Use to heighten aroma and complement the juice without adding additional acidity.
- Whipped cream Offer a light, airy topping to finish each slice with creamy sweetness and visual appeal; dollop or pipe before serving to complement the dense cheesecake. Stabilize with a bit of sugar if desired to maintain shape during presentation.
- Meyer lemon slices Provide a decorative, flavorful garnish that reinforces the lemon theme; thinly slice and arrange atop the cake for elegance. Optionally candy or macerate slices to add a glossy, sweet contrast to the creamy filling.
- Meyer lemon zest Enhance visual brightness and concentrated citrus aroma when grated over the finished cake; use sparingly to avoid overpowering. Sprinkle finely for a burst of Meyer lemon scent that ties together the dessert's flavors.
Instructions
- Lightly coat a 7×3-inch springform pan with nonstick spray and set it aside.: The pan will feel cool and slightly slick from the spray, which helps release the cake later. Make sure the spray reaches the sides so the crust does not stick, otherwise the cheesecake can tear when you remove the ring. A common error is forgetting to protect the bottom edge, which can make the crust cling to the pan when you try to unlatch it.
- Add all the crust ingredients to a large bowl and stir until well combined.: As you mix the graham cracker crumbs , sugar , cinnamon , and melted butter , notice the aroma change from dry crumbs to a warm, toasty scent. The mixture should feel evenly moistened and hold together when pinched. If it feels too dry, add a tiny extra splash of butter. Avoid overmixing, which can make the crust greasy.
- Press the mixture into the prepared springform pan. Press the crust and try to line the sides to the middle of the pan edges.: Use the heel of your hand or a measuring cup to press the crumbs down firmly. The surface should be compact and slightly glossy from the butter. Proper pressing prevents a crumbly base and gives clean slices. A common mistake is pressing unevenly, which leads to thin spots that collapse later.
- Freeze for at least 20 minutes.: The cold crust will firm up and hold shape when the filling is added. You will feel a chill if you touch the pan, and the crumbs will sound more compact when tapped. Skipping this step can make the crust shift during cooking, causing a soggy bottom.
- Using a hand mixer, beat the cream cheese in a large bowl until light and fluffy at low to medium speed.: Beat cream cheese until it becomes smooth and slightly aerated, with no visible lumps. The texture should be satin like, and the sound of the mixer will become more even as it softens. Overbeating at this stage can incorporate too much air and cause the cheesecake to crack.
- Add the sugar and cornstarch and continue beating until well combined. Scrape the sides and bottom of the bowl.: When you add sugar and cornstarch , the mixture turns glossy and holds together. Scraping prevents pockets of unmixed ingredients. If you skip scraping, you might get flecks of cornstarch that don’t dissolve, affecting texture.
- Add the eggs one at a time and beat after each addition until well combined.: Each egg should disappear into the batter smoothly, making the mixture fuller and slightly looser. Watch for the batter to remain cohesive; if it becomes frothy, you are overmixing. Overbeaten eggs introduce air and can lead to cracking during cooking.
- Add heavy cream, sour cream, vanilla extract, lime juice, and lime zest. Beat until just combined.: The batter will become silkier and pourable as you add heavy cream and sour cream , with a fresh citrus scent from the zest and juice. Mix only until blended to preserve smoothness. Be careful not to overmix, which changes texture and can incorporate air that causes structural issues.
- Remove the crust from the freezer and pour the cheesecake batter mixture into the prepared pan. Cover the top with foil.: Pouring the batter should feel thick but flowing, and the surface should level with a slight wobble when nudged. Tenting the top with foil prevents condensation and protects the cake from direct steam. If you skip foil, the top may get wet or pockmarked from steam.
- Place metal trivet into a 6-qt Instant Pot and add 1 1/2 cups water.: The water should look clear and calm, and placing the trivet properly creates a stable platform. This steam environment cooks the cheesecake gently. Don’t use too little water, or the pot might overheat and interrupt cooking.
- Gently transfer the cheesecake pan to the top of the trivet.: Move slowly so the batter stays centered, and the pan should sit steadily on the trivet. A steady placement prevents sloshing and uneven cooking. If the pan tips, the batter can leak and the cake will set unevenly.
- Select the manual setting and adjust the pressure to high. Set the time to 35 minutes.: As the Instant Pot ramps up, you’ll hear the familiar hum and occasional clicks. High pressure ensures even, gentle heat that sets the cheesecake without drying the top. Avoid opening the pot during the cycle, which interrupts the temperature and can cause the center to sink.
- After cooking and the Instant Pot beeps, release pressure naturally for about 20-30 minutes.: During the natural release, the cake continues to set and the surface calms. You’ll notice the pot quieting and the pressure indicator falling. Forcing a quick release can shock the cake, causing cracks or a collapsed center.
- Carefully open the pot and transfer the cheesecake to a cooling rack. Let it cool for 1 hour, then run a paring knife around the edges.: The aroma at this point is creamy citrus perfume. Cooling on a rack allows even temperature drop, and running a knife around the edge prevents the cake from sticking to the pan as it contracts. If you skip the knife step, the top may cling and tear when you remove the ring.
- Transfer the cheesecake to the refrigerator for at least 6 hours or overnight.: Chilling lets the texture firm and the flavors meld. The cake should feel set and slice cleanly after chilling. Cutting too soon results in a loose center and messy slices.
- Garnish with whipped cream and lemon slices before serving.: The final touch adds contrast, with airy whipped cream and bright Meyer lemon notes. Arrange slices thinly for elegance. Overloading the top with heavy garnishes can hide the cake’s beautiful texture and flavor balance.
Notes
- Use block cream cheese: Always choose block style cream cheese and bring it to room temperature, it beats smoother than spreadable types and will create a lump free, velvety filling. The wrong texture here is the easiest way to get a gritty or uneven batter, so let the block sit out for at least an hour.
- Fine zesting matters: Use a plane grater or microplane to remove only the yellow skin of the Meyer lemon, avoiding white pith which adds bitterness. Finely grated zest disperses evenly so each bite gets citrus perfume without textural surprises.
- Room temperature ingredients: Bring eggs, heavy cream, and sour cream to room temperature to help them incorporate smoothly, which prevents curdling and ensures a uniform bake. Cold ingredients cause clumps and uneven texture when mixing.
- Press crust firmly: Compact the crust using the bottom of a measuring cup for even density, this prevents crumbling and helps the cake release clean slices. Uneven pressing causes thin weak spots that break when slicing.
- Watch your mixing speed: Use low to medium mixer speed when combining to avoid whipping too much air into the batter, as excess air can lead to cracks during cooking. Gentle mixing yields a dense yet tender texture.
- Foil tenting: Cover the top of the pan with foil to protect against condensation in the Instant Pot, this prevents pockmarked surfaces and keeps the top smooth. If you skip foil, moisture can mar the finish.
- Natural pressure release: Let the Instant Pot release pressure naturally for the recommended time to allow the cheesecake to finish setting slowly, this reduces sinking and cracking. Quick releases can collapse the center.
- Chill thoroughly: Refrigerate the cheesecake for at least six hours, overnight is better, chilling firms up the texture and deepens flavor so you get cleaner slices. Slicing too soon results in a loose center.
- Garnish sparingly: Use a light ribbon of whipped cream and thin Meyer lemon slices to complement the cake, heavy toppings mask the delicate lemon notes. Keep garnishes minimal to showcase the filling.
- Use a sharp blade for slicing: Run a hot, clean knife through slices for neat pieces, wiping between cuts to maintain tidy presentation. A dull knife drags and ruins the texture on the plate.