Instant Pot Hungarian Pot Roast
Instant Pot Hungarian Pot Roast delivers tender beef in a creamy, paprika scented sauce that is both comforting and easy to make. This rich, savory recipe is ideal for an easy weeknight dinner or a cozy weekend meal, offering deep, layered flavors and minimal hands on time. Try it for a satisfying family dinner that reheats beautifully.
Equipment
- Instant Pot
- Large Frying Pan
- Cutting Board
- Non metal turner
- Whisk
Ingredients
- 2 T olive oil, divided Heat in the Instant Pot to sear the roast and build fond; use divided oil so some is available for initial searing and some for sautéing vegetables later. Adds fat for browning, prevents sticking, and carries flavors into the sauce.
- 1 beef chuck roast, about 3.5 pounds after trimming Brown thoroughly to develop deep savory flavors and create a meaty base for the braise; choose a chuck roast for its marbling which breaks down into tender, succulent meat under pressure. Provides the primary protein and texture that defines the pot roast.
- 2 T steak seasoning (see notes) Rub onto the roast before searing to build a seasoned crust that enhances the meat and layers flavor throughout cooking; includes a blend of salt and spices to complement paprika and beef. Intensifies savory notes and helps form a flavorful pan fond for the sauce.
- 1 large onion, chopped Chop and sauté until softened to contribute sweetness and aromatics that balance the paprika and tomatoes; cook with oil to release sugars and deepen flavor before pressure cooking. Adds moisture, texture contrast, and a sweet-savory backbone to the dish.
- 2 T sweet Hungarian paprika (or more) Sprinkle into the pot during sautéing to bloom its sweet, smoky flavor and vibrant color; use the full amount for a classic Hungarian profile or adjust to taste for intensity. Serves as the signature spice that defines the sauce’s character and color.
- 1/2 tsp . sharp Hungarian paprika (also called Hot Paprika, this is optional, but good) Add optionally to introduce a sharper, spicier paprika note that complements the sweet paprika and deepens complexity; include when a piquant finish is desired but omit for milder heat. Provides a hint of heat and an extra layer of authentic Hungarian flavor.
- one 12 oz. jar roasted red bell peppers, drained and chopped Drain and chop before adding to the braising liquid to contribute tender roasted pepper bites, smoky sweetness, and bright red color; stir in with tomatoes so their juices meld into the sauce. Balances acidity and paprika, while adding pleasant texture.
- one 14.5 oz. can petite diced tomatoes, drained Drain and add to the pot to supply bright tomato pieces and acidity that cut through richness; petite dice gives small, evenly distributed tomato flavor throughout the sauce. Helps build the braising liquid and contributes tang and body.
- 1 cup beef broth Pour in to provide the necessary braising liquid for pressure cooking and to enhance beef flavor; use low-sodium broth if controlling salt levels and adjust seasoning after cooking. Ensures proper pressure, prevents burning, and yields a rich gravy when reduced.
- fresh ground black pepper to taste (see notes) Grind over to taste to finish seasoning and add aromatic heat that complements the paprika and steak seasoning; adjust amount after tasting the sauce since broths and seasonings can vary. Balances flavors and sharpens the overall savory profile.
- 1 cup sour cream Stir in off heat to create a creamy, tangy finish that mellows acidity and enriches the sauce; temper the sour cream with a bit of hot liquid before fully incorporating to prevent curdling. Contributes silkiness, tang, and a luscious mouthfeel to the finished roast.
Instructions
- Trim fat and unwanted parts from the chuck roast; my roast was about 3.5 pounds after trimming.: The first tactile job is to feel along the surface of the beef , removing any large pockets of silver skin or excessive fat so the roast sears evenly and its internal texture is tender rather than chewy. As you trim, notice the marbling, which promises gelatinous richness after pressure cooking. A common mistake is leaving too much thick fat, which can create greasy pockets in the sauce, so trim judiciously while preserving some marbling for flavor.
- Rub the roast with steak seasoning.: When you coat the surface with the steak seasoning , take a moment to press the rub into the meat so the spices adhere and form a flavorful crust as it browns. The aroma should be savory and piquant, giving you a preview of the finished roast. Avoid over salting if your rub is already salty, otherwise the dish can finish too salty after reduction.
- Heat 1 tablespoon olive oil in a large frying pan and brown the meat well. (I did this in a pan so I could cook onions in the Instant Pot at the same time.): Browning the beef creates caramelized Maillard notes, a toasty scent that signals depth of flavor. Use a hot pan and resist crowding, letting each side get a deep brown color before turning; you'll hear a consistent sear, not sputtering. If the pan is too cool, the roast will release juices and steam instead of browning, which reduces flavor.
- Add the rest of the olive oil to the Instant Pot, use SAUTE, MEDIUM HEAT and brown onions.: With the Instant Pot on SAUTE and set to medium, the remaining olive oil will shimmer gently, and the chopped onion should soften and become translucent, releasing a sweet aroma. Stir frequently so the onions do not burn; burnt onion tastes bitter and will taint the sauce. If the pot gets too hot, lower to medium low briefly to avoid darkening too fast.
- Add the paprika after the onions are lightly browned and cook a few minutes more.: Toasting the paprika in the warm oil with the softened onion amplifies its flavor and releases fragrant red pepper notes. You should smell a warm, smoky scent but not a burnt bitterness; cook only a few minutes. A common error is overcooking ground paprika, which can turn bitter, so watch it closely.
- Then add the drained petite dice tomatoes, and one cup beef stock to the Instant Pot.: Pouring in the drained petite diced tomatoes and beef broth adds bright tomato acidity and savory depth that dissolves browned fond, creating a flavorful braising liquid. The liquid should sizzle slightly and lift those caramelized bits off the pot bottom, which is crucial for a deep sauce. If you skip deglazing, you risk sticking and burnt flavors trapped at the bottom.
- Use a non-metal turner to scrape the bottom to be sure onions aren't stuck on, then add the browned pieces of chuck roast to the Instant Pot.: Scraping with a non metal turner releases concentrated flavor into the broth, ensuring nothing valuable is left behind. Add the seared beef to nestle into the liquid so it sits partially submerged, which promotes even braising. Do not skip this step, because trapped fond can cause an error on some pressure cookers or impart bitterness if scorched during pressure cooking.
- Season with some black pepper. (The steak rub has salt so I didn't add more.): Fresh ground black pepper layered on now gives a bright, peppery lift that persists through cooking, cutting through the dish's richness. Taste the cooking liquid if you can, and be mindful of the rub's salt content before adding extra salt. Over seasoning early can be hard to fix after the sauce reduces.
- Set Instant Pot to MANUAL, HIGH HEAT, 40 minutes.: Choosing MANUAL and high pressure for 40 minutes is the timing sweet spot for a 3.5 pound beef chuck roast to become tender while retaining structure. You will hear a steady hum as pressure builds; the ensuing quiet indicates the pot is sealed and doing its work. A frequent misstep is cutting time too short, resulting in a chewy center, so trust the process and the timing.
- When it finishes cooking, let it NATURAL RELEASE for 20 minutes, then release the rest of the pressure.: Allowing a 20 minute natural release lets the meat relax and juices redistribute gently, which keeps it moist. You will notice the float valve drop after the full venting, and that is your cue to open. Quick releasing entirely can cause a sudden texture change and a spray of liquid, so follow the recommended release style for best results.
- Remove meat to a cutting board. (You might want to cover with foil to keep it warm.): Transferring the roast to a board lets residual heat rest the meat slightly, ensuring juicier slices. Tent with foil to preserve temperature if you need extra time before slicing. Cutting too soon can cause the juices to run out excessively, leaving meat dry, so give it a brief rest.
- Remove about 1/3 cup of the liquid, let it cool for a minute or two, and then whisk it into the sour cream.: Cooling a small portion of hot braising liquid before whisking into the sour cream tempers the dairy and prevents curdling, creating a smooth, emulsified finish. You should see the mixture become glossy and slightly thickened. If you add hot liquid directly to cold sour cream, it can separate, so always temper slowly.
- Set the Instant Pot to SAUTE, MEDIUM HEAT and start simmering to reduce the liquid in the pot. We simmered about 5 minutes.: Reducing the remaining braising liquid intensifies flavors and thickens the sauce, producing a spoonable consistency. You will hear a gentle simmer and see the surface concentrate with aromatic steam. Avoid boiling vigorously which can reduce too fast and intensify saltiness.
- Drain the jar of roasted red peppers, finely chop, and add them to the Instant Pot to be part of the sauce.: Adding chopped roasted red bell peppers contributes bright, sweet notes and a pleasant texture contrast. Stirring them in at this stage warms them without degrading their roasted flavor. If added too early they can melt completely into the sauce, losing the lively pepper character you want.
- When liquid has reduced by a little less than half (or as much as you prefer), turn off Instant Pot and let the liquid cool for several minutes.: Watch for the sauce to take on a thicker, glaze like sheen and slightly cling to a spoon; that tells you it has concentrated enough. Turning off heat and letting it cool prevents the sauce from being so hot it will split the dairy when you finish. Over reducing will make a gravy that is too intense or salty after adding the sour cream .
- While the sauce cools, slice meat and arrange on a serving plate.: Slicing against the grain produces tender pieces that are pleasant to bite into, and arranging them in a shallow layer helps sauce distribution. The meat should feel moist and easily pull into slices; if it resists, it may need a touch more resting time. Cutting too thick can hide the wonderful tenderness you just achieved.
- When sauce has slightly cooled, stir the sour cream mixture into ingredients in the Instant Pot to make the sauce. (Be sure the ingredients are not still boiling or the sour cream will separate.): Gently stirring the tempered sour cream into the warm sauce yields a silky, velvety finish that coats the meat. The aroma will shift to a creamy tang, and the color will mellow to a warm, inviting hue. If the sauce is still boiling, the dairy can split, so ensure it has cooled a touch.
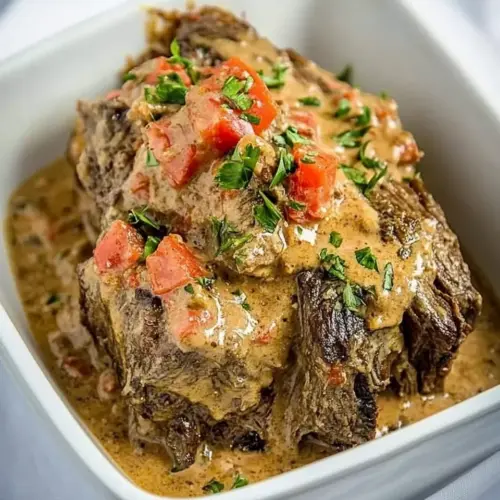
- Serve sliced meat with the sauce, either spooned over the meat or on the side. Serve hot.: Spoon the glossy sauce over the sliced beef or present it on the side for guests to ladle. The final plate should emit savory steam with a balance of paprika warmth, pepper brightness, and creamy tang. Keep the leftovers chilled promptly to preserve safety and texture.
Notes
- Choose the right cut - A beef chuck roast with good marbling is ideal because it breaks down into tender strands and enriches the sauce. Leaner roasts will cook faster but can end up dryer.
- Don’t skip browning - Searing the meat creates complex flavors through the Maillard reaction, which you will smell as a deep, toasty aroma. If you skip this, the sauce will taste flatter.
- Watch the paprika - Toasting paprika briefly with onions brings out aromatic depth, but overcooking it can make the sauce bitter; keep the heat moderate and stir constantly.
- Temper the dairy - Always cool and temper a small portion of hot liquid into the sour cream before adding it to the pot to maintain a glossy, stable sauce.
- Adjust reduction for salt - If your steak seasoning is salty, reduce the sauce less, taste, then finish; over reduction concentrates saltiness, which is harder to correct.
- Store and reheat gently - Refrigerate leftovers in an airtight container and reheat on low heat with a splash of broth to refresh the sauce without breaking the dairy.