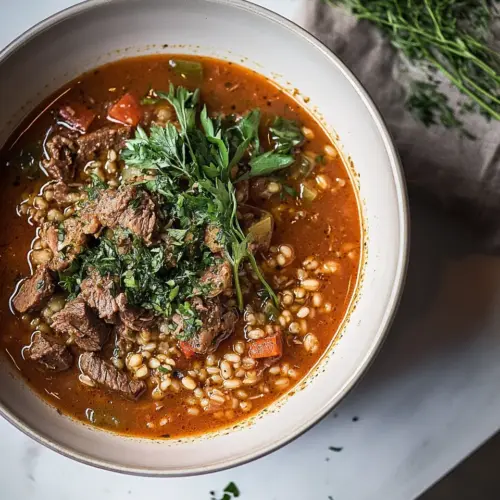
Instant Pot Hearty Beef Vegetable Soup with Barley
Instant Pot Hearty Beef Vegetable Soup with Barley is a rich, comforting bowl of tender beef, chewy barley, and mixed vegetables simmered into a savory broth. This easy weeknight dinner delivers deep, slow cooked flavor thanks to pressure cooking, with a nourishing texture that satisfies. Make it for family dinners or to cozy up on cold nights, it’s a reliable, crowd pleasing meal.
Equipment
- Instant Pot
- Kitchen scissors
- Tongs
- Can opener
Ingredients
- Olive oil or neutral oil for cooking Use for sautéing and developing flavour at the start of cooking; adds a light fruity or neutral fat that prevents sticking and helps brown the beef and vegetables, improving overall mouthfeel and aroma.
- 800 –850 grams Bone-in beef shin Braise to provide rich, gelatinous body and deep beefy flavour; bone-in shins release collagen during pressure cooking which gives the soup a silky texture and hearty mouthfeel.
- 650 –750 grams mixed vegetables such as: onion leeks, carrots, celery, butternut, cauliflower, courgette (zucchini) Chop and add to build the aromatic and textural base of the soup; the mix of onion, leeks, carrots, celery, butternut, cauliflower and courgette offers sweetness, vegetal depth and varying textures that balance the beef.
- 3 garlic cloves crushed Crush and stir in near the beginning to contribute pungent, savory warmth; garlic boosts umami and aroma, complementing the beef and vegetables throughout the simmer.
- 1 tsp dried parsley or mixed herbs Sprinkle dried parsley or mixed herbs to add mild herbaceous notes; these dried herbs contribute background green flavour and help round out the soup’s seasoning profile.
- 1/2 –3/4 cup early barley Rinse if desired and add early in cooking to absorb liquid and thicken the broth; early barley provides chewy texture and a nutty flavour while expanding to make the soup more filling.
- 2 bay leaves Tuck in whole to infuse subtle, slightly bitter bay leaf notes during cooking; bay leaves impart complexity and aromatic depth to the simmered stock without overpowering.
- Bouquet garni with the following stalks of fresh herbs: Rosemary Thyme (3 stalks), parsley, sage (optional) Bundle and include to impart concentrated fresh herb aromas; the bouquet garni of rosemary, thyme, parsley and optional sage releases bright, savory, and resinous notes that elevate the broth.
- 400 gram tin of chopped peeled tomatoes Pour in to supply concentrated tomato sweetness and acidity; chopped peeled tomatoes enrich the broth with body, balancing the richness of the beef and enhancing overall savoury depth.
- 1250 ml 5 cups total stock (use all beef or a combo of mainly beef, some chicken and vegetable stock – you will need 5 stock cubes or sachets for 1250 ml water) Add as the cooking liquid to provide the primary savory base; using mainly beef stock (with optional chicken or vegetable) and stock cubes yields a deeply flavoured broth that carries all ingredients.
- Chopped fresh parsley for garnish optional Sprinkle chopped for finishing to add fresh herbal brightness and a clean contrast to the rich soup; parsley garnish lightens flavours and adds visual appeal.
- Freshly grated Parmesan for garnish optional Grate and serve over individual bowls to contribute salty, umami-rich finish and creamy texture; freshly grated Parmesan enhances savouriness and pairs well with barley and beef.
Instructions
- Heat the Instant Pot to Sauté and add a splash of oil.: The pan should shimmer slightly and release a warm, faintly nutty scent from the oil . This initial heat creates the hot surface needed for good browning which builds savory fond that later enriches the broth. You want the surface hot enough that a small piece of beef sizzles on contact, but not so hot that the oil smokes. A common mistake is crowding the pot right away; that causes steaming rather than searing, which reduces flavor development.
- To stop the beef shin curling while frying, snip through the firm connective tissue around the edges. Cut in 3 to 4 places with kitchen scissors.: When you hear that immediate sear and smell the caramelizing meat, you know the surface is developing complexity. Snipping the connective tissue helps the pieces lie flat so they make even contact, producing more consistent browning. If you skip this, the shin can pucker and brown unevenly, leaving some parts underdeveloped and others overcooked.
- Season the meat very well on both sides with salt and pepper and fry in batches on both sides until browned (the meat does not need to be cooked all the way through). Once browned, set the meat aside.: As the beef browns you will smell a toasty, meaty aroma and see mahogany crust forming, which is where a lot of the flavor lives. Browning in batches avoids overcrowding and ensures each piece gets that crisp crust. Do not skip seasoning, because salt draws flavor into the meat. One pitfall is frying too long at too low heat; that yields gray, steamed meat rather than deep browning.
- Add a splash more oil to the Instant Pot bowl and add all your vegetables. Give them a good mix and allow them to cook for a few minutes. Put the lid on the Instant Pot to generate a little steam.: As the vegetable s hit the hot oil you should hear a lively sizzle and smell sweet aromatics as edges caramelize. Briefly softening them concentrates their sugars and creates a better base for the broth. Covering to trap steam helps soften denser pieces like butternut or carrot. Avoid overcooking, which can lead to mushy pieces that lose structure in the pressure cooker.
- Add the garlic and dried herbs to the pot along with the tin of tomatoes, and barley and give it a good mix. Add the stock, bay leaves and bouquet garni.: The crushed garlic will release a pungent, savory perfume that melds with tomato acidity and dried herbs. When you stir in the barley it begins to swell slightly as it hits the hot liquid, soaking up flavors. Adding the stock and herbs now ensures that the flavors marry under pressure. A mistake is adding too little liquid for the barley, which will absorb more and can dry out the pot; measure carefully.
- Nestle the browned beef back into the pot, making sure the meat is submerged below the liquid.: As the meat sinks into the aromatic broth you will see the surface ripple and small bubbles form at the edges. Submerging ensures even cooking and maximum flavor transfer from the beef into the stock. If pieces remain exposed they may dry out or cook unevenly, so tuck them down gently to avoid those issues.
- Seal the Instant Pot and set it to Pressure Cook on High for 50 minutes.: During sealing you may hear clicks and see the pot beginning to build pressure, a process that intensifies aroma and extracts gelatin from the bone. That 50 minute high pressure phase transforms tough connective tissue into unctuous tenderness. Release method matters; allow natural release when possible to preserve juiciness. A common error is quick releasing too early which can toughen meat and scatter liquid everywhere.
- Serve with bread rolls crisped up in the Air Fryer or oven.: At serving you will notice steamy, concentrated aroma and a glossy broth. Crisp bread provides contrast, its crackling crust and warm crumb pairing beautifully with the soup’s tender components. Don’t skip the crisp element if you enjoy textural contrast; softened bread straight into the bowl can become soggy fast. Toasting releases a toasty scent that complements the soup’s savory profile.
Notes
- Boost broth depth — If you want a more concentrated stock, brown the beef longer and reduce part of the cooked liquid gently on sauté mode before serving to concentrate flavors.
- Make it heartier — Add extra barley at the end and simmer until tender, remembering it will soak up additional liquid so adjust the stock accordingly.
- Vegetable swaps — Use seasonal vegetables from the ingredient list to vary texture; root vegetables add sweetness, while courgette lends freshness near the end of cooking.
- Garnish ideas — Finish with chopped parsley or a light dusting of grated Parmesan at the table, serving both so guests choose their preference.
- Make ahead strategy — Cook fully, cool, then refrigerate. Reheat slowly on the stovetop to preserve texture, adding a splash of water if the barley has absorbed too much liquid.