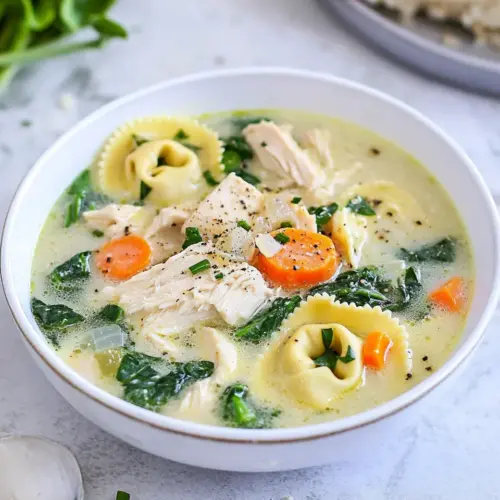
Instant Pot Chicken Tortellini Soup
Instant Pot Chicken Tortellini Soup is a creamy, comforting bowl with tender chicken, pillowy tortellini, and a rich broth that makes an easy weeknight dinner. The pressure cooking delivers deep flavor fast, while the final stir of cream and spinach keeps the texture luxurious and bright. Its a family friendly recipe that feels special with minimal effort, perfect for cold evenings.
Equipment
- Instant Pot
Ingredients
- 1 pound chicken breast diced Dice and cook until no longer pink to provide lean protein and hearty texture that soaks up the soup flavors; adds substance and makes the dish filling for dinner or leftovers.
- 2 carrots diced Dice finely and sauté or simmer to release natural sweetness and add tender, earthy bites; balances savory elements and contributes color and nutrients.
- 2 celery stalks diced Dice and soften to add aromatic crunch and a mild, slightly bitter flavor; enhances the soup's savory base and complements the carrots.
- 1/2 cup diced onion Dice until translucent and cook to build a flavorful aromatic foundation; adds mild sweetness and depth to the broth.
- 1 teaspoon olive oil Measure and use to lightly coat the pot when sautéing aromatics, lending a subtle fruity richness; helps prevent sticking while adding healthy fats.
- 1 tablespoon butter Melt gently when sautéing to enrich the soup with a silky mouthfeel and a hint of creamy, buttery flavor; helps brown vegetables and deepen savory notes.
- 1 teaspoon garlic powder Season liberally to impart a warm, mellow garlic essence that blends easily into liquids; offers convenience over fresh garlic while maintaining aromatic depth.
- 1 teaspoon onion powder Season to contribute concentrated savory-onion flavor that rounds out aromatics; adds consistent background umami without texture from fresh onion pieces.
- 1/2 teaspoon oregano Add to infuse a warm, slightly floral Mediterranean note that complements tomatoes and broth; helps unify herbs and seasonings for balanced flavor.
- 1/2 teaspoons salt Season to enhance overall taste and bring out natural flavors while controlling seasoning levels; use to adjust salinity during cooking for a well-rounded broth.
- 1/4 teaspoon ground black pepper Season to introduce bright, sharp heat and subtle woody notes that contrast the creaminess; helps lift the overall flavor profile when used sparingly.
- 8 cups chicken broth Pour and simmer as the liquid base to deliver savory depth and body; provides seasoning, moisture for cooking, and a broth that carries all other flavors.
- 2 cups tortellini Add and cook until tender to supply chewy, comforting pasta pockets that absorb broth and add carbohydrate richness; becomes a textural centerpiece of the soup.
- 1 cup spinach Tear or chop and stir in near the end to add vibrant color, a tender leafy texture, and nutritional boost; wilts quickly and brightens the finished soup.
- 2 cups heavy cream Pour in to create a rich, creamy consistency and smooth mouthfeel while balancing savory and acidic notes; thickens the broth and makes the soup indulgent.
- Parmesan cheese for topping Grate over each serving to contribute salty, umami-rich finishing notes and a slightly granular texture; enhances creaminess and provides a classic Italian touch.
Instructions
- Turn the Instant Pot to saute and add the butter and olive oil. Add the chicken and cook until no longer pink.: As the butter melts, you should hear a soft sizzle and smell a nutty, rich aroma from the fats, which helps build the base flavor. The chicken will begin to white on the edges then firm; once most pieces are opaque and slightly golden at the edges, they are no longer pink and have developed savory notes. This initial browning adds depth that the pressure cycle will enhance, it is not about achieving a full crust but about flavor development. A frequent mistake is overcrowding the pot which causes steaming rather than browning, so work in batches if needed and let pieces develop slight color. If you notice a lot of liquid quickly pooling, raise heat briefly to evaporate it and coax more browning.
- Once the chicken is done, add the carrots, celery and onion. Saute for 1-2 minutes.: You will smell a sweet vegetal lift as the carrots and onion soften, and the celery will loosen its aromatic oils, brightening the mix. The quick sauté releases those sugars which mingle with the browned chicken for a harmonious base. This short time is purposely brief, it is only to begin tenderizing and layering flavors, not to fully cook the vegetables. A common slip is over-sautéing until vegetables are mushy, so keep this step short and mindful. If the pot starts to stick, deglaze with a splash of broth right away to prevent burning.
- Turn off the saute function. Pour in some of the broth and scrape the bottom of the inner pot to make sure there are no bits stuck to the bottom.: When you add liquid you should hear a lively hiss as the hot base meets cool broth, and while stirring, you want to see browned bits lift from the bottom, signaling flavorful caramelization being reincorporated. Scraping is crucial because stuck bits can trigger a burn notice on the Instant Pot and curdle finishes, so remove them to maintain even cooking and clear broth. Do not skip this step because ignoring stuck bits can lead to a bitter, scorched flavor and a ruined cooking cycle. If scraping does not release residue, add a little more broth and let it sit briefly to loosen.
- Add in the spices and the rest of the broth. Stir to combine.: You’ll notice the aroma change as the dried spices bloom in the warm liquid, giving the broth a layered, inviting scent. Stirring ensures even distribution so every spoonful is seasoned consistently. Properly dispersing the spices prevents pockets of concentrated flavor later. One mistake is to dump spices all at once without mixing, which can make the soup taste uneven; take a moment to whisk them in thoroughly for uniformity.
- Pressure cook for 8 minutes on high.: During the pressure cycle expect the pot to hiss slightly and then quiet as it builds pressure, the internal steam intensifies flavors and tenderizes the chicken quickly while infusing the vegetables. This short, high heat phase concentrates broth flavor without breaking down the pasta that will be added later. A common error is setting a much longer pressure time which can overcook protein and soften textures too far, so stick to the recommended duration. Ensure the lid is sealed properly to avoid pressure problems; if the pot fails to pressurize, check the sealing ring.
- Manually release the pressure when done cooking. Do this by turning the sealing valve to vent.: As steam vents, you will hear a loud rush that gradually calms; this quick release stops further cooking, preserving the texture of the chicken and vegetables. Be cautious keeping your hands and face away from the steam to avoid burns. A common oversight is opening the valve too slowly which prolongs heat exposure and can yield overcooked components, so follow the release directions confidently. If foam or sputtering occurs, pause and let the pressure drop naturally a little before releasing fully.
- Turn saute mode back on and add the tortellini. Allow to simmer for about 5 minutes or until tortellini is done. You will know tortellini is done because it will float to the top of the pot. Turn off and stir in the spinach. Pour in the heavy cream and give one final stir.: Once the tortellini hits the hot broth you should see gentle bubbles around the edges and hear a soft simmer. The pasta will hydrate and swell, and after a few minutes tender pillows will rise to the surface, signaling doneness. The simmer also concentrates flavors, giving the broth a slightly thicker mouthfeel before the cream is added. After turning off heat, stirring in spinach wilts it quickly to a vivid green, and adding heavy cream at the end preserves a silky, unbroken texture. A typical mistake is boiling the cream which can lead to separation; ensure heat is off or very low during the addition. If the soup looks too thin, simmer briefly to reduce before adding cream.
- If you desire, add parmesan cheese on top. Then, serve hot and enjoy!: Grated Parmesan cheese sprinkled on each bowl offers a salty, nutty contrast that brightens the creamy broth and ties flavors together. You should notice a fragrant, savory lift as the cheese melts slightly on contact with the hot surface. Serving immediately ensures the pasta keeps a pleasant texture and the cheese retains some granular bite. A common mistake is adding the cheese too early which will fully dissolve and lose texture, so reserve it for the table. If someone prefers less salt, offer cheese on the side so each person can adjust to taste.
Notes
- Swap the pasta style Try different filled pastas for a change in texture while keeping cook time similar, just watch for size differences which affect simmer time.
- Leafy green boost Stir in other greens like baby kale at the end, adjusting wilting time to keep texture pleasant and avoid bitterness from overcooking.
- Cheese finish Offer grated Parmesan cheese at the table for guests to adjust salt and umami intensity to their liking.
- Broth quality matters Use a good low sodium chicken broth to control salt and enhance overall flavor without overpowering the cream.
- Adjust creaminess Reduce the heavy cream amount for a lighter broth, or replace half with milk for a less rich version while watching for thinning.