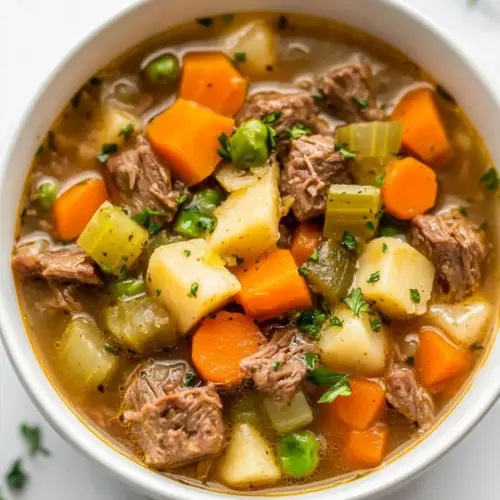
Instant Pot Beef and Vegetable Soup
Instant Pot Beef and Vegetable Soup is a hearty, comforting bowl with tender beef, creamy potatoes, and bright vegetables. This easy weeknight dinner delivers rich savory broth and cozy textures in under an hour, perfect for winter evenings or busy nights when you want homemade flavor without fuss. Make it for family dinners or batch cook for satisfying leftovers.
Equipment
- Instant Pot
- Wooden Spoon
Ingredients
- 1 pounds stewing beef cut into small (3/4-1" pieces) Cut into bite-sized pieces to ensure even, tender cooking in the Instant Pot and to provide hearty texture throughout the soup; browning before pressure cooking develops deep, savory flavor and mouthfeel.
- 3 medium carrots peeled & sliced Peeled and sliced to add natural sweetness and body to the broth; softens during cooking and melds with other vegetables to enhance overall flavor and color.
- 3 sticks celery chopped Chopped to contribute aromatic freshness and a slight crunch if undercooked, while releasing savory notes that balance the richness of the beef and broth during pressure cooking.
- 1 medium onion chopped Chopped to release savory, sweet aromatics that form the flavor base; softens and melds into the broth, providing depth and balance to the soup.
- 2 tablespoons olive oil Used to sauté the beef and vegetables, promoting browning and flavor development while preventing sticking; adds a subtle fruity richness to the finished soup.
- 3 cloves garlic minced Minced to infuse sharp, pungent umami into the cooking process; softens quickly and blends with sautéed aromatics to deepen the soup’s savory profile.
- 4 cups beef broth Provides the savory liquid foundation and concentrated beef flavor; dissolves seasonings and deglazes the pot, ensuring a rich, cohesive soup base under pressure.
- 2 cups water Used to adjust liquid volume for proper pressure cooking and simmering; balances concentration of flavors so vegetables and meat cook evenly without drying.
- 2 large Russet potatoes peeled & diced Peeled and diced to add hearty starchiness and body; softens to comforting tenderness and helps thicken the broth slightly while absorbing surrounding flavors.
- 1 teaspoon Worcestershire sauce Adds a subtle umami tang and complexity to the broth; a small amount brightens savory notes and rounds out beefiness without overpowering other ingredients.
- 1/4 teaspoon Italian seasoning Sprinkled to introduce a blend of dried herbs and aromatic warmth; helps unify the savory elements and complements the vegetables without dominance.
- 3/4 cup frozen peas and/or corn optional Added optionally to introduce pops of sweetness, color, and textural contrast; frozen mix thaws into the hot soup quickly and contributes variety to each spoonful.
- Salt & pepper to taste Season to individual taste to enhance overall flavor balance; adjust gradually to avoid over-salting and to complement the natural juices from meat and vegetables.
Instructions
- Cut the beef into smaller pieces (about 3/4-1" or so cubes) - they will cook faster and be more tender. Season them with salt & pepper. Prep the other ingredients.: The moment you smell the first cut pieces and the clean scent of fresh beef , you know the foundation is set and it primes the rest of the dish. Texture matters here, because uniform 3 quarter to 1 inch cubes ensure even cooking and predictable tenderness under pressure. When you season early, the salt begins to interact with the surface proteins, helping a better browning reaction once the meat hits hot oil. A common error is leaving irregular chunks which either become tough or fall apart, so take an extra minute to measure visually for consistency.
- Add the olive oil to your Instant Pot (IP) and press the sauté button. Brown the beef on all sides (about 5 minutes total). If you think the IP will be crowded, do this in two batches. Take the meat out and set it aside, and then spoon out most of the excess fat from your IP (leave about 1-2 tablespoons).: As the oil warms and the pot begins to sizzle, the first pieces will give off a toasty, caramel aroma that signals proper searing. Browning creates the fond, those browned bits that dissolve into the liquid later for depth of flavor. Remove meat once each piece has a rich brown crust, and keep the residual fat minimal so the soup finishes clean rather than greasy. Overcrowding reduces heat and causes steaming instead of browning, which is the most frequent mistake at this stage.
- Add in the onion and celery and sauté for 4-5 minutes, then stir in the garlic. Ensure any brown bits are scraped up from the bottom of the IP.: When the onion and celery hit the warm pot you should hear a gentle sizzle and soon notice softened, translucent vegetables releasing sweetness. Stirring in the minced garlic toward the end preserves its bright aromatic quality without burning it. Use a wooden spoon to deglaze the bottom and lift the fond, because those browned bits carry intense savory flavors into your broth. A common slip is letting the garlic darken too much which introduces bitterness.
- Add the meat back into the IP, along with the carrots, potatoes, broth, water, Worcestershire sauce, and Italian seasoning.: Once everything is reunited, you'll see the pot transform from separate elements into a unified stew, with the broth reflecting the concentrated color of the sautéed bits. The combination of broth and water ensures a balanced base while the small addition of Worcestershire adds umami lift. Even distribution of ingredients helps the pressure environment cook everything uniformly, so nestle the vegetables around the meat rather than piling them. Avoid overfilling the pot which can interfere with proper pressurization.
- Close the lid, ensure the valve is on "sealing", and then set the timer to cook on high pressure for 20 minutes. It'll take at least 10 minutes to get up to pressure.: With a sealed pot, aromas become concentrated and the air feels warmer in the kitchen while the Instant Pot builds pressure. The waiting period until full pressure is normal and part of the process, allowing connective tissue to soften gradually. Setting the correct time is critical because pressure cooking is precise; too little and the beef will remain tough, too long and delicate vegetables can disintegrate. Do not attempt to force open the lid mid cycle, as that interrupts the cooking and is unsafe.
- Once the countdown has finished, let the pressure naturally release for 15 minutes, then turn the valve to release the remaining pressure.: The natural release continues the gentle cooking, smoothing textures and letting the juices settle. You will hear a quiet hiss and later a more distinct release when you open the valve. This slightly extended resting time helps the beef fibers relax and makes the potatoes creamier. Forcing a quick release too early can cause splatter or result in under tenderized meat, which is the usual misstep here.
- Stir in the frozen peas and corn (I just mix the two together, but you can use one or both or neither). They will cook through really fast. Season the soup with extra salt & pepper as needed.: The frozen pieces bring a bright, sweet note and a contrasting pop of texture; stirring them in at the end preserves their color and slight snap. After integrating them, take a spoonful to taste and adjust salt and pepper, because the concentrated broth may need fine tuning. Remember that these frozen vegetables require minimal time to heat, so adding them earlier will yield a dull, overcooked texture, which you want to avoid.
Notes
- Swap cut size for finish: Try slightly larger beef cubes if you want distinct chunks in the bowl, or smaller ones for a homier, casserole like feel; just remember cooking times remain the same so texture comes from size control rather than longer cooking.
- Boost umami carefully: A little extra Worcestershire sauce lifts the broth, add cautiously and taste as you go, since too much can push the profile toward a robust, tangy edge.
- Vegetable mix ins: If you prefer more texture, stir in the frozen peas and corn separately to control how each one cooks, giving you bursts of sweetness without over softening the rest of the soup.
- Potato control: Cut Russet potatoes into consistent dice so they thicken the broth pleasantly; for a lighter broth, reduce potato volume slightly and increase carrot for color.
- Leftover plan: Cool quickly and refrigerate in an airtight container, the soup often tastes better the next day as flavors meld, and you can refresh it with a splash of water or broth when reheating.