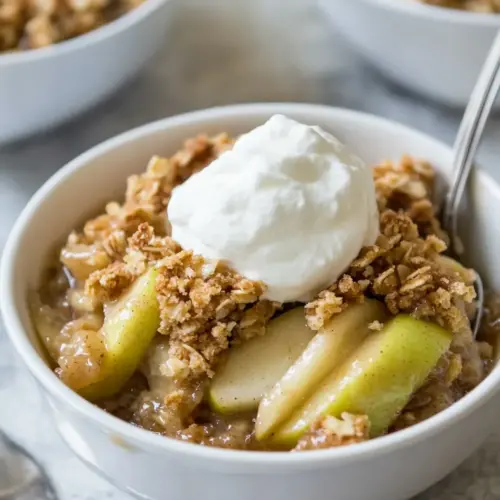
Instant Pot Apple Crisp
Instant Pot Apple Crisp is a quick, comforting dessert with tender, slightly tart apples and a crispy, buttery oat topping. This easy autumn treat yields a warm, cozy aroma and a mix of soft and crunchy textures perfect for an easy weeknight dessert or holiday gathering. It is simple enough to make any night, yet special enough to serve to guests.
Equipment
- Instant Pot
Ingredients
- 1/2 cup all-purpose flour Provide structure and lightness to the crisp topping by binding dry ingredients and creating a tender crumb when mixed with butter and baked or warmed in the Instant Pot.
- 1/2 cup old-fashioned rolled oats Add chewiness and a toasty texture to the topping while contributing whole-grain flavor and visual interest that contrasts with the soft cooked apples.
- 1/2 cup light brown sugar Impart deep caramel-like sweetness and moisture to the topping, enhancing the overall flavor complexity and helping the oats and flour brown nicely.
- 1/2 teaspoon ground cinnamon Introduce warm spice and aromatic depth to both topping and filling, complementing the apples and balancing sweetness with subtle earthiness.
- dash of salt Enhance overall flavor by balancing sweetness and accentuating other spices and fruit while helping to round out the profile even in small amounts.
- 6 tbsp unsalted butter, cut into small pieces Create richness and help bind the flour and oats into a cohesive, tender crumble that browns and flakes when finished in the Instant Pot.
- 4 small Granny Smith apples, chopped into 1 inch chunks Provide the primary fruit base offering bright tartness and firm texture that holds its shape when cooked, contributing fresh apple flavor and acidity.
- 2 tablespoons butter, melted Add buttery moisture and richness to the apple filling to round out flavors and help the fruit develop a glossy, appealing finish.
- 1 tablespoon lemon juice Brighten the apple filling with acidity that prevents browning and lifts sweetness, adding a subtle tart counterpoint to the brown sugar.
- 1/2 teaspoon vanilla extract Contribute a warm, sweet floral note to the filling, enhancing the fruit flavors and harmonizing with the cinnamon in both layers.
- 1/4 cup light brown sugar Sweeten the apple filling with a deep molasses undertone that balances the fruit's acidity and helps create a saucy consistency when cooked.
- 1/2 teaspoon ground cinnamon Layer additional warm spice into the filling to echo the topping flavors and provide a cohesive spiced profile throughout the dessert.
- dash of salt Round out and enhance the other flavors in the filling by providing subtle salinity that makes the sweetness and spices more pronounced.
- 1 cup water Provide the necessary liquid for the Instant Pot to build pressure and gently cook the apples into a tender, saucy filling without burning.
Instructions
- In a medium size bowl combine the crumb topping ingredients with a fork or pastry blender until it resembles small crumbs.: You will notice the dry mix becoming dotted with pea sized clumps as the unsalted butter is worked in, giving off a faint, buttery scent that promises a golden finish. Press a few clusters between your fingers, they should hold but easily break apart, which ensures the topping will toast in pockets rather than fuse into a paste, producing those prized crunchy bits. The why behind this is texture control, smaller clumps bake evenly and deliver both tender and crisp spots. A common mistake is over mixing until it becomes smooth and pasty, which leads to a heavy, greasy topping; to avoid that, stop as soon as pea sized bits form.
- Refrigerate while you prepare the apple filling.: Chilling the crumb keeps the butter firm, preserving those distinct pockets so they melt slowly and brown attractively later. The cool topping will smell faintly of butter and cinnamon when you return to it. This pause also gives you time to focus on the filling without the butter melting prematurely. If you skip chilling, the topping can clump together and lose the sought after flaky texture, so resist the urge to proceed immediately.
- Spray IP with non-stick cooking spray.: A quick coat of spray prevents sticking and makes serving effortless, the light scent of neutral oil dissipates quickly. Coating the pot is especially important because the filling will release juices as it cooks, and you want those to come out cleanly without caramelizing onto the inner liner, which makes cleanup harder. The typical error is using too much spray which can pool and affect the topping texture, so a light, even mist is best.
- Add melted butter, lemon juice, vanilla, brown sugar, cinnamon and salt and stir to combine. Add apples and toss to coat. Pour in water.: As you stir, the aroma should open up, with bright lemon notes lifting the molasses sweetness from the light brown sugar and warm spice from the ground cinnamon . The mixture should look glossy and evenly coated; this ensures every apple piece will caramelize slightly during cooking. The reason this step matters is flavor distribution, uniform coating means balanced bites. Avoid under stirring which can leave pockets of dry sugar or spice, leading to uneven sweetness.
- Sprinkle crumb topping evenly over the apples.: Tossing the chopped Granny Smith apples lets the juices mingle with the sweetened butter mixture, so each chunk is flavored all the way through. You will hear a soft rustle as the pieces rub together, and the apples will glisten when well coated. This tactile cue indicates readiness. Why this matters is texture control, a proper toss prevents dry centers and creates a cohesive filling. A common pitfall is overcrowding the bowl which causes uneven coating, so toss in batches if necessary.
- Cook on high pressure (manual for 1 minute).: Adding the water introduces the steam necessary for the instant pot to come to pressure and gently cook the fruit. You will see the liquid pool briefly, then be absorbed slightly by the fruit and sugar; this steam cooking keeps the apples tender while concentrating flavors. This step matters because steam prevents the fruit from drying and creates the syrupy base beneath the crumb. Do not omit the water, because without enough liquid the pot may not pressurize correctly.
- When timer beeps, turn the valve to quick release the pressure/steam. Start slowly to be sure only steam comes out, and then fully release it.: Distribute the chilled topping so it covers the surface in a single, even layer; visually it should look like a patchwork of small buttery bits sitting on the apples. This even distribution ensures uniform browning if you choose to broil later, and protects the fruit from direct steam so the top gains texture. The why here is surface coverage, which creates the desired crust to contrast the filling. A typical mistake is piling the topping in one spot, leading to uneven textures; aim for an even hand when sprinkling.
- Optional: Spoon servings into oven-proof dish and broil for 1-2 minutes, to crisp the topping, if desired.: Once sealed, the instant pot will hiss softly as it builds pressure, and the aroma of cinnamon and cooked fruit will begin to perfume the kitchen quickly. Even though the cook time is short, this high pressure blast is enough to soften the apple chunks while preserving their shape. The technique matters because brief pressure cooking concentrates flavor without breaking the fruit down to mush. A common error is setting a longer time thinking it will be better, which can turn the fruit to applesauce, so stick to the prescribed minute.
- When timer beeps, turn the valve to quick release the pressure steam: Start releasing slowly until you hear the steady rush of steam, then fully open the valve; the sound is a satisfying whoosh and the pot will deflate within moments. Rapid release stops the cooking immediately, preserving the texture of the apples and preventing over softening. This technique matters because residual heat continues to cook the fruit if pressure is held. Be careful of escaping steam which is extremely hot, a frequent mistake is opening the valve too quickly with your hand directly over it, so use a tool or stand back.
- Optional: Spoon servings into oven proof dish and broil for 1 to 2 minutes to crisp the topping if desired : If you transfer portions and place them under a hot broiler, the topping will sizzle faintly while developing a deeper golden color and a crisp, toasty aroma that heightens contrast. This finishing step intensifies texture and creates caramelized edges. The reason to do this is purely for crunch and visual appeal, it elevates the dish without changing the core flavors. Watch closely during broiling as sugars can burn quickly; the most common mistake is walking away and creating bitter spots, so stay attentive.
Notes
- Swap the apple variety: Try using different tart apples to adjust sweetness and texture, keeping in mind firmer apples hold up best under pressure.
- Toast the oats first: Lightly toasting the old fashioned rolled oats in a dry skillet before incorporating makes the topping nuttier and more complex.
- Adjust sugar to taste: Reduce the brown sugar in the filling if you prefer a less sweet dessert, the lemon juice helps keep flavors bright.
- Make individual servings: Spoon the filling into small oven proof ramekins before broiling for elegant single portions with evenly crisped tops.
- Control the crunch: For a chunkier topping, pulse the mixture less when cutting in the unsalted butter, leaving larger butter pockets to create big crisp clusters.
- Use salted butter cautiously: If you swap in salted butter, reduce added salt in both topping and filling to avoid oversalting the dessert.