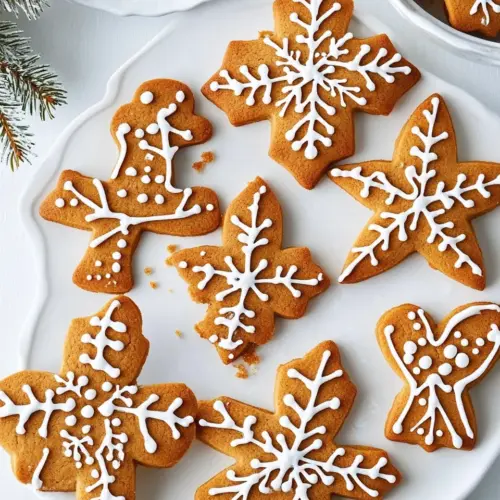
Iced Gingerbread Cutout Cookies
Iced Gingerbread Cutout Cookies deliver warm, spicy aroma with a tender yet crisp bite, perfect for holiday gifting and cookie swaps. This easy to follow recipe balances deep molasses flavor with zesty lemon zest and classic spices, making for beautifully shaped cookies that hold up to detailed Royal Icing decoration. Bake a batch to fill tins and share festive joy.
Equipment
- Stand mixer
- Paddle attachment
- Mixing Bowls
- Baking Sheets
- Parchment Paper
- Rolling Pin
- 3 1/2-inch cutters
- Wire racks
- Pastry bag
- Coupler
- Piping tips
Ingredients
- 1 cup (227 grams) unsalted butter, softened Creamed to create a tender, rich dough by incorporating air and fat for structure and flavor in the cookies.
- 3/4 cup (165 grams) firmly packed dark brown sugar Packed to provide deep molasses-like sweetness and moistness, contributing to the cookie’s chewy texture and caramel notes.
- 1/4 cup (50 grams) granulated sugar Granulated for extra sweetness and to help stabilize the dough’s texture while balancing the richer brown sugar flavor.
- 1 large egg (50 grams), room temperature Beaten to bind ingredients, add moisture, and contribute to leavening and richness for a tender crumb in the cookies.
- 1 1/2 teaspoons (6 grams) vanilla extract Added for aromatic sweetness and depth, enhancing the overall flavor profile with a familiar vanilla warmth.
- 1/4 cup (85 grams) unsulphured molasses Incorporated to supply robust, complex sweetness and characteristic molasses flavor that defines gingerbread taste.
- 3 cups (375 grams) all-purpose flour Sifted and mixed in to form the cookie’s structure, providing gluten for chew and absorbing wet ingredients evenly.
- 2 teaspoons (4 grams) ground cinnamon Sprinkled into the dough to deliver warm, aromatic cinnamon notes that complement the gingerbread spice blend.
- 1 1/2 teaspoons (7.5 grams) baking powder Measured as a chemical leavening agent to gently lift the cookies, creating lightness and slight rise during baking.
- 1 teaspoon (2 grams) ground ginger Ground to give sharp, spicy heat and classic gingerbread flavor, balancing the sweetness and other warm spices.
- 3/4 teaspoon (2.25 grams) kosher salt Added to enhance overall taste by bringing out other flavors and slightly moderating the sweetness with savory balance.
- 1/2 teaspoon (1 gram) packed lemon zest Zested and packed to contribute a bright citrus aroma that cuts through the warm spices and enriches flavor complexity.
- 1/4 teaspoon ground nutmeg Ground to add subtle, nutty warmth and complexity that supports the cinnamon and cloves without overpowering the blend.
- 1/4 teaspoon ground cloves Ground to contribute deep, aromatic pungency that reinforces the gingerbread spice profile with a slightly sweet-bitter edge.
- Royal Icing (recipe follows) Prepared as a decorative and finishing component, providing a smooth, pipeable icing that hardens to set on cooled cookies.
Instructions
- In the bowl of a stand mixer fitted with the paddle attachment, beat butter and sugars at medium speed until creamy, 3 to 4 minutes, stopping to scrape sides of bowl. Beat in egg and vanilla until combined. Beat in molasses just until combined, stopping to scrape sides of bowl.: The aroma of creamed butter and sugars becomes noticeably sweeter and fluffier, with a pale, silky texture that catches the light. This aeration traps tiny air bubbles that help the dough feel tender rather than dense. When mixing, listen for a smooth, little hum from the mixer and watch for streaks to disappear as the mixture turns uniform. If you skip scraping, pockets of unmixed butter or sugar can cause uneven texture in the dough, so pause and use a spatula to clean the bowl sides. A common mistake is overbeating which can incorporate too much air, causing cookies to spread in the oven. Take your time and stop when mixture is light and homogeneous.
- In a medium bowl, whisk together flour, cinnamon, baking powder, ginger, salt, lemon zest, nutmeg, and cloves. With mixer on low speed, gradually add flour mixture to butter mixture, beating just until combined and stopping to scrape sides of bowl. (Dough will be slightly sticky.) Turn out dough onto a lightly floured surface. Divide dough in half (about 480 grams each), and shape each half into a disk. Wrap in plastic wrap, and refrigerate until firm, about 1 hour.: As you add the egg , the mixture becomes glossy and slightly thinner, with a cohesive ribbon forming as you lift the paddle. The vanilla calms the spice notes and adds a round sweetness that fills out the profile. The temperature of the egg matters because a cold egg can seize the butter, creating lumps and a curdled appearance. If that happens, let the bowl rest briefly until the mixture smooths, or very gently warm the bowl over a warm water bath while stirring. Avoid vigorously increasing mixer speed, which can splatter and incorporate too much air.
- Preheat oven to 375°F (190°C). Line baking sheets with parchment paper.: Adding the molasses darkens the batter to a warm brown hue and releases a deep aromatic scent that hints of caramel and earth. Stirring just until incorporated preserves the dough's consistency, since overmixing can make it sticky and challenging to roll. When the molasses blends in, the batter will clump slightly, signaling readiness. If you overdo it, the dough can become tacky and require extra flour later, which alters texture. To troubleshoot tackiness, chill the dough briefly before shaping to regain manageability.
- On a lightly floured surface, roll half of dough to 1/4-inch thickness. (Keep remaining dough refrigerated until ready to use.) Using desired 3 1/2-inch holiday cutters dipped in flour, cut dough, rerolling scraps as needed, and place 2 inches apart on prepared pans. (Refrigerate dough if it becomes too soft when rerolling.) Repeat with remaining dough.: Whisking dry ingredients distributes the spices and leavening so every bite tastes consistent. You will notice the fragrant spice cloud as you whisk, a sign that flavors are marrying well. Proper mixing also prevents pockets of baking powder which could create uneven pockets during baking. If your flour is lumpy, sifting helps; otherwise, a thorough whisk will do. A pitfall here is adding the dry mix too fast to the butter mixture, which may cause clumps and uneven incorporation.
- Bake until centers are slightly puffed and dry and edges are slightly golden, 6 to 8 minutes. Let cool on pans for 3 minutes. Remove from pans, and let cool completely on wire racks.: The dough will transform from sticky batter to a cohesive mass, and you should stop as soon as streaks of flour disappear. The tactile cue is a slightly tacky but manageable dough that holds together. Overworking at this stage develops gluten and can produce tough cookies, so err on the side of minimal mixing. If the mixer struggles, finish folding by hand with a spatula to maintain tenderness. A common error is adding too much flour while trying to fix stickiness; instead, chill the dough to firm it up.
- Place Royal Icing in pastry bag fitted with a coupler to switch between piping tips as desired. Decorate cooled cookies with icing as desired. Store in an airtight container for up to 1 week.: The dough will feel cool and pliable, and as you press it out you will see a smooth surface with occasional flecks of spice. Light flour on your workspace prevents sticking without drying the dough. If the dough clings, lift and dust with a little more flour sparingly, because excess flour will dry the rolled cookies. Use your hands to form a neat mass, avoiding pounding which warms the butter. If it becomes too soft, wrap and chill for a few minutes.
- Divide dough in half (about 480 grams each), and shape each half into a disk: Shaping into disks ensures even chilling and makes rolling easier later. Flatten each disk gently so it chills uniformly, otherwise thicker centers may stay soft while edges firm. The disks should have smooth edges and a compact feel. Label them if you like to keep track, and wrap tightly to avoid drying out. A mistake is leaving them uncovered which forms a crust and harms rollability.
- Wrap in plastic wrap, and refrigerate until firm, about 1 hour: Chilling lets the butter solidify slightly so dough rolls without tearing and keeps shapes during baking. You will notice the dough becomes firmer and less tacky after the hour, with flavors melding. If you are short on time, refrigerate longer rather than shorter, as overly soft dough will spread in the oven. Avoid freezing at this point unless planning extended storage, because frozen dough needs more thaw time which can create condensation and soggy surface.
- Preheat oven to 375°F (190°C). Line baking sheets with parchment paper: A fully preheated oven promotes quick set of edges, preserving crisp outlines on your cutouts. The smell of the warming oven signals readiness, and parchment prevents sticking while allowing bottoms to brown consistently. If the oven is underpreheated, cookies may spread before edges set. Use an oven thermometer if yours runs hot or cold, and rotate pans midbake for even color when baking multiple sheets.
- On a lightly floured surface, roll half of dough to 1/4-inch thickness: Rolling to the correct thickness creates cookies that bake evenly, yielding slightly tender centers with crisp edges. The surface should be smooth, and the dough should roll without cracking at the edges. If cracks appear, press them gently to reseal, or chill briefly. Keep the unused dough refrigerated to maintain firmness. Using too much flour while rolling can dry the dough, so dust sparingly and lift the dough often to prevent sticking.
- Using desired 3 1/2-inch holiday cutters dipped in flour, cut dough, rerolling scraps as needed, and place 2 inches apart on prepared pans: The act of cutting releases a satisfying sound and visual of clean edges. Flour on cutters prevents sticking and helps shapes come away perfect. Space cookies to allow gentle expansion while baking, and reroll scraps only once or twice to avoid toughness from extra handling. If dough softens during this process, pop the tray in the fridge briefly. A frequent misstep is over-rolling scraps, which increases toughness, so try to minimize rework.
- (Refrigerate dough if it becomes too soft when rerolling): Cooling restores firmness and prevents misshapen cookies, and you will feel a clear difference when you resume rolling, with cleaner cuts and less sticking. Quick chill sessions of 10 to 15 minutes are often enough. Leaving dough out too long between rollings causes spreading during baking, so keep this tip in mind. Do not freeze unless you plan a longer pause, as freezing alters rolling texture slightly.
- Repeat with remaining dough: As you work through batches, you will notice rhythm and small improvements in cutting technique. Keeping unused dough chilled between batches ensures consistent results. Arrange baking sheets so you can load and unload efficiently, maintaining oven temperature. A common oversight is mixing chilled and warm dough batches which bake differently; keep them separate to avoid uneven cookies.
- Bake until centers are slightly puffed and dry and edges are slightly golden, 6 to 8 minutes: During baking you will see edges take on a gentle golden hue and centers puff a touch, a visual cue that they are done. The kitchen will smell intensely of spice and toasted sugar, an inviting sign. Pulling them out too early leads to underbaked centers, while overbaking makes them hard. Use the shorter end of the time range for crisper cookies and the longer end for slightly softer interiors. If you notice rapid browning, lower the rack or reduce oven temperature slightly.
- Let cool on pans for 3 minutes: This short rest allows cookies to set so they do not bend when moved. You will feel them firm slightly to the touch, and the surface will no longer feel glossy. Moving them too soon risks breakage, while leaving them too long can continue cooking on the hot pan, so this brief pause is important. If pans are particularly hot, lift them off the heat briefly to slow carryover cooking.
- Remove from pans, and let cool completely on wire racks: Cooling on racks promotes air circulation so bottoms do not become soggy, and you will see a steady loss of warmth as cookies reach room temperature. Fully cooled cookies provide a stable surface for decorating; icing applied to warm cookies will run. If you must speed cooling, set racks in a cool part of the kitchen but avoid drafts that dry the surface unevenly.
- Place Royal Icing in pastry bag fitted with a coupler to switch between piping tips as desired: Preparing your Royal Icing and tools at this stage means you can move quickly once cookies are cool. A coupler allows you to change tips without refilling, saving time when switching between outlines and floods. I recommend testing consistency on parchment to ensure lines hold for piping and floods level for filling. Too thin icing will run off edges, while too thick icing resists spreading.
- Decorate cooled cookies with icing as desired: Decorating is where personality shines; watch how the icing glistens as you pipe borders and fills, and listen for the soft scrape of the tip across the pastry bag. Take breaks between colors to let sections set, and use small tools to nudge icing if it needs leveling. A common pitfall is rushing layers before the base sets which can cause colors to bleed. Work patiently and enjoy the creative part.
- Store in an airtight container for up to 1 week: Proper storage keeps cookies crisp and protects decorations. Layer cookies with parchment to avoid sticking, and keep them at room temperature away from heat or humidity. I often test a cookie after a few days to ensure texture is maintained. If humidity creeps in, crispness softens, so airtight is essential. For longer storage, consider freezing undecorated cookies, but decorated ones are best enjoyed within a week.
Notes
- Tip 1: If your dough becomes too sticky while rolling, chill it for 10 to 20 minutes to regain firmness without adding more flour, which can dry out the texture.
- Tip 2: For brighter spice notes, toast whole spices lightly before grinding, then measure, this deepens aroma and flavor in the finished cookie.
- Tip 3: Use a coupler on your pastry bag so you can switch between piping tips quickly for outlines and fills, it saves time and keeps your workflow smooth.
- Tip 4: Test your Royal Icing consistency on parchment paper before decorating, adjusting with tiny amounts of water until the flood consistency levels within 10 to 20 seconds.
- Tip 5: Let piped details crust for at least 20 minutes before stacking cookies to prevent sticking and preserve crisp designs between layers.