Ice Cream in a Bag
Ice Cream in a Bag is a creamy, easy to make frozen treat that transforms simple pantry ingredients into a rich, scoopable dessert. This quick method is perfect for summer gatherings and easy weeknight celebrations, delivering satisfying texture and customizable mix ins for kids and adults alike. Try it for a fun, hands on dessert that rewards you fast.
Equipment
- Gallon sized ziplock bags
- Measuring Cups
- Spoon
- Towel
Ingredients
- 2 gallon sized ziplock bags Use a pair of sturdy, gallon-sized reusable bags to contain the mixture and insulating salt/ice separately; double-bagging prevents leaks and keeps the ice from diluting the cream. Ensure a tight seal to withstand shaking and to maintain cleanliness while children participate.
- 2 cups heavy cream half and half or whole milk Pour in heavy cream, half-and-half, or whole milk to provide the fat and liquid base that becomes creamy ice cream; higher fat yields richer texture. Chill the dairy beforehand for faster freezing and smoother final consistency.
- 1/4 cups sugar Measure and dissolve granulated sugar to sweeten and help lower the freezing point for scoopable texture; adjust sweetness to taste but keep proportions for structure. Stir thoroughly so the sugar fully integrates with the dairy base before sealing the inner bag.
- 1 teaspoon vanilla Add vanilla extract to impart aromatic flavor and enhance overall sweetness perception; use real or pure extract for best results. Mix it evenly into the dairy so the flavor distributes uniformly throughout the ice cream.
- 6 -8 cups ice Pack crushed ice around the sealed cream bag to create the cold environment necessary for freezing; use several cups to surround the inner bag completely. Keep extra ice on hand because frequent shaking melts some and cools are needed throughout the process.
- 1/3 cup rock salt Sprinkle coarse rock or kosher-style salt over the ice to lower the melting temperature and draw heat from the cream bag, enabling rapid freezing. Use measured amounts and handle carefully to avoid skin irritation and to prevent over-salting the ice cream.
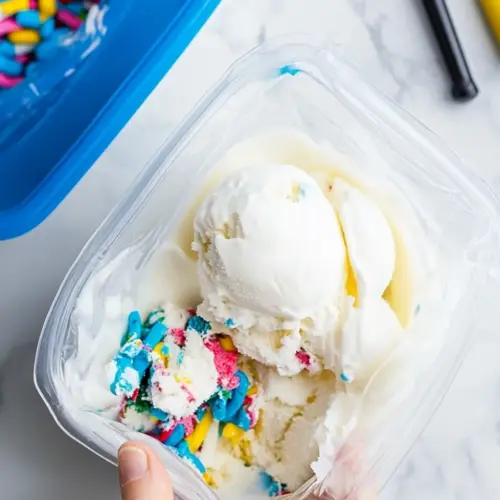
- sprinkles Add colorful sprinkles as a fun, crunchy mix-in to provide visual appeal and a slight sugary crunch throughout the ice cream. Fold them in after the base has thickened so they retain texture rather than fully dissolving.
- crushed oreos Fold in crushed Oreo cookies to introduce chocolatey flavor and crunchy cookie bits that soften slightly for a pleasing contrast. Add them toward the end of churning so larger chunks remain distinct rather than becoming powdery.
- mini m&ms Mix in mini M&Ms to contribute candy-coated chocolate pieces that add color and a firm bite; they hold up well in frozen desserts. Stir them in during final mixing so the candy shells remain mostly intact and distribute evenly.
- sliced fruit Layer in sliced fruit to add fresh flavor, natural sweetness, and a contrasting texture; choose firm fruits and thin slices to avoid excess moisture. Gently fold fruit in once the base is semi-frozen to prevent large ice crystals and preserve fruit integrity.
Instructions
- In gallon sized ziplock bag add the ice and salt.: The clink of ice settling into the bag is the opening act, and you will notice the air in the bag shift as the cubes move around. The rock salt starts to draw heat from the ice immediately, creating a cold, slushy environment that is essential for rapid freezing. A common mistake is using too little ice, which slows the process and can lead to a soft final texture, so be generous with your ice and mix the salt evenly among the cubes.
- In another gallon sized bag add the heavy cream.: Pouring the dairy into the inner bag is reassuringly simple, and you will see a glossy, pale pool that promises richness. Using heavy cream produces a thicker mouthfeel, while lighter options yield a softer scoop, so choose according to your preference. Avoid overfilling the bag, because you need room for the mixture to move and churn inside; overfilling can prevent proper chilling.
- Add in the sugar and shake the bag.: When you add the sugar , the mixture will look slightly grainy at first, but as you agitate it the granules begin to dissolve, smoothing the base. The sound here is a gentle swish, and you may feel the texture round out as it integrates. A typical pitfall is not shaking long enough for the sugar to dissolve, which can leave a gritty texture, so continue until it feels silky to the touch.
- Add in the vanilla and shake.: A teaspoon of vanilla rounds out the flavor and changes the aroma, lending a comforting, familiar scent to the cream. The smell becomes richer almost immediately, and that fragrant note makes the base taste complete. Be careful not to add too much vanilla, which can overpower the delicate sweetness, and shake well so the flavor distributes evenly.
- Seal the bag completely so that the salt will not get into the bag and place in the bag with the ice.: Proper sealing is crucial to keep the salty brine out of your ice cream. Press out excess air and double check the zipper seal; if salt gets into the cream, the texture and taste can be ruined. A frequent error is neglecting to test the seal before shaking, so take a moment to ensure it is airtight, and place the inner bag centrally among the ice for even cooling.
- Shake the bag for about 5 minutes or until frozen.: This is where the transformation really happens, and you will feel the mixture firm up under your hands as small ice crystals form. The rhythmic shaking blends air into the base, giving it scoopable body, and the cold from the salted ice accelerates freezing. Expect your arms to get a workout, and watch for visual cues like stiffening and a thickened appearance; stop once the texture resembles soft serve. A common mistake is stopping too early which results in a slushy texture, so persevere until it is properly set.
Notes
- Use chilled cream to speed up the freezing process and reduce the shaking time required, because starting colder gives the mixture a head start toward firming.
- Crush the ice if possible, because smaller ice pieces create more surface area and a more consistent cold bath, leading to cream that sets faster and with fewer large crystals.
- Experiment with sweetness by tasting the base pre freeze, since sugar level is easier to adjust before it chills, and it helps avoid a too sweet or too bland result.
- Protect against leaks by double bagging the inner cream pouch, a small step that prevents salt contamination and keeps the finished ice cream pristine.
- Add solids late like crushed oreos or mini m&ms after the mixture has thickened, ensuring they keep texture and do not dissolve or break down during shaking.