How to Cook Spaghetti Squash
How to Cook Spaghetti Squash turns winter squash into tender, noodle like strands that are light, slightly sweet, and perfect for an easy weeknight dinner. This simple roast method yields caramelized edges and delicate texture with minimal effort, giving you a healthy, versatile base to dress however you like. Make it for meal prep or a cozy family meal, it is reliably satisfying.
Equipment
- Oven
- Baking Sheet
- Chef's Knife
- Spoon
- Fork
Ingredients
- 1 Spaghetti Squash Roast to soften and transform into tender strands that mimic pasta; pierce and bake or microwave until easily shredded with a fork. Enhance natural sweetness and texture by cooking evenly and preventing sogginess; scoop out seeds before cooking and allow to cool slightly for easier handling.
- 2 tsp extra-virgin olive oil Drizzle to coat the squash strands lightly, promoting browning and adding a subtle fruity flavor; toss with the cooked flesh before serving for shine and mouthfeel. Use sparingly to avoid overpowering the delicate squash while helping seasonings adhere evenly.
- Salt and Pepper Season generously to balance flavors and elevate the mild sweetness of the squash; sprinkle during and after cooking to build depth. Adjust to taste and grind fresh for best results, tasting as you go to achieve a well-rounded finish.
Instructions
- Preheat the oven to 425 degrees F. Line a large rimmed baking sheet with parchment paper or aluminum foil for easy clean up. Set aside.: The warmth from a properly heated oven brings a deep roast flavor that a lower temperature cannot match. As the oven climbs, you may catch the faint mineral scent of heating metal and the gentle hum of the fan as it stabilizes. This high heat encourages the cut edges of the squash to brown and slightly caramelize, producing a pleasant toasted aroma. A common mistake is placing the squash in before the oven is fully preheated, which can lengthen cooking time and prevent those golden edges. Ensure the rack is centered so heat circulates evenly and the surface can crisp.
- Using a sharp chef’s knife, slice the spaghetti squash in half lengthwise. Scoop out the seeds and ribbing.: When you cut into the squash, you may hear a crisp scrape of the knife through the firm rind that gives way to a denser, slightly moist interior. Working carefully with a sharp chef's knife makes control easier, and the visual cue is a clean, even cut with pale stringy flesh exposed. If the squash resists, take short steady strokes rather than forcing the blade, which can be dangerous. One common error is using a dull knife, which increases the risk of slips; sharpen your blade and stabilize the squash on the cutting board before slicing.
- Place the spaghetti squash on a baking sheet then drizzle the inside with olive oil and sprinkle with salt and pepper. Flip them over so the cute side is down on the baking sheet.: As you remove the seeds, you'll notice a moist, slightly sticky texture, similar to pumpkin guts but finer. Use a sturdy spoon to reach into the cavity and scrape out the seeds and fibrous ribs until the surface feels relatively smooth. This clean interior allows the flesh to roast evenly and ensures the strands separate properly after cooking. Avoid leaving clumps of ribbing, as they can retain moisture and create pockets that take longer to cook. Collect the seeds if you want to toast them separately, but do not leave them in the cavity.
- Place in a preheated oven for 30-40 minutes or until the cut sides are golden brown and they are fork tender, but still a little firm. The time will vary upon your squash.: Once coated, the flesh will glisten slightly and take on a glossy sheen that promotes browning. The oil encourages the sugars at the cut edge to caramelize, while the salt draws out moisture to concentrate flavor. For even seasoning, rotate the squash so oil and spices coat both halves uniformly before flipping them cut side down on the baking sheet. A mistake here is applying oil only to one section, which yields uneven color and texture. Use your hands or a pastry brush to distribute the oil evenly.
- Remove from the oven and flip squash so the cut side is up. Let cool for five minutes. Using a fork, scrape and fluff the strands from the sides of the squash. They should pull off the side easily.: Placing the cut side down produces a small steam pocket against the sheet that helps the inner flesh cook tender without drying, and the skin side develops gentle browning. You may notice a faint sizzling as the squash makes initial contact with the hot metal. If you place them cut side up, the surface will dry and brown differently, which can change texture. Avoid crowding the pan, as overlapping pieces will steam rather than roast, leading to floppy strands.
- Place in a preheated oven for 30 to 40 minutes: As the squash roasts, the kitchen fills with a warm, sweet scent as the natural sugars caramelize. Visual cues include the cut edges turning golden brown and the flesh pulling slightly away from the rind. Because squash sizes vary, begin checking at 30 minutes by inserting a fork into the thickest part, looking for tender flesh that yields easily. A common pitfall is relying only on time; use the fork test to prevent undercooking. If it still feels firm, continue roasting in five minute increments.
- Remove from the oven and flip squash so the cut side is up: After pulling the pan from the oven, the immediate rush of warm, nutty aroma is a sign the sugars have caramelized nicely. Letting the halves rest cut side up for about five minutes allows the steam to settle and cool slightly, making them easier and safer to handle. This brief rest also firms the strands slightly so they separate more cleanly. Avoid rushing to shred while the squash is too hot, which can cause loss of moisture and make the strands mushy.
- Let cool for five minutes: The gentle cooling period is tactile and reassuring, the heat subsiding so your hands can manage the squash without burning. This pause helps the texture set, and you'll notice the flesh pulling away a bit from the rind. If you skip cooling, you risk pulling out strands while the flesh is still too soft and losing that distinct noodle like texture. Be patient, use a towel if needed, and wait the brief interval for best results.
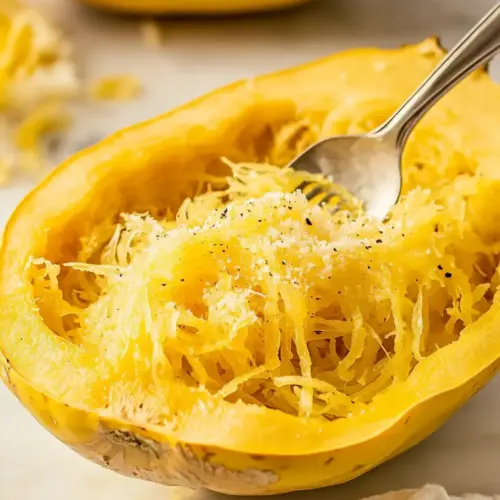
- Using a fork, scrape and fluff the strands from the sides of the squash: As you run the fork along the flesh, the strands reveal themselves with a soft tearing sound and a delicate, noodle like appearance. The aroma becomes milder and more roasted, and the strands should separate cleanly without clumping. Fluffing brings air into the strands, improving mouthfeel and presentation. One common mistake is scraping too aggressively, which can shred the flesh into mush instead of distinct strands. Use gentle pressure and scrape along the length to coax out tidy threads.
- They should pull off the side easily: When properly cooked, the strands emerge with a silky texture and slight resilience, not mushy or crunchy. The visual cue is long, thin ribbons that resemble spaghetti and hold their shape when lifted. If the strands break apart or remain stubbornly attached, it usually indicates under or overcooking, so adjust your next roast time accordingly. Avoid overworking them, as repeated handling can make them waterlogged and limp.
Notes
- Roast with herbs, toss the finished strands with a sprinkle of dried or fresh herbs to shift the flavor profile without extra fuss.
- Garlic butter finish, after shredding, mix with a small amount of melted butter and garlic powder for a rich, savory touch.
- Light tomato sauce, combine with a warm, simple tomato sauce to create a low carb alternative to pasta that soaks up flavors beautifully.
- Citrus brightness, add a squeeze of lemon or a little lemon zest to lift the dish and cut through the roasted sweetness.
- Make ahead, roast and shred the squash up to five days in advance for fast weeknight meals and easy reheating.
- Seed to snack, clean and toast the seeds from the cavity for a crunchy, economical topping that reduces waste.