How To Brine A Turkey
How To Brine A Turkey delivers a juicy, flavorful roast using a simple, classic brine. The combination of salty, herbal, and citrus notes creates tender meat with crisp skin, perfect for an easy weeknight dinner or a holiday centerpiece. This method is forgiving and scalable, making it a must try for anyone who wants reliable, delicious turkey every time.
Equipment
- Brining Bag
- Large Pot
Ingredients
- 1 gallon water Provide the liquid medium that dissolves salt and transfers flavor into the turkey; ensures even moisture throughout the meat and helps tenderize proteins during brining. Can be warmed to dissolve salt then cooled, and chilled fully before adding the turkey to maintain food safety.
- 1 cup kosher salt Act as the primary seasoning and preservative that draws moisture and seasons the turkey through osmosis; helps break down muscle proteins for a juicier texture and balanced salt uptake. Measure accurately to avoid over-salting and dissolve completely in the brine for even distribution.
- 1 head garlic sliced in half lengthwise to reveal cloves Impart aromatic sulfurous notes and mild pungency that deepen the brine's savory profile; slicing the head lengthwise exposes multiple cloves for greater infusion. Place halves directly into the brine so their oils and flavors slowly release during the resting period.
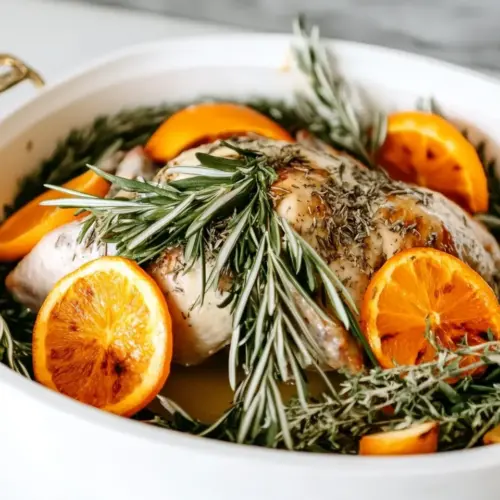
- 4 lemons or oranges, cut into large wedges Contribute bright citrus acidity and sweet-tart aromatics that brighten and balance the brine; large wedges release juice and fragrant oils without overpowering the meat. Use either lemons or oranges for subtle differences in flavor, and bruise rinds slightly to help essential oils seep into the solution.
- 1 cup fresh herbs sage, thyme, oregano, rosemary are all good choices Add a layered herbal character that complements poultry with woodsy, herbal, and slightly peppery notes; a mix of sage, thyme, oregano, and rosemary allows complexity and customization. Tie herbs together or toss loose into the brine so their leaves and stems can infuse flavor over the brining time.
- 1 tbsp whole peppercorns Introduce warm, floral, and slightly spicy notes that add depth and a subtle bite to the brine; whole peppercorns infuse slowly without clouding the liquid. Leave intact to control intensity, and consider lightly crushing a few if a stronger pepper presence is desired.
- 2 Bay Leaves Provide an earthy, slightly floral background aroma that enhances savory flavors; bay leaves contribute subtle bitterness and complexity when steeped in the brine. Use whole leaves to avoid shredding, and remove before cooking if desired for texture and presentation.
Instructions
- Add all ingredients to a large pot and cook over medium-high heat. Bring to a boil, stirring occasionally. Reduce heat and simmer for 30 minutes. Salt should be fully dissolved.: As the mixture warms, you'll notice the steam carrying citrus oils and garlic aromas, and the surface beginning to ripple and steam. The sound is a steady, gentle simmer turning brisk, and visually you'll see bubbles gather and break, which signals active heat transfer. Stirring helps dissolve the salt and distribute the herbs and peppercorns , preventing them from clumping or sticking to the pot. This technique matters because full dissolution of the salt ensures even seasoning; gritty, undissolved salt can create pockets of over seasoning. Avoid rushing with high heat, which can blast off delicate citrus oils and concentrate the liquid too quickly.
- Remove from heat and allow to cool completely.: During the simmer, the kitchen will fill with a mellow, savory perfume from the herbs and a faint citrus brightness. Simmering extracts essential oils from the citrus rinds and pulls flavor from the garlic without driving off volatile notes as boiling would. You'll see the liquid darken slightly and small aromatic particles float, which is normal. This gentle approach matters because it builds depth without bitterness. A typical misstep is letting the pot sit at a vigorous boil, which can make the brine taste flat or cooked; moderate heat keeps the flavors balanced and fresh.
- Place turkey in a brining bag and/or pot with lid large enough to submerge whole turkey in brine.: When the salt has fully dissolved, the brine will look clear rather than grainy, and a small spoonful will feel evenly salted on the tongue. Dissolution is the chemical step that makes the brine effective, allowing ions to interact with the turkey tissue. You might test a pinch between your fingers to feel for grittiness; any grit means a bit more simmering and stirring are needed. Do not assume visual cues alone; tasting a cooled sample is the best confirmation. A common error is leaving undissolved salt, leading to uneven salty pockets in the turkey.
- Pour brine over turkey and cover with lid or plastic wrap.: Once you remove the pot from the stove, the aromas will still be vivid but will mellow as the brine cools. Cooling is critical, because hot brine can raise the turkey's internal temperature and create food safety issues. I usually let the pot sit uncovered until it reaches room temperature, then chill in the fridge until completely cold. You should see no steam and feel a cool temperature when you touch the container. Rinsing a hot turkey is another mistake to avoid, so never place the bird into warm brine.
- Refrigerate for 24-48 hours.: Select a container that allows the brine to envelop every surface of the bird. A heavy duty brining bag or a large stockpot works well. Check for leaks in bags and ensure the pot lid will close or that you can weight the turkey so it stays submerged. The visual cue here is full coverage; if you can spot any exposed skin, the brine cannot do its job evenly. A frequent oversight is using a container that is too small, which forces folds and prevents uniform contact with the brine.
- When you're ready to roast the turkey, remove from brine, rinse and pat dry. Do NOT season with more salt…it is fully seasoned and ready to roast. (Feel free to add other seasonings as desired.) Allow turkey to sit out for about an hour before placing in hot oven.: When you pour the cooled brine, watch how it settles and fills the cavity and spaces under wings and legs. The scent will be less sharp now but still fragrant. Covering is essential to prevent contamination and to keep odors from other fridge items from affecting the turkey. If using plastic wrap, press it close to the surface of the brine to reduce air contact. A mistake here is not weighting the turkey, which can allow pockets of air where the brine does not reach, producing uneven seasoning.
- Refrigerate for 24-48 hours.: In the fridge, the brine works slowly to move salt and flavors into the meat, and you'll notice a subtle change in texture as the turkey firms slightly from the osmotic process. The longer end of the window yields deeper seasoning, but even 24 hours produces significant improvement. Keep the turkey on the bottom shelf to catch any potential leaks. A common misjudgment is leaving the bird in for too long beyond 48 hours, which can start to change texture and make it overly salty.
- When you're ready to roast the turkey, remove from brine, rinse and pat dry.: After removing the turkey from the brine, thoroughly rinse under cold running water to remove surface salt and aromatics, then pat the bird dry with clean towels until the skin is nearly dry to the touch. The sound and feel of patting are satisfying, and dryness is key for achieving crisp skin in the oven. Rinsing also washes away any loose bits that could burn during roasting. Avoid skipping the drying step, a misstep that prevents skin from crisping properly.
- Do NOT season with more salt…it is fully seasoned and ready to roast.: Resist the impulse to add additional salt; the brine has already distributed salt inside the meat. At this point, you can add non salt seasonings for color or aromatic interest, but extra salt risks an over seasoned result. The why is simple, over salting masks the delicate flavors and can pull moisture out. A frequent mistake is misunderstanding that brined meat still needs no external salt, so trust the process and focus on herbs or butter for finishings.
- Allow turkey to sit out for about an hour before placing in hot oven.: Letting the turkey rest at room temperature briefly evens the chill and promotes more consistent cooking, which helps achieve uniform browning. You will notice the skin relax and the bird come closer to room temp, which shortens oven time and reduces the risk of under done interior near the bone. Never leave poultry out for extended periods beyond safety guidelines; one hour is enough to reduce chill without compromising food safety.
Notes
- Brine Ratio: The reliable rule is 1 cup kosher salt per 1 gallon water. If your turkey is larger than your container, scale the liquid and salt proportionally to maintain the same concentration.
- Cooling the Brine: Always cool the brine to room temperature and then chill thoroughly before adding the turkey. Placing a hot turkey into warm brine or vice versa can create food safety concerns.
- Herb Choices: Use a mix of sage, thyme, rosemary, and oregano for a balanced, classic profile. You can adjust the ratio of these fresh herbs to emphasize pine like notes or savory depth depending on your preference.
- Citrus Options: Both lemons and oranges work well. Lemons provide brighter acidity while oranges give floral sweetness. Cut into large wedges to release oils without adding bitterness from pith.
- Timing Window: Brine between 24 and 48 hours. If you are short on time, 24 hours is sufficient; if planning ahead, 48 hours deepens flavor but do not exceed this range to avoid textural issues.
- Storage During Brining: Keep the brining bird on the bottom shelf of the refrigerator in a leak proof container. This prevents cross contamination and keeps the brine at a safe, consistent temperature.