Hot Fudge Sundae Cake
Hot Fudge Sundae Cake is a warm, fudgy one pan dessert with a tender cake top and a gooey chocolate sauce beneath. This easy recipe uses pantry staples to create a creamy, crackly top and a syrupy base that pairs beautifully with cold ice cream, making it perfect for simple gatherings or weeknight treats. Make it for the comforting hot and cold experience.
Equipment
- 8 x 8 glass baking dish
- Spatula
- Measuring Cups
Ingredients
- 1 cup all-purpose flour Provide structure and tender crumb to the cake by forming the base of the dry ingredients; combine with leaveners and liquids to create the batter. Use spooned and leveled measurements for consistent texture and avoid overmixing once liquid is added to prevent toughness.
- 1/2 cup cocoa powder (divided in half) Add deep chocolate flavor and color while contributing to the cake's cocoa intensity; divide usage so part is mixed into the batter and part is reserved for the sauce or topping. Sift before measuring to remove lumps and ensure even distribution for a smooth cake and rich hot fudge.
- 3/4 cup granulated sugar Sweeten the cake and aid in browning while helping with moisture retention in the finished crumb. Dissolve into the dry mix for even sweetness and to balance the chocolate bitterness without overpowering other flavors.
- 2 teaspoons baking powder Leaven the batter to create lift and a light, tender texture by releasing gas during baking; work with the milk and beaten batter to set the crumb. Measure accurately and ensure freshness for reliable rise and even cake height.
- 1/2 cup whole milk Moisten the dry ingredients and provide richness and mouthfeel to the cake batter; interact with leaveners to form the crumb structure. Use at room temperature for better incorporation and to avoid shocking melted butter when mixing.
- 2 tablespoons melted butter Contribute richness and tenderizing fat to the cake, enhancing flavor and creating a softer crumb; melted form blends smoothly into the batter. Use clarified or fully melted butter and mix promptly into warm or room-temperature liquids to prevent re-solidification.
- 2 teaspoons vanilla extract Impart aromatic sweetness and depth to the cake and complement chocolate notes, rounding out the flavor profile. Add with liquids to distribute aroma evenly and avoid overuse to keep vanilla subtle and supporting.
- 1/2 cups semi-sweet chocolate chips Provide pockets of concentrated chocolate and textural contrast throughout the cake or topping when mixed into batter or sprinkled on top. Use semi-sweet chips for balanced sweetness that complements the brown sugar and cocoa, and fold gently to prevent melting prematurely.
- 1 cup packed light brown sugar Introduce deep caramel-like sweetness and additional moisture to the cake, enhancing chewiness and depth of flavor. Pack lightly to measure consistently and incorporate into either the batter or a topping layer for a rich, toffee-like note.
- 1 3/4 cups hot water Create the hot liquid component that activates baking powder and melts reserved cocoa and chips to form a glossy hot fudge layer; the heat dissolves sugars and blooms cocoa for intense chocolate sauce. Pour carefully into the batter or over the cake as instructed to produce syrupy, fudgy texture.
Instructions
- Preheat the oven to 350°F.: When you preheat, you will notice the oven warming up and a dry heat filling the cavity, which ensures the batter begins setting the moment it goes in. This consistent environment helps form a dry, cake like top while the bottom turns syrupy. A common mistake is not preheating, which can yield uneven rising and a gummy texture. Make sure your oven reaches temperature before baking, and if you have an oven thermometer, use it to confirm accuracy.
- In an 8 x 8 glass baking dish, mix together the flour, 1/4 cup cocoa powder, granulated sugar, and baking powder.: The dry mixture should look uniform, with the cocoa giving a rich brown tone and the powder dispersed so there are no clumps. You will smell a faint cocoa aroma, and the texture will be light and sandy. Properly combining the dry ingredients ensures even lift and chocolate distribution. Avoid aggressive sifting that removes air, and do not add wet ingredients until this step is evenly blended to prevent pockets of leavening that cause tunneling.
- Mix in the milk, butter, and vanilla extract until a thick batter forms.: As you stir, the batter will come together into a glossy, slightly thick mass, and you may see streaks disappear as hydration completes. The melted butter adds a sheen and the vanilla scent will bloom. It's important not to overmix, which can develop gluten and make the cake dense. If the batter feels too tight, check your measuring, but do not add extra liquid beyond the recipe, because the top must hold structure while the bottom becomes pudding.
- Stir in the chocolate chips and spread the batter evenly in the baking dish.: Folding in the chocolate chips adds little warm pockets of melting chocolate inside the cake. When you press the batter into the dish, it should be level so the top cooks evenly, and you may see a smattering of chips across the surface. If chips clump, break them apart with your fingers before folding. A frequent error is leaving the batter lumpy or uneven, which leads to inconsistent texture; take a moment to smooth the top with a spatula.
- Combine the remaining 1/4 cup of cocoa powder and brown sugar and sprinkle over the batter.: This layer forms the flavor basis for the sauce after you add hot water. The brown sugar will smell slightly molasses like, and when evenly spread it creates a uniform sweet crust that later dissolves into the fudgy bottom. If you pile the sugar in one spot, the sauce will be uneven, so sprinkle and spread gently. Do not mix this into the batter, the separation is what creates two distinct layers.
- Pour hot water over the top of all ingredients.: As you pour the hot water , you will hear a soft hiss as it hits the dish and begin to see the sugar dissolve and darken into syrup. Pour evenly across the surface so the water soaks down around the sugar and cocoa. The sensory cue is a glossy, darkening film across the top. A common mistake is stirring the water in, which will ruin the layered effect; the water must remain on top to seep through during baking, so pour carefully and do not agitate the surface.
- Bake for 40 minutes or until the cake has formed a dry top and a bubbly, pudding-like bottom.: During baking you will notice steam rising from the pan and small bubbles forming at the edges, which signal that the bottom is setting into sauce. The top should feel springy and slightly set to the touch, not wet. If it bakes too long the top can become overly dry, and if underbaked the center may be raw. Trust the visual cues, and if needed check at 35 minutes for color, then toward 40 to confirm bubbling below.
- Remove the cake from the oven.: The moment you pull the pan out you will smell a deep chocolate aroma and see the bubbling sauce that makes this cake special. Letting it rest briefly helps the sauce settle so serving is cleaner, while still warm. Avoid leaving it in the pan for too long if you want warm sauce, but also give it a short rest so the top firms a bit. Removing too early can cause the center to be too unset, so allow the visible bubbles to subside slightly after pulling from heat.
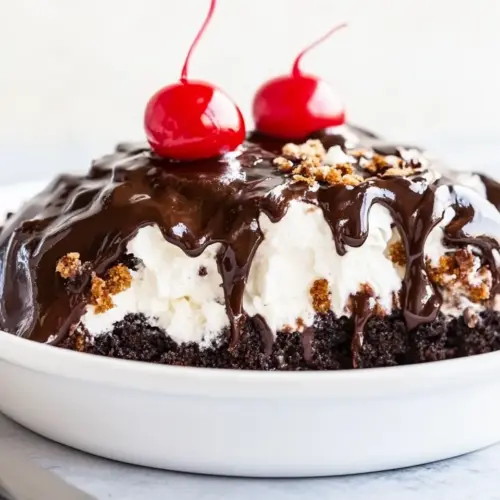
- Serve warm cake with ice cream if desired. Top with whipped cream and a cherry!: The warm plate against a cold scoop of ice cream will create a wonderful contrast in temperature and texture, and you will likely hear soft melting and see a pleasing ripple of cream as it meets warm sauce. Top with whipped cream and a cherry for a classic finish. A typical mistake is serving it straight from oven without a short rest, which can cause a running, less cohesive serving. Spoon carefully so you capture both cake and the syrupy bottom in each portion.
Notes
- Measure carefully: Accurate measurements for flour and cocoa powder ensure the top bakes into a tender cake while the bottom forms a sauce, so spoon and level rather than scooping directly from the container.
- Use hot but not boiling water: Very hot water dissolves the sugars and melts chocolate efficiently without breaking glass dishes, and it helps create a glossy fudgy layer when poured evenly over the top.
- Room temperature milk helps: Cold milk can hinder the batter from blending smoothly; let it sit out for a few minutes so it combines evenly with melted butter and vanilla.
- Even spreading matters: Smooth the batter so the top is level, this promotes even baking and prevents thin edges from overbrowning before the center sets into pudding.
- Serve with cold ice cream: A scoop of ice cream provides the temperature contrast that makes the dessert feel special, and the melting adds a creamy dimension to the fudgy sauce beneath.