Hot Cross Buns
Hot Cross Buns are softly spiced, fruit studded yeast buns with a tender crumb and bright orange scented icing. This easy hands on recipe yields golden, glossy buns perfect for breakfast or brunch, offering warm cinnamon notes and a chewy burst from the raisins. Make them for a festive morning or a cozy weekend bake, they are a crowd pleaser every time.
Equipment
- Kitchen Scale (optional)
- Stand mixer
- 9×13 baking pan
Ingredients
- 1 cup milk 227 grams, lukewarm (105-110°F) Warm and gently heated to activate yeast and dissolve sugar; provides liquid for hydrating flour and creating dough structure. Lukewarm temperature (105–110°F) ensures optimal yeast activity without killing it, contributing to proper rise and tender crumb.
- 1/2 cup granulated sugar 100 grams Sweet and granulated to help feed yeast and balance flavors; contributes to browning and tender texture in the buns. Quantity affects sweetness level and helps with caramelization during baking.
- 0.25 ounces instant yeast 7 grams (1 packet) Powdered and fast-acting yeast used to leaven the dough quickly; initiates fermentation to produce carbon dioxide for rise. Measured precisely to deliver consistent fermentation and airy crumb within typical proofing times.
- 4 cups all-purpose flour 480 grams Versatile, medium-protein flour serving as the primary structure-building ingredient; provides gluten-forming proteins that trap gas from fermentation. Quantity determines dough yield and texture, yielding soft but sturdy hot cross buns.
- 1 teaspoon kosher salt 3 grams Coarse salt used to season and strengthen gluten network; controls yeast activity for balanced fermentation. Small amount enhances overall flavor and improves dough handling.
- 1 teaspoon ground cinnamon 3 grams Ground spice imparting warm, aromatic cinnamon flavor; complements sweet fruit and traditional hot cross spice profile. Adds depth to the dough and stimulates appetizing aroma when baked.
- 1/4 teaspoon ground nutmeg Ground spice adding subtle warm, slightly sweet nutty notes; supports the overall spiced profile without overpowering other flavors. Used sparingly to maintain balance with cinnamon and allspice.
- 1/4 teaspoon ground allspice Ground spice offering a peppery, clove-like warmth to complement cinnamon and nutmeg; enhances the classic hot cross bun spice complexity. Small quantity contributes background aromatic interest.
- 3/4 cup raisins 112 grams Dried fruit providing chewy texture and bursts of concentrated sweetness; distributes fruity pockets throughout the buns. Adds traditional flavor contrast and contributes to moist crumb and visual interest.
- 2 large eggs 100 grams, room temperature Whole eggs at room temperature used for richness, structure, and color; contribute proteins that stabilize dough and enrich crumb. Room temperature helps with emulsification and consistent incorporation into dough.
- 6 tablespoons unsalted butter 85 grams, melted (3/4 stick) Softened and melted unsalted butter delivering fat for tenderness, flavor, and richness; aids in crumb softness and extends shelf life. Measured melted for even incorporation and consistent dough texture.
- 1 large egg 50 grams Whole egg used as an egg wash to promote glossy, golden crust when brushed before baking. Adds light shine and helps glazes or decorations adhere to the surface.
- 1/2 cup all-purpose flour 60 grams Fine flour reserved for making a thick paste for the traditional cross decoration; combines with water to form a pipeable dough. Provides a visible white cross that bakes into a slightly crisp accent on each bun.
- 5 tablespoons water 71 grams Neutral water used to hydrate the cross paste and adjust consistency; creates a smooth, pipeable mixture with the reserved flour. Helps form the decorative cross without altering dough flavor.
- 1/2 cup powdered sugar 57 grams Finely powdered sugar used to make a sweet glaze for finishing; dissolves smoothly when mixed and provides sheen and sweetness on cooled buns. Balances spice and fruit with a bright, sweet finish.
- 2 tablespoons milk 28 grams Additional milk used to thin the glaze for brushing; adds slight dairy richness and helps dissolve powdered sugar for smooth application. Contributes to glossy appearance and pleasant mouthfeel of the glaze.
- 1/2 teaspoon orange zest 1 gram Finely grated orange zest adding bright citrus aroma and subtle tang; enhances overall flavor complexity and complements the sweetness and spices. Small amount lifts the profile with fresh citrus notes.
Instructions
- Combine the milk, sugar, and instant yeast in the bowl of a stand mixer. Let it sit for a few minutes until the yeast becomes foamy 1 cup milk, 1/2 cup granulated sugar, 0.25 ounces instant yeast: The moment you mix warm milk and sugar with instant yeast , you should notice a faint yeasty aroma and tiny bubbles forming on the surface after a few minutes, a visual cue that the yeast is alive and ready. The warmth of the liquid gives an immediate soft steam scent, and the sugar helps the yeast wake up energetically. I often swirl the bowl gently to help dissolve the sugar and check that the yeast is foamy before proceeding. If nothing happens, the likely culprits are water too hot or yeast past its prime, so pause and test with fresh yeast and correctly warmed milk. Avoid adding hot ingredients directly because that will kill the yeast and lead to dense buns.
- In a separate medium-sized bowl, whisk the flour, salt, cinnamon, nutmeg, allspice, and raisins together. 4 cups all-purpose flour, 1 teaspoon kosher salt, 1 teaspoon ground cinnamon, 1/4 teaspoon ground nutmeg, 1/4 teaspoon ground allspice, 3/4 cup raisins: When you whisk these dry components, the scent of cinnamon and allspice will become pronounced, filling the air with warm spice notes. Coating the raisins with flour helps prevent them from sinking during mixing, maintaining even distribution in each bun. Take a moment to break up any clumps so the dough can hydrate uniformly. A frequent mistake is adding the raisins directly without tossing in flour, which can cause them to gather in one area and create uneven bites.
- Add the eggs and butter to the yeast mixture. 2 large eggs, 6 tablespoons unsalted butter: Adding room temperature eggs and warm melted butter creates a silky, rich liquid base that will blend smoothly into the dry mix. You will notice a glossy sheen and a thicker texture once the eggs are mixed in, and the aroma shifts to a buttery, egg rich scent. If the butter is too hot, it will shock the yeast, so ensure it is merely warm. A common error is using cold eggs, which can slow mixing and disrupt dough temperature control.
- Attach the dough hook to the mixer and mix on low until combined, about 1 minute.: As the dough hook engages, listen for a steady, light whir and watch the ingredients come together into a shaggy mass, indicating hydration is working. The surface will look moist and slightly sticky, and you may detect the cinnamon notes rising from the bowl. Mixing too long on high can overwork the gluten and heat the dough, so keep the speed low to develop structure gently. If your mixer strains or the dough clings excessively to the hook, stop and adjust flour a little at a time.
- Add in the flour mixture in 2 installments and continue mixing on low speed for 4-5 minutes, until the dough comes together and pulls away from the sides of the bowl. If the dough seems sticky, sprinkle in a little flour and continue mixing: During this mixing phase, the dough will transform from shaggy to smooth and elastic, and you will hear a change in the motor as the dough hooks into the developing gluten. A properly developed dough should stretch slightly and hold shape without tearing, creating a faint sheen on the surface. If the dough remains overly sticky, add small pinches of all-purpose flour to avoid drying it out, because too much flour yields tough buns. Avoid rushing this stage, since under kneading leaves a dense crumb and over kneading can break down the structure.
- Cover the bowl with a towel, and let the dough rise in a warm place until doubled in size. This will take 45-60 minutes. If your kitchen is cold, let the dough rise in your oven set to 200°F or on its warm setting.: As the dough proofs, you will notice it increase in volume and develop a light, pillowy surface with small gas bubbles visible under the skin; the aroma will become mildly fermented and sweet. This gentle fermentation builds flavor and creates the air pockets that make the buns tender. If the dough does not double, it may need more time or warmer ambient temperature, but avoid pushing it to overproof since that weakens the gluten and flattens the buns. Keep an eye on the dough rather than the clock because exact times vary with room temperature.
- Punch down the dough. Remove it from the bowl and gather it into a ball on a floured surface. Divide the dough into 4 equal parts. Then, divide those pieces into 3 equal pieces for a total of 12 (about 93 grams per bun).: When you gently deflate the risen dough, you should smell a deeper, sweeter yeast note and feel the dough relax under your hands. Dividing into uniform pieces ensures even baking and consistent size for each bun. Use a scale for accuracy and a bench scraper to help portion cleanly. A typical mistake is eyeballing sizes which results in uneven baking, where some buns brown quicker while others remain pale and undercooked.
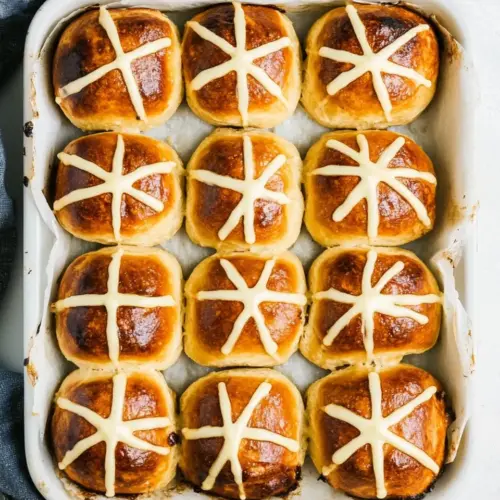
- Roll each piece into a ball and place them in a greased 9×13-inch baking pan.: Rolling creates surface tension on each bun, producing a smooth, taut skin that helps the buns rise upward instead of spreading. When placed snugly in the greased pan, they support each other, yielding soft sides and uniform doneness. Press lightly to ensure contact with the pan if needed. If you roll too loosely the buns will flatten, so take a few extra seconds to create a tight round before placing them in the pan.
- Cover the baking pan with a kitchen towel, and place it in a warm spot to rise for 45 minutes until puffy. Preheat the oven to 350°F while the dough rises..: During this second proof the buns should become noticeably puffy and spring back slowly when touched, signaling readiness to bake. Preheating to 350°F ensures the oven is ready to set the structure quickly, producing a golden crust while keeping the interior soft. If you skip preheating, the buns can overproof while your oven warms and then collapse. Watch for a gentle jiggling and rounded tops as cues to bake.
- Whisk the egg and a couple of teaspoons of water in a small dish. Brush the egg wash over the risen buns. 1 large egg: Brushing with the egg wash creates a glossy, deep golden finish and enhances browning. You will notice an immediate shine after brushing, and during baking the scent of baked eggs and butter intensifies. Avoid over brushing, which can cause streaks or pooling, and be careful not to deflate the buns with a heavy hand during application.
- In a bowl, combine the flour and water, mixing until it forms a paste-like consistency. 1/2 cup all-purpose flour, 5 tablespoons water: This simple paste for the crosses should be thick enough to hold shape when piped, and it smells neutral with a raw flour note until baked. The correct consistency looks like a pipeable paste that does not run. If too thin, add a touch more flour ; if too stiff, add a teaspoon of water at a time. Commonly, folks make it too runny and lose the crisp cross shape during baking.
- Transfer the mixture to a sealable plastic bag, and snip the corner of the bag.: Using a snipped bag as a piping tool gives you control to draw neat crosses on each bun, and it is easy to handle. The tactile feeling of squeezing the bag and watching the paste emerge helps you judge pressure and line thickness. If the snip is too large the lines will be thick and may not bake crisp, so start small and enlarge if needed.
- Once the buns have risen, squeeze the flour mixture in a straight line across each row/column of buns to form a cross on each bun.: Piping the crosses is a visual joy, and once baked they will set into a contrasting pale cross against the golden bun, giving the characteristic look. The sound is subtle, a soft smear as the paste settles, and you should aim for confidence in the motion to keep lines even. Avoid dragging the piping tip which can tear the dough and deflate the buns.
- Bake the buns for 20 minutes until golden brown.: In the oven, you will see the buns gradually take on a warm golden color and smell an intensified aroma of spices and browned butter. The top should be evenly colored and the surface spring back slightly when pressed. Underbaking leaves a gummy interior, while overbaking creates an overly firm crust, so check at around the 18 minute mark and adjust as needed.
- Allow to rest for a few minutes after baking.: Resting lets the crumb set and cool just enough so the buns hold their shape when glazed, and you will notice steam rising and a soft, warm scent lingering. This pause also prevents the icing from sliding off the hot surface. Resist the urge to cut immediately, since very hot steam inside can disrupt texture and make edges gummy.
- Whisk together the powdered sugar, milk, and orange zest. 1/2 cup powdered sugar, 2 tablespoons milk, 1/2 teaspoon orange zest: The icing quickly transforms into a glossy, fragrant glaze, and the citrus oils from the orange zest give a bright contrast to the warm spices. The mixture should be smooth and pourable; if it is too thick, add a little more milk , and if too thin, add a touch more powdered sugar . Overly runny glaze will pool and mask the buns appearance.
- Brush the icing over the buns.: Brushing on the warm glaze creates a shiny, slightly sticky finish that sets as it cools, enhancing both flavor and presentation. The glaze will magnify the orange aroma and offer a gentle sweetness on the surface. Apply evenly with a soft brush to avoid tearing the crust, and allow it to cool on a rack so the bottom stays crisp and not soggy.
Notes
- Use bread flour for chewier buns, swap some or all of the all-purpose flour for bread flour to increase gluten and give a slightly chewier texture while still maintaining tenderness.
- Swap dried fruit if you do not love raisins, try currants, dried cranberries, or chopped dried apricots, keeping total add ins to roughly 1 cup to avoid weighing down the dough.
- Add citrus peel for brightness, fold in small pieces of candied orange or lemon peel along with the raisins to amplify the orange notes in the glaze and create a lively contrast to the spices.
- Adjust spice levels by increasing cinnamon slightly or adding a pinch more allspice for deeper warmth, taste the dry mix to preview the profile before adding to the dough.
- Make mini buns by dividing the dough into smaller pieces for bite sized treats that bake faster and are great for parties, reduce bake time and watch for doneness closely.