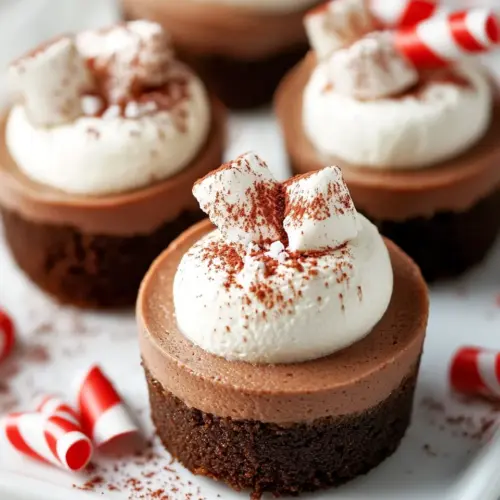
Hot Cocoa Cheesecake Minis
Hot Cocoa Cheesecake Minis are creamy, chocolate forward, and irresistibly festive. These bite size treats combine a crunchy Oreo crust with a silky cocoa cheesecake filling, fluffy whipped cream, and playful marshmallow toppers. Perfect for winter gatherings or holiday cookie swaps, they are easy to portion and impressive to serve, making them an ideal small dessert to share.
Equipment
- Muffin Tin
Ingredients
- 10 OREO cookies Crush into fine crumbs to form a sturdy, chocolaty base that adds texture and flavor to the cheesecake crust; combines well with melted butter to bind and hold mini cheesecakes together. Provides a sweet, cocoa-rich contrast to the tangy cream cheese filling and helps create uniform portions when pressed into molds.
- 1 tablespoon butter, melted Melt to bind the cookie crumbs into a cohesive crust, delivering richness and helping the base hold its shape through baking and chilling. Adds subtle buttery flavor that balances the sweetness of the cookies and reinforces the structural integrity of each mini cheesecake.
- 28 ounce packages PHILADELPHIA Cream Cheese, softened Soften and beat until smooth to create a creamy, tangy cheesecake filling that contributes body, richness, and structure; provides the primary dairy protein and fat necessary for a stable set. Bring to room temperature for even mixing to avoid lumps and ensure a silky texture in each mini cheesecake.
- 1/2 cup + 1 teaspoon sugar, divided Measure precisely and divide to control sweetness in both crust and filling; incorporate part into the filling to sweeten and part into the crust or topping for balanced flavor. Adjust proportion slightly if desired for a less or more sweet final dessert, but maintain measured division for consistent texture.
- 1/4 cup + 1/2 teaspoon unsweetened cocoa powder, divided Sift and divide to contribute deep chocolate flavor without adding sweetness; mix some into the filling for a rich cocoa profile and some into the crust or garnish for extra intensity. Use in measured portions to avoid dryness and to maintain smooth, velvety cheesecake consistency while enhancing overall chocolate notes.
- 2 eggs Whisk in one at a time to emulsify and thicken the filling, providing structure and a tender, custard-like set as it bakes and chills; eggs also help trap air for a lighter texture. Avoid overbeating once eggs are added to prevent a dense or cracked surface on mini cheesecakes.
- 4 ounces BAKER’S semi-sweet chocolate depending on the size of your handles Melt and fold into the filling to create a deep, semi-sweet chocolate core or swirl, enhancing overall chocolate complexity and richness; choose size-appropriate chocolates for easy melting and smooth incorporation. Use tempering or gentle heating to avoid seizing and to maintain glossy, luscious texture within the cheesecake.
- 3/4 cup heavy whipping cream Whip or fold to add creaminess and lighten the filling's texture, contributing volume, silkiness, and a richer mouthfeel; can be whipped to soft peaks and folded in for an airy consistency. Chill properly to help the fat stabilize the cheesecakes and support a smooth, decadent finish.
- 1/2 cup mini marshmallows Scatter or press on top before a final short broil or torching to create gooey, toasty marshmallow accents that add chew and campfire-like sweetness. Use sparingly to complement the chocolate profile without overpowering the delicate cheesecake texture.
Instructions
- Heat oven to 325°F.: You should notice the oven warming and the air around you shifting to a gentle heat, which stabilizes the baking environment and encourages even setting of the cheesecakes. This temperature allows the centers to set slowly without cracking. A common pitfall is skipping preheating, which can cause uneven rise and soggy crusts.
- Pulse Oreo in a food processor until you have a crumb texture. Combine cookie crumbs and butter; press onto bottoms of 12 paper-lined regular-size muffin cups. Bake 8 min.: When pulsing the OREO cookies , listen for a consistent, fine grinding sound and watch for even crumbs, not large chunks. This fine texture helps the crumbs bind with butter and press smoothly into the muffin cups. If the crumbs are uneven, the crust will be inconsistent in texture; scrape the bowl and pulse again until uniform.
- Beat cream cheese, 1/2 cup sugar and 1/4 cup cocoa powder in medium bowl with mixer until blended. Add eggs, 1 at a time, mixing on low speed after each just until blended. Spoon over crusts.: The mixture should hold together when pinched between your fingers, and the bottoms should feel compact and even when pressed with a measuring cup or the back of a spoon. Press firmly to prevent the crust from crumbling after baking, but avoid pressing so hard you compress it into a dense slab. An issue I see is not distributing crumbs evenly, which makes some minis fragile.
- Bake 22 to 25 min. or until centers are almost set. Cool completely. Refrigerate 2 hours.: During this short bake, the butter melts and the crumbs crisp, releasing a warm, toasted aroma. The crust will firm up but should not brown deeply. Remove when the edges feel set to the touch. Overbaking leads to a brittle crust that can shatter when cutting.
- Meanwhile, make the chocolate handles. Cover a baking sheet with parchment. Melt semi-sweet chocolate as directed on package, then spoon it into resealable plastic bag. Cut a small piece off one bottom corner of bag. Squeeze the chocolate into 12 handle shapes on the prepared baking sheet. Freeze until ready to use.: The PHILADELPHIA Cream Cheese mixture should turn glossy and smooth, with no lumps visible. Use medium speed and scrape the bowl often. Properly blended batter smells faintly of cocoa and is silky on the paddle attachment. If you start with cold cream cheese, stop and let it soften more rather than overmixing to break down lumps.
- Remove paper liners from cheesecakes. Beat cream and remaining sugar in separate medium bowl with mixer on high speed until soft peaks form; spoon onto cheesecakes. Sprinkle with remaining cocoa powder; top with marshmallows (we even added crushed candy canes for an extra flair). Gently press chocolate handle into side of each cheesecake.: After each egg , the batter should appear slightly more fluid and cohesive. Mixing on low prevents incorporating excess air, which would create unwanted cracks. The batter should flow slowly off a spoon in a ribbon. A typical error is using a high speed, which traps air and causes the centers to puff and then collapse.
- Spoon over crusts: The filling should sit level on the pressed crust and spread gently when tapped. I use a cookie scoop for even portions so each mini bakes consistently. If the filling fills the cups too high, it can overflow and bake unevenly, so keep portions uniform.
- Bake 22 to 25 min. or until centers are almost set: Watch for the telltale gentle jiggle in the center while the edges are set and lightly puffed, and you may detect a sweet, chocolatey aroma deepening in the oven. When the center moves slightly but the edge appears firm, remove from oven to prevent overbaking. Overcooking results in a dry, crumbly texture instead of a creamy center.
- Cool completely: As they cool, the cheesecakes will settle and the surface may contract slightly, which is normal. Cooling allows steam to evaporate so the texture firms without becoming hard. Cooling too quickly or reheating can cause condensation, which affects the whipped topping later.
- Refrigerate 2 hours: Chilling is when the texture transitions from soft to sliceable and the flavors meld. Refrigeration also makes it easier to remove liners cleanly. Avoid shortchanging this time, or the minis will be too soft to hold their topping and handles.
- Meanwhile, make the chocolate handles: Melt the BAKER'S semi sweet chocolate until smooth and shiny, then fill a bag and pipe handle shapes on parchment. The chocolate should flow smoothly and set to a glossy finish in the freezer. If the chocolate seizes or becomes grainy, gently warm it over a double boiler rather than adding liquid.
- Cover a baking sheet with parchment: This prevents sticking and makes transferring the frozen handles effortless. Parchment also helps the chocolate cool evenly, producing clean edges. Skipping parchment can make removal messy and risk breaking handles during transfer.
- Melt semi-sweet chocolate as directed on package, then spoon it into resealable plastic bag: The chocolate should be fully melted without lumps and glossy in appearance, indicating it is smooth and ready to pipe. Ensure the bag tip is small for neat handles and avoid overheating, which can dull shine and affect texture. If the chocolate is too thick, warm slightly in short bursts to avoid burning.
- Cut a small piece off one bottom corner of bag: This creates a controlled opening for piping. A small hole yields delicate, elegant handles, while a larger cut makes thick decorations that can feel heavy. Test a single handle first to adjust flow and size.
- Squeeze the chocolate into 12 handle shapes on the prepared baking sheet: Pipe consistent shapes so each mini gets a matching handle, watching for even thickness. The handles should be sturdy enough to insert but not bulky. Inconsistently piped handles can break when moved, so steady pressure is key.
- Freeze until ready to use: Freezing quickly sets the chocolate and preserves its form, giving it a satisfying snap. Keep them in a single layer so they do not stick together. Allowing them only to set at room temperature can lead to softness and fingerprints.
- Remove paper liners from cheesecakes: Gently peel the paper away while the minis are chilled, which helps prevent tearing. If they stick, chill a bit longer rather than forcefully removing the liner.
- Beat cream and remaining sugar in separate medium bowl with mixer on high speed until soft peaks form: The heavy whipping cream should become billowy and hold soft peaks that fold easily. This topping lightens the rich filling and adds a clean dairy note. Overwhipping will turn it grainy and eventually butterlike, so stop as you reach soft peaks.
- Spoon onto cheesecakes: The whipped cream should sit atop the chilled cheesecakes like a cloud, with a creamy sheen. Using a spoon or piping bag allows for decorative swirls. If the whipped cream melts, return the minis to the fridge before serving.
- Sprinkle with remaining cocoa powder: A light dusting adds aroma and enhances the chocolate profile without overwhelming the topping. Use a fine sieve for even coverage; heavy dusting can appear ashy and bitter.
- Top with marshmallows: Scatter the mini marshmallows so they nestle into the whipped cream and provide a playful contrast. Add them just before serving for the best texture. Putting them on too early can lead to stickiness and loss of shape.
- Gently press chocolate handle into side of each cheesecake: The frozen handles should slide in cleanly and stand without cracking the filling, adding whimsical presentation and a functional grip. If the filling is too soft, chill the minis longer before inserting handles to avoid breakage.
Notes
- Swap cookie base: Try different chocolate sandwich cookies for subtle flavor shifts, keeping the same crumb to butter ratio to maintain crust structure and pressability.
- Adjust cocoa intensity: Increase or decrease the cocoa amounts to bias the filling toward deeper chocolate or milder cocoa notes, tasting the batter gently before adding eggs as a check.
- Vary chocolate handle size: Pipe smaller, more delicate handles for a refined look, or slightly larger ones for a playful, robust handle that stands out on a dessert tray.
- Whipped cream styling: Use a piping bag with a star tip to create decorative swirls that hold marshmallows and cocoa dust without sinking into the filling.
- Make ahead timeline: Bake and refrigerate the cheesecakes a day in advance, then add topping and handles just before serving for peak freshness and texture.
- Presentation idea: Arrange minis on a platter with extra mini marshmallows and a sieve of cocoa for guests to dust their own, turning serving into a small interactive moment.
- Freezer storage: Freeze assembled minis without whipped cream and handles, then thaw in the fridge before finishing for make ahead convenience.
- Texture tweak: Fold a small amount of whipped egg white or stabilized cream into the batter for an airier finish while maintaining the rich flavor.
- Chocolate tempering tip: If you want glossy, snappy handles, cool melted chocolate quickly in short bursts and avoid overheating to maintain sheen.
- Mini marshmallow timing: Add marshmallows right before serving to preserve their soft chew and avoid stickiness from refrigeration.