Hot Chocolate Cookie Cups
Hot Chocolate Cookie Cups are creamy, festive, and delightfully bite sized dessert treats combining soft store-bought sugar cookie dough, a molten candy center, and playful peppermint handles. Easy to assemble and perfect for holiday gatherings, these cups deliver warm chocolatey notes, crunchy peppermint, and sweet frosting in every bite. Make them for parties or cozy nights in for a guaranteed crowd pleaser.
Equipment
- Oven
- Mini Muffin Pan
- Piping Bag
- Serrated Knife
- Microwave or double boiler
Ingredients
- 24 count Store-bought sugar cookie dough 16 ounce package Used to provide an easy, consistent base for cookie cups that saves time and delivers soft, buttery texture; simply portion and press into muffin tins to form sturdy cups for fillings; accommodates baking times well so interiors remain chewy while edges brown.
- 24 Miniature Reese’s cups unwrapped Placed inside each baked cookie cup to create a rich peanut butter center that melts slightly when warmed; unwrapping before use ensures even placement and prevents wrapping from melting into the cookie cavity.
- 11 ounce package white chocolate chips Melted down to create a smooth, creamy hot chocolate-style coating or drizzle that adds sweetness and glossy finish; can be tempered slightly or microwaved in short bursts for spreading into cups and for dipping toppings.
- 24 Mini candy canes Crushed or halved and used as a peppermint garnish that adds sharp minty contrast and festive appearance; placed upright or scattered across frosting to provide a crunchy texture and bright color.
- 16 ounces tub of white frosting Spread or piped to create a stable, sweet topping that resembles marshmallow-y hot chocolate foam and holds additional decorations; smooths easily and provides an adhesive surface for sprinkles and marshmallow bits.
- Marshmallow bits Sprinkled on top to mimic mini marshmallows in hot chocolate, offering small puffy pieces that add chew and authentic visual appeal; resists melting under normal serving conditions and complements frosting.
- Holiday sprinkles Scattered over frosted cookie cups to add color, sparkle, and crunchy bite for a festive finish; available in assorted shapes and colors that enhance holiday presentation and texture.
Instructions
- Preheat the oven to 350 degrees Fahrenheit and spray a mini muffin pan with non-stick spray.: As the oven warms, you will notice a dry, warm hum that readies the pan for baking, and the non stick spray helps ensure the cookie cups release cleanly. This temperature gives the cookie edges a light golden color while the centers remain tender, which is crucial for forming a sturdy cup. If your oven runs hot, watch for faster browning, and rotate the pan mid bake to ensure even color. A common mistake is skipping the spray, which can lead to stuck cookies that break when removed, so take a moment to coat each cup thoroughly.
- Unwrap your store-bought sugar cookie dough and break it apart. Place a piece of uncooked dough in each mini muffin pan cup. Take a small square of wax paper and press the middle of the dough with your fingers to create a reservoir in the middle of each cookie. Bake in preheated oven for 13 minutes or until slightly golden brown.: When you press the center while the dough is cold, you create a visible indentation that deepens as the dough spreads in the oven, creating a little pocket to hold the filling. The scent of baking sugar will begin to fill the kitchen, a warm, sweet aroma that signals the edges are setting and the centers stay soft. Listen for a gentle quieting as the cookies finish, rather than loud sizzling, which means moisture has evaporated correctly. Avoid pressing too thinly, which can cause the cup to lose structure and flatten during baking; aim for a shallow well that remains after rising.
- Make sure all your miniature Reese’s cups have been unwrapped. Then gather your mini candy canes and, with a serrated knife, carefully cut off the hooks used for the handle of your hot chocolate mug. Set aside the remaining part of the candy cane to use later as a peppermint stir stick.: The act of unwrapping releases the sharp peanut butter aroma and readies the candies for placement, while cutting the hooks gives you a neat, straight piece to attach as a handle. When cutting, the candy will crack crisply and you will see a clean edge, which makes gluing them easier. Keep a small towel nearby to catch sugar shards, and be cautious with fingers near the blade. One error I see is cutting too large a hook which makes the handle awkward to position, so aim for a slim piece that looks proportional to the cookie cup.
- Place your store-bought white frosting in a piping bag and set it aside. Make sure your marshmallow bits and holiday sprinkles are ready.: Preparing the piping bag early means you can add the finishing touches quickly while the cups are still warm, and having garnishes prepped ensures a smooth assembly line. The frosting should be smooth and slightly glossy in the bag, and the marshmallow bits and sprinkles should be within arm’s reach for efficient topping. If the frosting is very stiff, knead the tub briefly to soften it, but avoid adding liquid which can change texture. A pitfall is waiting until the last minute to prep, which can cause frosting to thicken or set before you finish assembling the tray.
- Once the cookies are done, remove them from the oven and press one mini Reese’s cup in the center of each cookie. Repeat until all cookies have a miniature peanut butter cup.: When you press the candy into the warm cookie, you will feel a gentle sink as the chocolate meets the soft dough, and the peanut butter scent melds with baked sugar. The residual warmth slightly melts the candy edges, helping it nestle into the center for a fudgy bite. Work carefully so each candy sits centered, and avoid pressing too deep which could pierce the base of the cookie. A frequent mistake is waiting too long to add the candy, which prevents it from settling into the cookie for that molten effect.
- Then take your prepared peppermint sticks and insert them at an angle near the edge of the cookie cup. Set the cookies aside to cool for at least 20 minutes.: Inserting the peppermint stick while the cookie is still warm helps it adhere slightly and creates an attractive, angled handle that evokes a mug stirrer. As the cookie cools, the structure firms up and the stick sets in place, giving a stable garnish. Cooling also allows the melted candy center to settle without running over the edges. Avoid moving the pan too soon, which might smear fillings; be patient and give the full cooling time to prevent collapse.
- Melt 1 tablespoon of white chocolate chips to use as the glue for your hot chocolate cookie cup assembly. Use your glue to place our previously prepared handles on the side of the cookie cup. Repeat for all cookie cups and set them aside to dry for at least 10 minutes.: The melted white chocolate chips will become a glossy, slightly viscous glue that sets firm as it cools, securing the peppermint handles in place. You will notice a sweet, milky aroma as the chocolate melts, and the thin ribbon of melted chips is easy to dab with a small spoon to attach the handle. Work quickly, because white chocolate cools and firms, and avoid overheating which can make it grainy and unusable. A typical mistake is using too much glue which leaves visible blobs; use small dots to create a neat attachment.
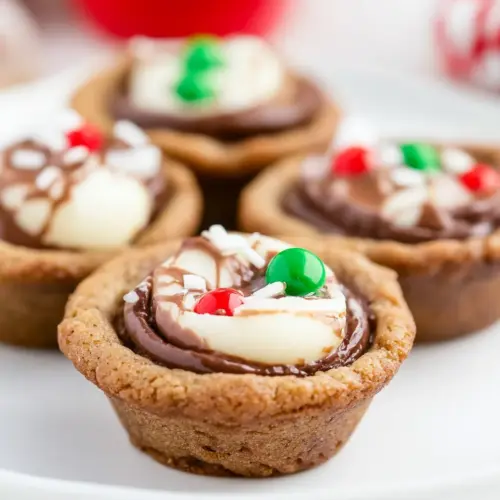
- Once the handles are dry, take your prepared piping bag of icing and pipe a tiny dollop of whipped cream on your hot chocolate.: Pipe a gentle swirl or dot of white frosting into the center, watching it sit like a miniature cloud atop the warm cookie surface. The contrast of the cool, sweet frosting with the warm cookie is delightful, and visually it reads like whipped cream crowning a cup of cocoa. If the frosting flops or spreads too much, it was likely too warm or too thin, so chill briefly and try again. One common misstep is piping too large a mound which overwhelms the cup, so aim for modest, pretty dollops.
- Finally, sprinkle your desired amount of holiday sprinkles and marshmallow bits on top.: The finishing scatter of marshmallow bits and holiday sprinkles adds crunch, color, and that unmistakable hot chocolate vibe. You will hear the faint clink of sprinkles and see the tiny marshmallows nestle into the frosting, creating a playful texture contrast. Apply lightly so the toppings complement rather than overpower the flavors. Avoid piling on too many sprinkles which can make each bite overly sweet and distract from the cookie and chocolate balance.
Notes
- Use flavored frosting: Swap the white tub for a mint or cream cheese style frosting to introduce a new note that complements the peppermint handle.
- Change the candy center: Replace miniature Reese’s cups with a different small candy to alter texture and flavor while retaining the molten center idea.
- Adjust topping intensity: Use fewer holiday sprinkles for a subtler look or choose a single color to match a party theme.
- Make ahead strategy: Bake the cookie cups and store them unfilled in an airtight container, then assemble with candy, handles, and frosting the day of serving for maximum freshness.
- Gently warm before serving: If you prefer the center extra gooey, warm the assembled cups briefly in a low oven, watching closely to avoid melting the frosting and sprinkles.