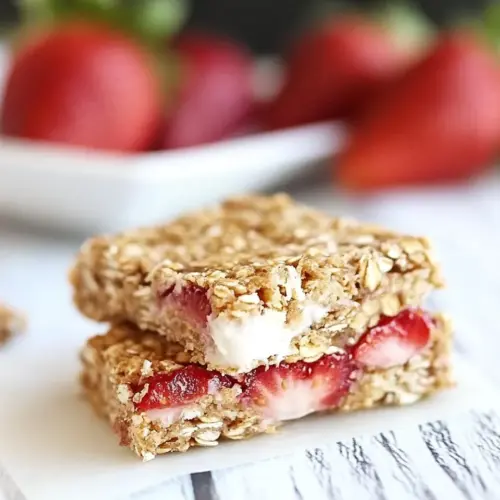
Homemade Strawberry Nutri Grain Bars
Homemade Strawberry Nutri Grain Bars are a chewy, slightly crisp grain bar filled with jammy strawberry center, offering a wholesome, easy snack. The combination of whole wheat flour and old fashioned oats creates a rustic texture, while grated cold butter and egg yolks keep the crumb tender. Perfect for an easy weeknight bake or portable breakfast, these bars are worth making for their nostalgic flavor and reliable results.
Equipment
- Mixing Bowl
- Box grater
- Rolling Pin
- Baking Sheet
- Parchment Paper
- Freezer
Ingredients
- 1 cup Whole Wheat Flour Provide a hearty base and structure to the bars, supplying fiber and a nutty flavor that complements the oats. Contribute to the overall texture by absorbing moisture and helping the dough hold together when baked. Add whole-grain nutrition and a subtle depth that keeps the bars from tasting overly sweet.
- 3/4 cup Old Fashioned Oats Offer chewiness and rustic texture while enhancing whole-grain character; oats also absorb moisture and bind with the flour to form the bar crumb. Contribute to a pleasing mouthfeel and help control spread during baking. Provide additional fiber and a toasty flavor when toasted in the oven.
- 1/4 teaspoon cinnamon Add warm, aromatic spice that brightens the flavor profile without overpowering; cinnamon balances the sweetness of the jam. Enhance perceived sweetness so less sugar is needed while lending a familiar baked-goods aroma. Pair well with both grains and fruit to create a rounded taste.
- 1/4 teaspoon kosher salt Bring subtle savory balance to the sweet components and enhance overall flavor complexity. Help accentuate other flavors by reducing flatness in the dough. When dissolved in the wet ingredients, salt improves the texture and controls fermentation-like flavor development.
- 6 tablespoons cold unsalted butter, grated Contribute richness, flakiness, and tender crumb by coating flour proteins and inhibiting gluten formation. Provide butterfat that melts during baking, creating pockets of tenderness and a satisfying mouthfeel. Using cold, grated butter ensures a sturdier, crumble-like texture that helps bars hold their shape.
- 2 egg yolks Help bind the dough and provide richness without the extra water of whole eggs, contributing to a denser, tender crumb. Add emulsifying properties that improve texture and cohesion between dry and wet ingredients. Offer color and a slight custardy note to the finished bars.
- 2 tablespoons plain greek yogurt Provide moisture, slight tang, and creaminess that tenderize the crumb while contributing beneficial protein. Act as a partial substitute for heavier dairy or fats, keeping bars moist and giving a subtle acidity that balances sweetness. Improve texture by interacting with flour and fats for a smoother dough.
- 2 tablespoons honey Add natural sweetness and act as a binder and humectant to keep bars moist over time. Contribute flavor complexity with floral or fruity notes depending on the honey type and help brown the surface during baking. Help preserve freshness by attracting and holding moisture.
- 2 teaspoons vanilla Provide aromatic depth and enhance other flavors with warm, sweet-vanilla notes. Work as a flavor enhancer that rounds out the sweetness of jam and honey while contributing a familiar baked-goods aroma. Complement both the grainy base and fruity filling for a harmonious profile.
- 1 cups strawberry jam, homemade or store-bought Supply the fruity, sweet filling that defines the bars and offers concentrated strawberry flavor and moisture. Act as both a flavor focal point and a textural contrast to the crumb, providing spreadable fruit goodness that melds with the dough during baking. Choose a jam with good set to avoid overly runny filling.
- buttermilk, for brushing Be used sparingly to create a golden, slightly shiny finish on the bars and help toppings adhere if applied. Add a touch of tang and encourage browning for an appealing appearance without altering the internal texture. Brush thinly to avoid adding excess moisture while improving the crust.
Instructions
- Preheat the oven to 350 degrees F. In a large bowl, mix the flour, oatmeal, cinnamon, and salt together. Add the butter and toss to coat. Add the egg yolks, yogurt, honey, and vanilla and mix until combined, adding 1 tablespoon of cold water at a time until the dough comes together and forms a ball. Turn the dough out onto a floured surface. Roll out into a 1/8-inch thickness. Cut the dough into about 4" x 4 1/2" squares. Place a heaping tablespoon of jam down the center of each square, leaving about 1/4 inch border. Brush the borders with buttermilk. Fold one side up and over the filling and then pinch the dough together at either end. Do the same for the other side and use your fingers to seal the dough together at the seams. Carefully roll the bar over and place the seam side down on a baking sheet lined with parchment paper. Repeat with remaining dough. Cover the bars and place the baking sheet in the freezer for 10-15 minutes. Once chilled, brush the tops of the bars lightly with buttermilk and transfer to the oven, bake on the middle rack for 15-20 minutes or until lightly golden brown on top, do not over bake. Allow to cool 5-10 minutes, then carefully transfer the bars to a glass container with a lid, layering them between pieces of parchment paper. This will trap in heat and moisture, and slightly steam the bars, ensuring they remain soft. Store in an airtight container for up to 3 days or in the fridge for longer. These can also be wrapped in plastic wrap and frozen, thaw for 1 hour.: As you wait for the oven to warm, you should smell a neutral warmth from the oven as it cycles, signaling readiness. Preheating ensures the thin dough sets quickly, producing a tender crust and a golden top. If you skip preheating, the bars may spread unevenly and the texture can become dense. A common mistake is setting the wrong rack; use the middle rack for even heat circulation.
- In a large bowl, mix the flour, oatmeal, cinnamon, and salt together: When you whisk these dry ingredients, you will notice the aroma of toasted oats and the faint spice of cinnamon . This even distribution is crucial for consistent bites. Mixing thoroughly prevents pockets of salt or spice that can throw off the flavor. Avoid overmixing once wet ingredients are added, as that can develop gluten and toughen the crust.
- Add the butter and toss to coat: The grated cold unsalted butter should feel cool and slightly granular against the dry mix, coating flakes of oats and flour. Tossing ensures every bit gets a touch, which helps create flaky texture as the butter melts during baking. If the butter gets too warm, chill the bowl briefly to prevent a greasy dough. A mistake is rubbing in the butter too long, which can lead to a greasy rather than flaky crumb.
- Add the egg yolks, yogurt, honey, and vanilla and mix until combined, adding 1 tablespoon of cold water at a time until the dough comes together and forms a ball: As you bring these wet ingredients into the dry, you'll notice the dough slowly gathering into a cohesive mass, smelling richer from the vanilla and honey . The yolks add silkiness, while the plain greek yogurt keeps the dough tender. Add water sparingly so the dough does not become sticky, and stop as soon as it holds together. Overhydration leads to a slack dough that spreads during baking.
- Turn the dough out onto a floured surface: The dough should feel slightly cool and pliable under your hands. Flour the surface lightly to prevent sticking, and move gently so you do not compress the dough excessively. If the dough is too soft, chill it briefly; handling warm dough can cause the butter to soften and ruin the texture. The usual error here is adding too much flour, which dries the dough.
- Roll out into a 1/8-inch thickness: Rolling to an even thickness yields uniform baking, and you should see a smooth, slightly grainy surface studded with oats. The thinness is key for the right bar texture, producing a tender crust that crisps at the edges. Use a light dusting of flour on the roller to avoid tearing. Rolling too thick will yield doughy centers, while too thin may crack around the filling.
- Cut the dough into about 4" x 4 1/2" squares: The sound of the pastry knife is soft as it slices through, and the edges should be clean. Uniform pieces bake evenly and make portioning simple. If shapes are uneven, some bars will bake faster than others. A slip here can create irregular bars that brown unevenly.
- Place a heaping tablespoon of jam down the center of each square, leaving about 1/4 inch border: The jam should sit bright and glossy, and you will feel the slight resistance as you spoon it onto the dough. Leaving a narrow border prevents leaks when you fold and seal. If the jam is too runny, blot a bit on a paper towel before using. Overfilling is the common mistake that causes jam to escape during baking.
- Brush the borders with buttermilk: Brushing the edges with buttermilk creates adhesive moisture that helps the dough seal and yields a golden finish on top. The smell is faintly tangy and the sheen helps the seam stay shut. Insufficient brushing can result in unsealed seams that open in the oven.
- Fold one side up and over the filling and then pinch the dough together at either end: As you fold, press gently to remove air and ensure the jam is enclosed, creating a neat seam. Pinching at the ends helps trap the filling and prevent leakage, and you should feel the dough bond under your fingers. If fingers are too warm, use a fork or chill briefly; warm hands can melt butter and weaken the seal.
- Do the same for the other side and use your fingers to seal the dough together at the seams: Sealing both sides creates a snug pocket. When sealed correctly, the seam feels secure and the bar holds its shape when lifted. Work quickly to avoid softening the dough. A common slip is leaving tiny gaps at the seam, which will let jam escape during baking.
- Carefully roll the bar over and place the seam side down on a baking sheet lined with parchment paper: Setting the seam down helps keep the bars intact and gives a clean appearance on top. The parchment prevents sticking and makes transfer effortless. Make sure the bars are spaced to allow heat circulation, otherwise edges may brown unevenly.
- Repeat with remaining dough: As you continue, the dough may warm slightly; if that happens, pop the tray in the fridge to firm up. Consistency at this stage ensures even baking across batches. A mistake is crowding the tray which causes uneven heat exposure and less crisping.
- Cover the bars and place the baking sheet in the freezer for 10 to 15 minutes: Chilling solidifies the butter pockets and helps the bars hold shape in the oven, producing flakier texture. The freezer will feel cold and the dough will firm but not freeze solid. If you skip this, bars can spread and lose flaky texture. Do not chill too long or the jam may become excessively stiff.
- Once chilled, brush the tops of the bars lightly with buttermilk and transfer to the oven, bake on the middle rack for 15 to 20 minutes or until lightly golden brown on top, do not over bake: In the oven you will notice an inviting aroma of toasted grains and warmed strawberry jam . Watch for a gentle golden hue on top, and a faint bubbling near seams as indicators of doneness. Overbaking dries them out, so remove once golden rather than deeply browned. A frequent error is leaving them in until too dark which yields a drier texture.
- Allow to cool 5 to 10 minutes, then carefully transfer the bars to a glass container with a lid, layering them between pieces of parchment paper: Cooling lets the filling set slightly and keeps the bars tender. Layering with parchment prevents sticking and traps a little steam that keeps them soft. If you stack hot bars without separation, they will sweat and stick together. Avoid sealing the container while the bars are very hot, as that can make them soggy.
- This will trap in heat and moisture, and slightly steam the bars, ensuring they remain soft: The trapped steam is gentle, producing a soft bite rather than a crisp, which many people prefer for these bars. Check after an hour to ensure they are not overly moist. If you notice condensation, open the lid briefly to release steam and prevent sogginess.
- Store in an airtight container for up to 3 days or in the fridge for longer: At room temperature they stay soft and ready to grab, while refrigeration extends shelf life but may firm them slightly. Bring refrigerated bars to room temperature before serving for the best texture. Placing them in a sealed container too long increases the chance of moisture transfer.
- These can also be wrapped in plastic wrap and frozen, thaw for 1 hour: Frozen bars are great for long term storage, and thawing for an hour restores a pleasant, tender texture. Wrap tightly to prevent freezer burn. Freezing too long can dull the fresh jam flavor, so consume within a couple months for best taste.
Notes
- Grate the butter: Grating cold unsalted butter yields tiny flakes that integrate into the dry mix more evenly than cubing, producing flakier results and preventing greasy spots.
- Use chilled baking sheets: If your kitchen is warm, place the baking sheet in the fridge while you shape the bars so the dough stays cool when transferred.
- Measure jam by consistency: If your strawberry jam is very runny, consider reducing it on the stovetop briefly to thicken, or blot excess moisture on a paper towel before assembling.
- Brush with buttermilk for color: A light brush of buttermilk gives a golden sheen and helps seams adhere, while adding a touch of tang to the crust.
- Freeze before baking: Ten to 15 minutes in the freezer firms the bars so they keep neat shapes and develop flakier texture when baked.