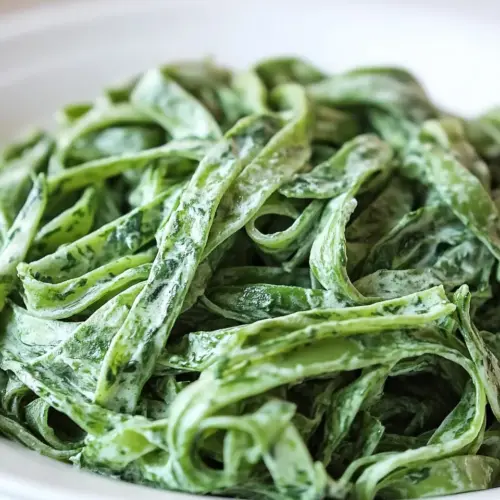
Homemade Spinach Pasta
Homemade Spinach Pasta is a creamy, vibrant, and easy weeknight dinner that brings fresh spinach into the dough for color and flavor. This recipe yields tender, spring green noodles with a satisfying bite thanks to a blend of semolina flour and all-purpose flour. Perfect for simple butter sauces or light cream finishes, it's a reason to make pasta from scratch.
Equipment
- Food processor 6 to 10 cup
- Pasta roller and cutter
Ingredients
- 8 oz spinach fresh, washed and stems removed Wilted and finely chopped to provide vibrant color and moisture to the dough; helps incorporate natural greens and nutrients into the pasta. Use well-drained spinach to avoid excess water that can make the dough too sticky, and pulse or chop evenly for a consistent texture. Blanching briefly can deepen color and soften leaves for easier blending into the eggs.
- 2 large eggs room temperature Beaten and brought to room temperature to bind the flours and create a smooth, elastic dough; provides structure and richness through proteins and fat. Whisk gently with the spinach purée and oil to ensure even hydration of the flours, and adjust slightly if the dough feels dry or too wet. Using large eggs gives a predictable liquid and protein ratio for reliable dough development.
- 1 tablespoon olive oil Poured in to add fat that enriches the dough and improves pliability, resulting in a silkier texture and easier rolling. Incorporate with the eggs and spinach to distribute fat evenly and prevent the dough from becoming tough. A modest amount prevents greasiness while contributing to flavor and mouthfeel.
- 1/2 teaspoon salt Sprinkled to enhance flavor balance and strengthen gluten formation slightly; also helps season the final pasta bite. Dissolve into the egg and spinach mixture to ensure even seasoning throughout the dough, and taste cautiously as some flours may already carry sodium. Salt also subtly affects dough handling properties during mixing.
- 3/4 cup semolina flour Added to contribute a coarse, nutty texture and increase firmness in the finished pasta; helps create a toothy bite and improves sauce adherence. Combine with all-purpose flour to balance protein content and produce dough that holds shape well when rolled and cut. Use measured amounts to prevent an overly dense or crumbly texture.
- 1 cup all-purpose flour plus more for handling pasta Combined as the primary flour to provide gluten-forming proteins that give the pasta its structure and elasticity; also used for dusting during handling to prevent sticking. Mix with semolina for a balanced texture and knead until smooth and elastic, adding extra for dusting as needed while rolling. Choose all-purpose flour for an approachable, versatile dough consistency.
Instructions
- Bring a pot of salted water to a boil.: The sound of a vigorous boil and the steam rising tells you the water is ready; adding salt now seasons the spinach as it cooks. This matters because properly salted water enhances the vegetal flavor and shortens cooking time. A common mistake is under-salting, which yields bland greens, or over-salting, which cannot be undone.
- Cook spinach for about 2 to 3 minutes, until fully wilted.: You will notice the leaves quickly shrink and darken, releasing a fresh, green aroma that signals tenderness. Cooking just long enough preserves color and flavor while softening the fibers so they puree smoothly. If you overcook, the spinach becomes waterlogged and loses brightness, so watch the pot closely.
- Drain spinach, when cool enough to handle, press out excess water. Roughly chop with a large knife. Set aside.: After draining, squeezing the spinach removes trapped moisture, which is crucial so the dough consistency stays correct. The chopped spinach should feel moist but not dripping, its scent concentrated. A pitfall is skipping this step, which leads to a sticky dough that needs too much extra flour.
- In a small bowl, add the eggs, olive oil, and salt. Mix together with a fork.: Whisking the eggs with olive oil creates an emulsion that helps distribute fat evenly through the dough, making the texture smoother. The mixture should look glossy and uniform. If it separates, whisk longer and ensure the eggs are at room temperature.
- Add egg mixture to a food processor and pulse a few times. Add the cooked spinach and pulse several times until combined with the egg mixture.: Pulsing builds a uniform green purée while keeping some texture. The aroma at this stage is a concentrated blend of egg and greens, and you should see a consistent color. Over-processing can make the mix too wet, so pulse in short bursts.
- With the motor running, slowly add the semolina flour through the tube. Next, add the all-purpose flour. Keep processing, pulsing if desired, until a ball forms. You may need to add more flour if the dough is too wet to form a ball.: As the flours hydrate, the mixture will change from sticky paste to a cohesive mass that clings together. This is the tactile cue that gluten is forming and the dough is ready to be handled. If you add too much flour at once, the dough turns dry and tough, so add gradually.
- Dust hands with flour, and remove the dough from the food processor. Dust the dough with plenty of flour, and form into a ball.: Handling the dough after processing lets you feel its elasticity. It should be supple and slightly tacky, not sticky. The scent is a blend of toasted flour and bright greens. If it sticks to your hands excessively, work in a touch more flour, but not so much that the dough becomes crumbly.
- Divide into 4 ths, and cover each with plastic wrap, place in the refrigerator, and let rest for 10 minutes.: Resting relaxes the gluten, so the dough rolls more easily and resists springing back. You will notice the dough smooth out and the surface become less tacky. Skipping rest makes rolling harder and increases tearing risk.
- Take the first 4 th of the dough, and flatten with your hand into a round disc, dusting with flour if too wet to the touch.: Flattening creates a manageable shape for rolling, and you will feel the dough yield under gentle pressure. Keep it lightly floured to avoid sticking. If you press too hard, the dough can become uneven, so work gently.
- Use a rolling pin to flatten the dough into a rectangle.: Rolling by hand gives you control over thickness and develops texture. You should hear a faint friction sound and see the dough thin into a consistent sheet. Uneven pressure will cause thin spots, so rotate the dough as you roll.
- Fold the right side in, and then the left, and roll again to flatten. Repeat this 5 times.: Folding and rolling builds layers and strengthens the dough, creating a smoother surface that feeds evenly through the pasta roller. You will notice the dough become more elastic and less ragged. Overdoing folds can create tight layers that are hard to flatten, so keep it controlled.
- Attach the pasta roller to your stand mixer, and place it on the widest setting. If using a manual pasta roller, set it to the widest setting.: Setting the roller wide reduces stress on the dough and gives you a gentle first pass. The machine should produce a steady whir as the sheet passes through. Forcing dough through too thin a setting initially can tear it.
- Carefully lower the dough through the roller.: As the sheet moves through, you will hear a smooth mechanical feed and see the dough transform into an even band. Keep hands steady and use a light touch. Rushing can cause the sheet to wrinkle or snag.
- Continue to fold the edges in, like an envelope, for another 5 times, keeping the roller on the widest setting.: This repeats the smoothing action, aligning gluten strands and producing a uniform sheet for subsequent thinning. The dough should feel firmer and more resilient. If the sheet gets too warm, chill briefly, since warmth can make it sticky.
- The dough is now ready for turning into pasta. Move to the next setting and place the dough through the roller. Move to the next setting. Continue this process until you've reached the desired thickness of the pasta. You may need to cut the pasta sheet in half during this process. If desired, change to the linguine or angel hair attachment, and then cut the pasta.: Each pass reduces thickness incrementally, producing a silky sheet that bends without tearing. Watch for evenness and listen for a steady feeding noise. Cutting too early yields thick noodles, while over-thinning can produce fragile strands.
- Once ready, place on a baking sheet lined with parchment paper that has been sprinkled with semolina. Sprinkle with more semolina. Cover the pasta with a kitchen towel.: The semolina prevents sticking and gives a slight texture to the surface, while the towel protects from drying out. The pasta will feel dry to the touch but still pliable. If left uncovered, the edges will become brittle and may break during cooking.
- Repeat the process with each other quarters of the pasta. As one layer is filled on the baking sheet, place parchment paper on the pasta, sprinkle with more semolina, and continue.: Working in batches keeps the sheets fresh and prevents them from clumping. The smell of flour and greens will fill the kitchen, and spacing sheets properly avoids sticking. Crowding the tray causes the pasta to fuse together.
- Once the pasta has been rolled out, bring a large pot of salted water to a boil.: A large volume of water helps the pasta move freely and cook evenly, and the salted water seasons the noodle from within. The boil should be energetic, producing rolling bubbles. Using too small a pot can lead to clumped, unevenly cooked pasta.
- Drop the pasta into the boiling water and cook for 3 minutes, or until fully cooked.: Fresh pasta cooks quickly, and you will notice it float and the texture become tender yet slightly firm to the bite. Taste a strand for doneness, aiming for a pleasant chew. Overcooking makes it soft and limp, so test early.
- Drain. The pasta is now ready to use in your favorite pasta recipes!: After draining, the pasta should look glossy and hold its shape. If you plan to toss it with sauce immediately, reserve a little cooking water to adjust consistency. Rinsing will remove surface starch and reduce sauce adherence, so avoid rinsing unless storing for later use.
Notes
- Room Temperature Eggs: Always bring the eggs to room temperature before mixing so they incorporate smoothly and create a cohesive dough.
- Spinach Drainage: After cooking, squeeze the spinach thoroughly in a clean towel to remove excess water which otherwise forces you to add too much flour and dry out the pasta.
- Gradual Flour Addition: Add the semolina flour and all-purpose flour slowly while the processor runs to achieve the ideal dough texture without over drying.
- Rest Time Matters: Resting the dough for about 10 minutes relaxes the gluten so rolling is easier and sheets stay elastic rather than springing back.
- Semolina Dusting: Sprinkle semolina on the parchment and between layers to keep strands separate and to preserve texture when cooking.
- Reserve Pasta Water: Keep a cup of the starchy cooking water to help the sauce adhere and create a glossy finish.