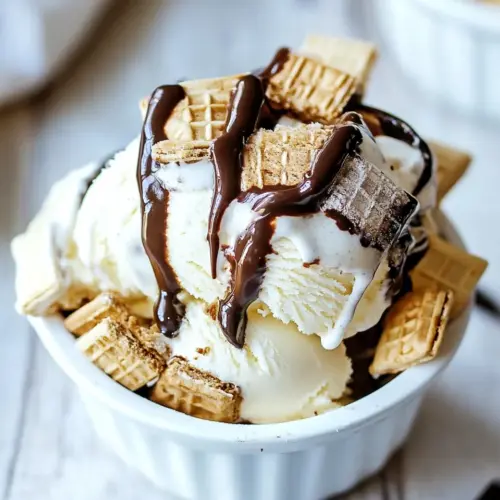
Homemade S'Mores Ice Cream
Homemade S'Mores Ice Cream is an indulgent, creamy frozen treat that blends toasted marshmallow smokiness, crunchy graham cracker bits, and ribbons of chocolate sauce for nostalgic campfire flavor. This easy to make dessert yields rich custard texture and playful layers, perfect for entertaining or a special summer dessert. Try it for its balanced textures and irresistible aroma that make it worth the effort.
Equipment
- Ice Cream Maker
Ingredients
- 5 large egg yolks Whisk vigorously to incorporate into the custard base; yolks provide richness, structure, and a silky texture when tempered with hot milk and cream. Cook gently to thicken without curdling, producing a smooth ice cream foundation with a deep, custardy flavor.
- 1 cup sugar divided Divide between initial custard cooking and optional sprinkling; sugar sweetens and helps control freezing point for scoopable texture. Dissolve fully into warm milk before adding yolks to ensure even sweetness and smooth consistency in the finished ice cream.
- 2 cups whole milk Heat slowly as part of the custard mixture; whole milk adds body and contributes to the liquid base that carries flavors. Combine with cream to balance fat content, promoting a creamy mouthfeel while allowing the egg yolks to thicken the mixture when heated.
- 1 1/2 cups heavy cream Whip richness and creaminess into the base; heavy cream increases fat content for a luxurious, smooth texture and slow melting properties. Blend with milk to create the proper fat-to-liquid ratio that yields a dense, velvety ice cream.
- Pinch Kosher salt Season subtly to enhance overall flavor; a pinch of kosher salt amplifies sweetness and balances the richness of the custard. Dissolve into the warm mixture to integrate evenly and brighten the chocolate and marshmallow notes.
- 10 oz marshmallows large, or jumbo, leave a few for garnish, if desired. Toast or fold in to create characteristic s'mores flavor and gooey texture; large or jumbo marshmallows can be gently browned for smoky sweetness before mixing. Reserve a few for garnish if desired, and fold in pieces near the end to retain soft pockets of melted marshmallow.
- 2 teaspoons vanilla extract Stir in at the end of cooking to impart a familiar vanilla aroma and round out flavors; vanilla extract enhances sweetness perception and complements chocolate and graham components. Add after the custard has cooled slightly to preserve volatile flavor compounds.
- 1 1/2 cups graham cracker roughly chopped, plus extra for garnish Crumble or pulse roughly to provide crunchy, honey-toasted notes reminiscent of classic s'mores; roughly chopped graham crackers add texture and a toasty, slightly sweet base flavor. Fold in during churning or after to retain some crunchy pieces for contrast against the creamy custard.
- 1 cup chocolate sauce click for recipe Drizzle or ripple through the churned ice cream to introduce concentrated chocolate flavor and a fudgy texture; chocolate sauce creates ribbons that freeze to soft, scoopable layers. Swirl in gently toward the end of churning to distribute without losing ribbon definition.
- 1 chocolate bar for garnish, optional Garnish as desired to enhance presentation and add fresh chocolate shards for extra crunch and visual appeal; a chocolate bar can be shaved over servings. Optional use allows customization of sweetness intensity and decorative finishing touches.
Instructions
- Add the egg yolks and sugar to a medium-sized bowl. Use a hand mixer on low speed or whisk, and beat until the mixture is pale and slightly thickened, about 2 minutes.: Feel the mixture change under the whisk as air is incorporated, creating a pale, ribbon like texture, which gives the custard body. The slight sweetness from the initial sugar helps dissolve during tempering, ensuring a smooth base. If you rush or skip aerating, the yolks may scramble when hot liquid is added, so always whisk steadily and avoid high speed. Listen for a faint soft sound as the mixture becomes homogeneous, and visually check for that pale, slightly thick appearance that signals readiness.
- Next, in a medium saucepan over medium-low heat, whisk together the milk, cream, 1/2 cup of sugar, and salt. Bring the mixture to a low simmer.: As the cream warms you will notice steam rising and the aroma of dairy becoming richer, a cue that proteins are loosening for a smooth custard. Whisking prevents a skin from forming and keeps the texture uniform. Maintain medium-low heat to avoid scalding; if you see large bubbles or rapid boiling, lower the heat immediately. Scalding can cause off flavors and curdling, which you want to prevent for a silky finish.
- Now, once the cream mixture has started to simmer, whisk about 1/3 of the hot cream mixture into the yolk/sugar mixture. Whisk to incorporate, and now add another 1/3 of the mixture, stir again. Leave the remaining cream in the saucepan, gently simmering.: This tempering process gently raises the yolk temperature, preventing curdling while marrying the custard flavors. You will hear soft whisking and feel the bowl warm slightly; those are good signs. If you add hot liquid too quickly, the yolks can scramble into lumps, so take your time and whisk continuously. A common mistake is pouring all at once, which ruins the smooth consistency.
- Return the egg/cream mixture back to the saucepan with the remaining simmering cream mixture, and stir to incorporate.: Once combined, the mixture looks uniform and slightly glossy, signaling that the eggs are fully integrated. Stirring helps distribute heat evenly so the custard cooks gently. Avoid high heat here, because aggressive boiling will curdle the custard. The sound is a quiet low simmer rather than a vigorous bubble fest, and the visual cue is a slightly thickened surface that moves slowly when stirred.
- Using a wooden spoon, stir the mixture constantly over low heat until it thickens slightly and coats the back of the spoon. DO NOT boil, or the yolk will overcook... this only takes a few minutes.: You will start to see the custard cling to the spoon and leave a clean line when you run your finger through it. The aroma deepens to a warm, custardy scent. Constant stirring prevents hot spots and keeps the texture smooth. Boiling is the enemy here because it creates curdled bits and a grainy mouthfeel, so keep the heat low and the motion steady. If you notice tiny cooked egg particles, remove from heat and strain immediately to salvage the texture.
- Pour the mixture through a fine-mesh strainer and discard the vanilla pod. Bring to room temperature (you can place the bowl in an ice bath, without submerging, to expedite cooling).: Straining removes any tiny cooked bits and ensures a satin finish. As it cools, the custard mellows and thickens slightly, and an ice bath speeds the process while preserving texture. Avoid submerging the bowl so water does not dilute the custard. A common oversight is skipping the strain, which leaves an uneven mouthfeel, so take the extra minute for a perfect base.
- Turn on broiler to high.: Preheating the broiler gets you the quick, intense heat needed to caramelize the surface of the marshmallows without melting them entirely. Expect a very short window of browning time, so stay attentive and position the rack thoughtfully to avoid burning. A frequent error is walking away during broiling, which can transform attractive golden blisters into unpleasant bitter char.
- Place marshmallows on a shallow baking sheet lined with parchment paper and broil for 2 - 3 minutes (keep a close eye on them, they brown quickly). Remove from oven and quickly flip the marshmallows. Roast again, but be careful, they'll brown even faster the second time.: The first side puffs and caramelizes, filling the kitchen with toasted sugar notes, and flipping ensures even color and flavor. The visual cue is bronzed blistering, not complete blackening. Work quickly when flipping, because residual heat accelerates browning. Avoid overbaking which yields excessive bitterness and a dry texture rather than the desirable gooey, smoky quality.
- Let the marshmallows cool slightly, then place them in the blender.: Cooling makes them easier to handle, but they should still be warm enough to blend into a smooth, stretchy puree. You will notice a sweet, toasted aroma as you lift the sheet into the blender. If they are too hot they can create excessive steam, so wait a moment. A mistake is tossing too many at once which can clog the blender, so work in manageable batches if necessary.
- Add the cooled custard to the marshmallows in the blender. And add another 1/2 cup of cream and the vanilla extract. Puree until well blended and smooth.: The blender will transform the toasted marshmallows into a silky, fragrant base; you will see the mixture lighten and become shiny. The additional cream softens texture, ensuring the puree is not overly dense. Stop and scrape down the sides to ensure even blending. If you skip this, you may end up with pockets of marshmallow or uneven flavor distribution.
- Pour into a bowl, cover with plastic wrap, and refrigerate 4 hours, or overnight (overnight is best).: Chilling lets flavors meld and improves churn performance, because a cold base freezes more quickly to a creamy consistency. The visual is a thicker, cooler custard with the aroma slightly muted and well rounded. A common oversight is under chilling which leads to poor texture during churning, so plan ahead and be patient.
- Make the chocolate sauce and let it cool (you can do this up to 1 week in advance). (Link to recipe in the Ingredients list).: The cooled chocolate sauce provides ribbons of concentrated cocoa and should be pourable but not hot when layered. Having it ready ahead reduces last minute tasks. If the sauce is too warm during layering it will melt the ice cream; if too cold it may be too thick to swirl, so aim for room temperature before use.
- Remove the cream mixture from the refrigerator and whisk again. Pour mixture into your ice cream maker and follow manufacturer instructions. During the last 5 minutes, fold in the graham cracker pieces.: Whisking refreshes the texture and reincorporates any separated ingredients. As the machine churns you will hear a gentle hum and see the mixture thicken into soft serve like consistency; this is the perfect moment to add the chopped graham cracker so they remain crunchy. Adding them too early will cause them to dissolve; adding too late risks uneven distribution.
- The ice cream will be thick, but still very soft. Transfer to a container with a lid, or leave in the ice maker bowl and cover with foil. Place in the freezer for at least 2 hours, or even better, overnight.: The final freeze firms the texture and deepens flavor meld. Expect a firmer scoop after sufficient time, and this period allows the components to settle. A common mistake is serving immediately from churn, which yields overly soft ice cream that lacks structure for layering.
- In an ice cream parlor glass, or bowl, add a couple of spoonfuls of the chocolate sauce on the bottom. Layer in one level of churned ice cream and then spoon more of the chocolate sauce. Continue adding ice cream and chocolate, in layers.: Layering creates alternating pockets of chocolate and creamy ice cream, so each bite has contrast. The visual is beautiful, and the sound is the soft plop of ice cream meeting sauce. Avoid stirring the layers together, which eliminates the attractive streaks and textural surprises.
- Garnish with a piece of graham cracker, a chocolate bar, and a toasted marshmallow, if desired. Serve at once.: The final presentation should look playful and nostalgic, with a crunchy graham cracker , a shard of chocolate, and a toasted marshmallow crowning the scoop. Serve promptly for best texture; letting it melt too long blurs the contrasts you worked to create. A typical misstep is overloading the garnish, which can overwhelm the balanced flavors in the cup.
Notes
- Boost the toastiness: Toast the marshmallows slightly longer for deeper caramel notes, but watch closely to prevent bitterness.
- Chunk size matters: Chop the graham cracker pieces into uneven chunks for more interesting texture throughout the ice cream.
- Make-ahead chocolate: Prepare the chocolate sauce up to one week in advance and store in the fridge, then warm gently before layering to keep a velvety ribbon.
- Garnish with intention: Reserve a few perfectly toasted marshmallows and a piece of chocolate bar for each serving to elevate presentation.
- Adjust sweetness: Reduce the sugar by a little if you prefer a less sweet profile, tasting the custard as it cools to gauge final balance.
- Texture control: If you like more chew, stir in a few extra graham cracker chunks after churning instead of during the last five minutes.