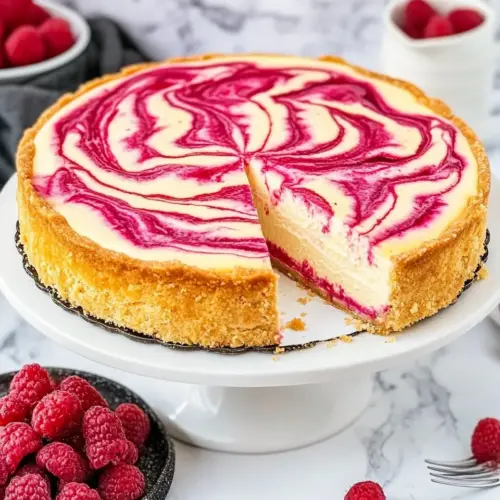
Homemade Raspberry Swirl Cheesecake
Homemade Raspberry Swirl Cheesecake is a creamy, silky dessert with bright raspberry ribbons and a toasty graham crust. This easy to follow recipe yields rich, velvety slices that are perfect for spring gatherings or an easy weeknight dessert, offering balanced sweetness and vibrant fruit notes. Make it to impress without stress, and enjoy why this cheesecake becomes an instant favorite.
Equipment
- Small Saucepan
- Fine-mesh strainer
- 9-inch Springform Pan
- Electric stand mixer with paddle attachment
- Flat bottomed glass or measuring cup for pressing crust
- Spatula
Ingredients
- 6 ounces fresh raspberries Purée and sweeten to create the vibrant raspberry swirl; gently cook with sugar, lemon juice, and water until slightly thickened, then cool before swirling into the cheesecake batter for bright fruit flavor and color contrast.
- 2 tablespoons granulated sugar Sweeten and balance tartness when combined with raspberries; dissolve into the fruit while cooking to enhance natural juices and create a glossy, stable raspberry sauce that holds shape during baking and slicing.
- 1 tablespoon lemon juice Brighten and preserve the fresh raspberry flavor; add a hint of acidity while cooking the fruit to lift flavors, balance sweetness, and help set the purée for a more pronounced swirl.
- 1 tablespoon water Loosen and adjust consistency of the raspberry purée; add small amounts during cooking to achieve a pourable but slightly thickened sauce suitable for marbling without thinning the cheesecake batter.
- 1 1/2 cups graham cracker crumbs Provide the crunchy, buttery base texture when combined with melted butter and sugar; press firmly into the pan to form a stable graham crust that supports the creamy filling and bakes to a golden finish.
- 3 tablespoons granulated sugar Sweeten and bind graham crumbs to the melted butter; sprinkle into the crust mixture to add gentle sweetness and help the crumbs adhere, resulting in a cohesive base that holds together when sliced.
- 6 tablespoons unsalted butter, melted Moisten and bind the graham cracker crumbs to form the crust; melt and mix evenly through crumbs to provide richness, help the crust set firmly, and contribute to overall flavor and mouthfeel.
- 24 ounces brick-style, full-fat cream cheese, softened to room temperature Cream and provide the primary rich, tangy base for the cheesecake filling; beat until smooth and lump-free to create a silky texture, contribute fat for structure, and deliver the characteristic cheesecake flavor.
- 1 cup granulated sugar Sweeten and balance the tang of the cream cheese; beat in gradually to control texture and taste, ensuring a uniformly sweetened filling that browns lightly and holds its shape after baking.
- 1/2 cup full-fat sour cream Smooth and add creamy tang to enrich the filling; fold in sour cream for a silkier mouthfeel, added moisture, and subtle acidity that complements the cream cheese for a balanced finish.
- 2 teaspoons pure vanilla extract Flavor and enhance the overall profile of the cheesecake; incorporate pure vanilla extract to add aromatic depth and a rounded sweetness that complements both the filling and raspberry swirl.
- 3 large eggs, at room temperature Incorporate structure, richness, and emulsion to the filling; add eggs one at a time at room temperature to bind ingredients, provide lift, and set the custard-like texture without curdling.
Instructions
- In a small saucepan over medium-low heat, stir together raspberries, sugar, lemon juice, and water. Use a fork to crush the berries a bit. Stir frequently, cooking until the berries start to release their juices. Increase heat to nearly medium, to bring the mixture to a gentle simmer. Cook for 3-5 minutes, or until the berries are broken down and the liquid is deep pink to light red in color and slightly thickened.: As the pot gently warms you will hear soft bubbling and notice the raspberries losing their shape, releasing a fragrant syrup that smells fruity and slightly tangy. This low to moderate heat coaxing concentrates the berry flavor while preserving brightness, which is crucial for that fresh tasting swirl. Stirring frequently prevents sticking and gives you a uniform sauce; you should smell a sweet berry aroma with a hint of lemon as the mixture takes on a glossy sheen. A common mistake is overheating, which can dull the fresh notes and cause the sugars to scorch, so keep the heat controlled and increase only as instructed. If the sauce seems too thin, a minute or two more at a gentle simmer will thicken it. The goal is a vivid colored liquid that will hold a bead when spooned.
- Remove saucepan from heat and pour raspberry mixture through a very fine mesh strainer into a bowl. If your strainer is not fine enough to strain the seeds, line it with a double layer of cheesecloth first. Use a spatula to press on the raspberry mixture in the strainer, to get as much juice as possible from the berries. Measure out 2 teaspoons of raspberry seeds from the strainer and add them to the raspberry juice. Discard the rest of the seeds in the strainer. Set raspberry sauce aside to cool – you should have about 1/3 cup of raspberry sauce.: Pressing the warm fruit through the strainer yields a silky sauce that is fragrant and vibrantly colored, and the tactile act of scraping releases the last sweet pockets of juice. The texture in the bowl should be smooth, with a glossy surface that reflects light. Leaving seeds in will create a grittier mouthfeel, so straining is worth the effort for a refined finish. A pitfall is pressing too hard when the mixture is hot, which can push through tiny particulates; use a firm but gentle pressure. Cooling the sauce allows it to thicken slightly and prevents it from bleeding too much into the filling when you swirl it later.
- Place oven rack in center of oven and preheat to 325°F. Very lightly spray a 9" springform pan with non-stick spray and set aside.: Preheating to the correct temperature ensures even cooking from the start; you can feel confident the oven will hold steady for the long, gentle bake the cheesecake needs. Lining or spraying the pan prevents sticking and makes release easier, and positioning the rack in the center gives the most even heat exposure for the pan. If your oven runs hot or cold, consider an oven thermometer to verify accuracy, because a wrong temperature can lead to overbaking or underbaking. Lightly spraying keeps the crust intact while still allowing a clean edge on release.
- In a medium bowl, stir together graham cracker crumbs and sugar. Add melted butter and stir until evenly combined.: When you mix the graham cracker crumbs with warm melted butter , the aroma turns toasty and inviting, and the crumbs take on a sheen that signals they are binding together. The sugar helps with slight caramelization when pressed and baked. The texture should look uniformly moistened and clump slightly when pinched. If some crumbs remain dry, add the butter gradually until the mixture holds; too much butter will make the crust greasy. Even mixing ensures a sturdy, flavorful base that will hold the filling well.
- Add the crust mixture to prepared 9" springform pan. Press mixture evenly up the sides, about 1 1/4" up (so the crust is as tall as the cheesecake filling), and onto the bottom of the pan. A flat-bottomed glass is helpful to gently and evenly press the crust mixture into place. Set crust aside.: Pressing the crumb mix firmly gives you a compact, buttery shell that contrasts with the smooth filling. The sound of the glass tamping the crumbs is slightly satisfying as the base compacts. Aim for even thickness around the sides so each slice has a consistent crust to filling ratio. If the crust is too thin in places, the filling can escape during slicing, so take time to build an even edge. Chilling the crust briefly before filling can help it set, though it is not required here.
- In the bowl of an electric stand mixer with a paddle attachment, on medium speed, beat cream cheese and sugar until completely smooth. Scrape down sides and bottom of bowl as needed, to ensure the mixture is free of lumps.: As you beat, the mixture transforms from stiff blocks into a silky, pale mass, and the aroma becomes rich and slightly tangy. Smoothness is critical to avoid pockets of curdled cheese in the final bake; scraping down ensures all lumps are removed. You should see no streaks of white; the batter should be consistent and velvety. A common error is overbeating at high speed which incorporates too much air; that can lead to cracking. Keep the speed moderate and stop to scrape frequently.
- Add sour cream and vanilla to cream cheese mixture and mix on low speed until evenly combined.: Introducing sour cream and vanilla softens the batter and adds tang and aromatic depth. Mixing on low helps fold these elements in without whipping in air. The mixture should become slightly looser and glossy, with a uniform aroma of dairy and warm vanilla. If you mix too vigorously here, you risk creating bubbles that may affect texture and lead to surface cracks. Gentle blending preserves a dense, smooth finish.
- In a small bowl, lightly beat the eggs. With mixer on low speed, very slowly drizzle the beaten eggs into the cream cheese mixture. When nearly all combined, scrape down the sides and bottom of the bowl, then mix again to fully and evenly combine.: Slowly adding the eggs helps them emulsify into the batter, producing a cohesive, creamy filling rather than a curdled texture. You'll notice the batter becoming silkier and more fluid as the eggs incorporate, and you should not see visible streaks of egg. The cautious pace prevents over aeration which can create bubbles and lead to a less dense texture. Rushing this step is a common pitfall, often resulting in a grainy or uneven bake, so take your time and keep the speed low.
- Pour cheesecake filling over prepared crust and smooth the top with a spatula.: As you spread the filling it will settle evenly into the crust, and the surface should be glossy and smooth under your spatula. Smooth the top to remove air pockets and create a flat canvas for the raspberry sauce. If the batter resists spreading, a few gentle taps on the counter will help level it. Avoid vigorous shaking which can introduce air. The right texture at this point is dense, weighty, and satiny, promising a creamy set after baking.
- Add six 1-teaspoon sized dots of prepared raspberry sauce to the top of the filling, spacing the dots out as much as possible. Use the tip of a chopstick, or something similar in your kitchen drawer, to gently swirl the raspberry sauce through the cheesecake filling to create a pretty, swirly pattern. Cover and refrigerate remaining raspberry sauce; save for serving time.: The spooned dots will sit as bright, jewel like spots on the pale filling, and when you drag the chopstick through them you will see elegant ribbons form. The visual contrast is striking, and the small, controlled swirls prevent the sauce from sinking entirely. Pulling the swirl just enough gives a marbled look while preserving pockets of concentrated berry flavor. Over swirling can muddy the colors, so keep the motions light and deliberate. Reserve the extra sauce for serving to reinforce the fresh fruit notes when plated.
- Place cheesecake in oven and bake for 50-55 minutes, or until cheesecake is mostly set, with just the center being a little bit jiggly.: During baking the sides will set first and possibly puff slightly, while the center remains gently wobbly, signaling the right doneness for a creamy texture. You will notice a faint golden edge but mostly a pale surface. The gentle jiggle in the middle is intentional because the filling continues to set as it cools; overbaking risks a dry, crumbly texture. A common mistake is relying solely on a timer, rather than visual cues, so trust the gentle wobble and the set edges to decide doneness.
- Now turn off the oven, crack the door open 3"-4", and let cheesecake sit in the oven undisturbed for 1 hour. Then remove cheesecake to a cooling rack to cool, until it is no longer warm. Once cooled, place in the refrigerator to chill and set for at least 6 hours. For the thickest, creamiest cheesecake texture, definitely chill overnight.: This slow cooling step tempers the temperature shift and helps prevent cracking while allowing the custard to finish setting gradually. You will feel the warmth ease off as the cake relaxes, and the surface will firm up without contracting suddenly. Moving it to a rack and then into the fridge ensures the texture becomes dense and sliceable. Rushing to slice before the chill time is up will yield a softer, less structured dessert; patience here transforms the mouthfeel into something truly luxurious.
- Serve slices of raspberry cheesecake with fresh raspberries and reserved raspberry sauce. Dollops of freshly whipped cream are always welcome, too!: When plated, the first forkful should reveal a clean slice with distinct layers of crust and filling, while the raspberry ribbons add bursts of bright flavor. The reserved sauce can be spooned for extra tang and visual appeal, and the whipped cream adds airy contrast to the lush filling. A common serving error is slicing while too cold straight from the fridge; let slices sit a few minutes to soften slightly for the best texture. The combination of cool creaminess, crisp crust, and zesty raspberry is what makes each bite sing.
Notes
- Use full fat dairy, full fat cream cheese and sour cream give the creamiest texture and the most reliable set; low fat versions can make the filling less rich and slightly grainy.
- Softening the cream cheese, bring it to room temperature slowly and avoid microwaving, which can create hot spots that lead to lumps in the batter.
- Control the oven temperature, an oven thermometer helps because cheesecake benefits from a consistent moderate heat of 325°F for even baking without overcooking the edges.
- Strain the raspberry sauce thoroughly, using a fine mesh or cheesecloth will give a seed free, silky sauce that swirls cleanly through the filling.
- Reserve extra sauce, keep some sauce refrigerated for serving so that each slice can be dressed with a bright finish right before plating.