Homemade Larabars
Homemade Larabars are chewy, nutty bars with pockets of chocolate and natural sweetness from dates, making them an easy, wholesome snack idea. These bars offer creamy date caramel, crunchy peanuts, and a hint of sea salt for balance, perfect for an easy on the go bite or an easy weeknight snack. They store well, travel easily, and are a persuasive reason to make them today.
Equipment
- Food Processor
- 9x9 baking dish
- Parchment Paper
- Sharp Knife
Ingredients
- 2/3 cup dry roasted unsalted peanuts Provide crunchy texture and nutty richness while contributing healthy fats and a toasty backbone to bind with the dates when processed into a paste. Grind to desired consistency to control bar chewiness and mouthfeel.
- 24 oz pitted dates I use the sunmaid brand Supply natural sweetness, chewiness, and moisture that act as the primary binder to hold the bars together once pulsed with the peanuts. Choose soft, finely chopped dates for easier blending and balanced caramel-like flavor.
- 1/4 cup chocolate chips Add pockets of chocolate flavor and small melty bursts that enhance sweetness and create contrast against the nutty base without overpowering. Stir or fold in after pulsing to preserve chip shape and texture distribution.
- pinch sea salt Enhance overall flavor by brightening and balancing sweetness, bringing out the roasted peanut notes and deepening the chocolate's profile with a subtle mineral edge. Use sparingly to avoid saltiness overpowering the bars.
Instructions
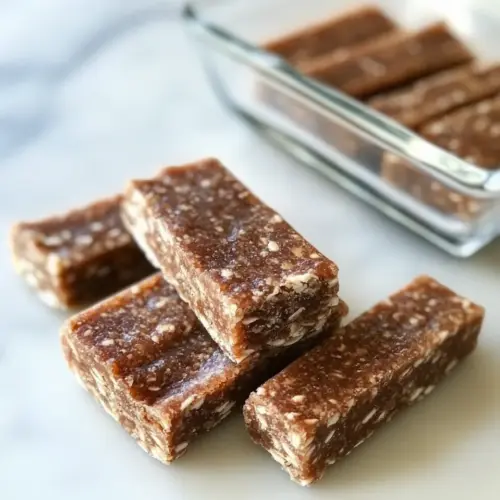
- Place peanuts into the bowl of a food processor. Pulse to chop into fine pieces without turning into a paste. Add in dates, chocolate chips and salt. Continue pulsing until one large mass comes together in the bowl. Line a 9×9 baking dish with parchment paper or plastic wrap and press date mixture evenly into the dish. Dip your fingers into water to prevent sticking. Place into freezer for 30 minutes.: The aroma of chopped nuts is immediate, warm, and toasty, and it signals that you are starting with a flavorful base. As you add the peanuts to the processor, notice the way they shift and settle, and be ready to pulse rather than run the machine continuously. Pulsing in short bursts preserves small crunchy bits that make each bite interesting, and it prevents the peanuts from heating up and releasing oil. If you overprocess, the mixture will feel greasy and start to clump into a paste, which will change the bar texture. To avoid that, pause frequently and tap the bowl to reposition ingredients; you'll see tiny granules before it becomes smooth, and that is the cue to stop.
- Remove completely from pan using excess plastic wrap as help and cut into 10 even pieces. Wrap each bar individually in plastic wrap and store in refrigerator for up to 2 weeks.: You will hear a change in rhythm as the peanuts break down, from a loud clatter to a softer, even sound when the bits become finer. Look for a sandy texture with scattered coarser pieces, not a uniform mass. That variance gives the bars contrast. The reason this matters is textural balance, and it affects how the bars hold together when combined with the sticky dates . A typical pitfall is running the processor too long which increases heat and oil release, making it harder for the mixture to bind with the dates. If you sense oiliness, stop and let the bowl cool, or scrape out and re pulse fewer times.
- Add in dates, chocolate chips and salt: When you add the dates , notice the dense, glossy feel as they hit the bowl, and how their caramel scent mingles with the roasted notes of the nuts. The addition of chocolate chips introduces little bursts of cocoa, and the tiny grain of sea salt will make flavors pop. It's important to add everything before processing so the ingredients can meld evenly. If your dates are a bit firm, they will sound slightly hollow at first; that is fine, they will soften during pulsing. A common misstep is adding too many extras at once, crowding the blade; instead, ensure there's space so the ingredients can circulate and coat one another.
- Continue pulsing until one large mass comes together in the bowl: As you pulse, the sound becomes more muted and the mixture will slowly clump, moving as a single mass around the blade. You want a sticky yet manageable ball that holds shape when pressed, indicating the dates have released enough moisture to bind the peanuts . This step matters because proper cohesion ensures bars slice cleanly and hold together during transport. If you stop too soon, the bars will crumble; if you go too long, chocolate may melt excessively and the texture will be off. If it looks too dry, pulse a couple more times or add a small soft date; if too wet, chill briefly.
- Line a 9×9 baking dish with parchment paper or plastic wrap and press date mixture evenly into the dish: Pressing the mixture into the dish creates consistent thickness and helps the bars set uniformly. Use a spatula or the back of a measuring cup to compress the mass firmly, watching for smooth, even surfaces and sealed edges. The visual cue to aim for is a compact slab with minimal air pockets, which yields bars with sturdy edges. This technique matters because uneven packing leads to bars that fall apart or have inconsistent chew. A common error is pressing too lightly, leaving gaps that cause crumbling; press firmly and evenly until the slab feels dense and cohesive.
- Dip your fingers into water to prevent sticking: Wetting your fingers keeps the mixture from adhering to your skin while smoothing the top and edges, and it also helps you create neat, compact corners. The water should be just enough to prevent sticking, not so much that it wets the mixture. You'll notice your fingertips glide over the surface, leaving a glossy, even finish. This small trick is practical because it preserves texture and prevents waste. Avoid using oil instead of water, as oil can change the flavor and make the bars greasy. If your hands are still sticking, re wet briefly and continue smoothing gently.
- Place into freezer for 30 minutes: Chilling firms the bars so they can be cut cleanly, and it mellows the flavors as the chocolate chips and dates settle. The freezer imparts a cold snap that makes slicing tidy and preserves shape during wrapping. You will notice the mixture becomes denser and less tacky to the touch after chilling. This matters because unchilled bars often compress and smear when cut. A typical mistake is leaving them too long in the freezer which can make them too hard to slice; 30 minutes is usually ideal, and if your freezer runs cold, check at 20 minutes.
- Remove completely from pan using excess plastic wrap as help and cut into 10 even pieces: Using the overhanging parchment or plastic helps you lift the slab cleanly from the pan without deforming it. As you slice, aim for steady, even strokes with a sharp knife, and wipe the blade between cuts if the chocolate or date mixture begins to stick. Look for clean edges and a consistent thickness across bars, which ensures balanced portions. If the slab flexes as you cut, it needs a little more chill time. A common issue is using a dull knife, which drags and tears the bars; a sharp chef knife works best for neat slices.
- Wrap each bar individually in plastic wrap and store in refrigerator for up to 2 weeks: Wrapping seals in freshness and keeps the bars from absorbing other flavors in the fridge. The cool environment helps maintain texture, so when you open a wrapped bar the crumb is cohesive and the chocolate is pleasantly firm but not brittle. Label the package if you make multiple batches, and stack wrapped bars neatly to save space. A frequent mistake is leaving them unwrapped, which dries the edges and shortens shelf life. For longer storage, you can freeze individually wrapped bars for extended keeping, but thaw briefly before eating for the best chew.
Notes
- Pulse in short bursts, this prevents the peanuts from releasing oil and becoming paste, preserving a desirable crunchy texture.
- Check date moisture, if your dates are dry, soak briefly in warm water and drain, which helps the mixture bind more easily.
- Firm packing matters, press the mixture very firmly into the pan to eliminate air pockets so the bars slice neatly.
- Freeze briefly before cutting, a 30 minute chill in the freezer makes cleaner slices and prevents smearing of the chocolate chips.
- Use quality chips, better chocolate yields a more pleasant melt and avoids waxy aftertastes in the bars.
- Portion evenly, measure or mark the slab into 10 equal pieces for balanced bars each time.