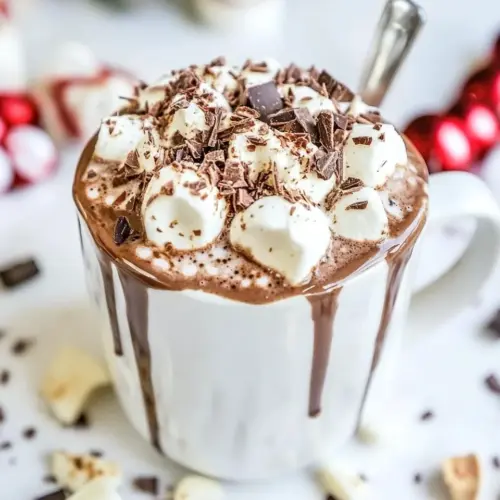
Homemade Hot Chocolate Recipe
Homemade Hot Chocolate Recipe is a creamy, indulgent slow cooker classic that blends rich chocolate chunks and cocoa powder with velvety milk and cream. Perfect for winter gatherings and easy to scale for a crowd, this drink yields silky texture and customizable toppings for a festive finish, making it an irresistible reason to warm up with friends and family.
Equipment
- Slow Cooker
- Ladle
- Whisk
Ingredients
- 4 cups milk Heat gently and provide the creamy liquid base that carries flavor and creates a smooth hot chocolate texture. Use whole milk for richness and body, and warm it slowly to avoid scalding while allowing other ingredients to dissolve. Adjust quantity if a thinner or thicker consistency is preferred.
- 2 cups cream Enrich the beverage with additional fat to produce a luxuriously creamy mouthfeel and enhanced richness. Use heavy cream combined with milk for a velvety texture that helps emulsify cocoa and chocolate. Add gradually while heating to prevent separation and to achieve a balanced richness.
- 1/3 cup sugar Sweeten the drink and balance cocoa's natural bitterness for a pleasant, rounded flavor. Dissolve fully into the warm milk mixture to avoid grittiness, and taste as you go to adjust sweetness level. Granulated sugar also helps slightly thicken and stabilize the final beverage.
- 1 tablespoon vanilla Flavor subtly and enhance the overall aroma by adding warm vanilla notes that complement chocolate. Stir in near the end of heating to preserve its delicate fragrance. Use pure vanilla extract for best results and to avoid overly artificial flavors.
- 1/2 cup Cocoa Powder Provide concentrated chocolate flavor and body while contributing color and a slight dryness that intensifies taste. Whisk cocoa powder thoroughly into a small amount of warm milk to make a smooth paste before combining with the rest to prevent lumps. Choose unsweetened or Dutch-processed depending on desired acidity and depth.
- 1 cup chocolate chunks Melt into the warm milk for deep, melt-in-your-mouth chocolate richness and a silky texture. Add chunks gradually and stir constantly until fully incorporated for a glossy finish. Use high-quality chocolate with a cocoa percentage that matches your preferred sweetness and intensity.
- pinch salt Enhance overall flavor by balancing sweetness and amplifying chocolate notes through a subtle minerality. Pinch cautiously, as salt can quickly change the taste profile; dissolve it early in the heating process to distribute evenly. Salt also aids in rounding out and intensifying other flavors.
- 1 cup marshmallows Provide classic topping texture and nostalgic sweetness that melts slightly on contact with warm liquid. Add marshmallows just before serving so they soften but still maintain some shape, creating a fluffy contrast to the dense drink. Mini marshmallows work best for even melting and presentation.
- 1 cup chocolate chips Offer small melty pockets of chocolate that add bursts of sweetness and textural contrast as they soften in hot liquid. Sprinkle toward the end so chips hold some shape while still giving gooey chocolate bites. Use semi-sweet or milk chips based on desired sweetness balance.
- 1 cup sugared almonds Introduce a crunchy, nutty element and toasty almond flavor that contrasts with creamy hot chocolate. Chop or use whole sugared almonds sparingly as a garnish to add texture and visual appeal without overpowering sweetness. Place on top of whipped cream for a decorative finish.
- 1 cup crushed candy canes Add a refreshing peppermint crunch and bright flavor that cuts through richness, creating a festive contrast. Crush candy canes finely and sprinkle as a garnish so pieces stick to cream or foam. Use sparingly to avoid overwhelming the chocolate and maintain balance.
- 1 cup whipped cream Top the beverage with airy richness and a light, creamy contrast that elevates presentation and mouthfeel. Whip until soft peaks form and add dollops just before serving so it melts slowly into the hot chocolate. Optionally sweeten lightly to complement overall sweetness.
- 1 cup chocolate sauce Drizzle to finish with intense chocolate flavor and glossy visual appeal that enhances decadence. Warm slightly for easy pouring and swirl on top of whipped cream or into the drink for extra chocolate impact. Choose a sauce of preferred sweetness and thickness for best results.
Instructions
- Place all the ingredients in the 7 QT Crock-Pot Cook & Carry Easy Clean Slow Cooker and set to low for 2 hours. An hour later, use a whisk to make sure the chocolate has melted and seal the old back on.: Warm aromas will start to rise within the first 20 to 30 minutes, a gentle chocolate and dairy scent that tells you the flavors are melding, and you will hear a faint, steady simmer but no violent bubbling. The slow, even heat is important because it allows the chocolate chunks and chocolate chips to soften and release cocoa butter into the liquid slowly, creating a velvety mouthfeel rather than a greasy separation. As the mixture gently warms, stir once every 20 to 30 minutes to distribute heat and melting chocolate, preventing hot spots. A common mistake is cranking the heat too high to rush melting, which can scorch the bottom and create bitter notes, so keep the cooker on low. Texturally watch for the surface to shimmer and small, nearly imperceptible steam trails to rise, signs the liquid is warm and integrating. If lumps form, a whisk or immersion blender can smooth them out; however in a slow cooker they usually dissipate with gentle stirring. Avoid leaving the lid off for long periods because that cools the pot and prolongs melting time.
- Use a ladle to scoop the hot chocolate into your serving cups and top them however you please! Enjoy!! 🙂: At this point the mixture should be noticeably thicker and richly colored, and when you run a spoon through it you will see slow, syrupy ribbons. Whisking adds air and breaks up any remaining cocoa powder pockets, improving mouthfeel and eliminating graininess. The sound here is soft, almost silky, as the whisk glides through the warm liquid, and you will smell concentrated chocolate and dairy notes. The why is simple, incorporating air and dispersing particles results in a smoother, more uniform cup. A common pitfall is vigorous whisking which can splash and cool the surface, so whisk with steady, gentle strokes. After whisking, replace the lid promptly to trap heat and allow the flavors to settle, preserving the temperature for serving. Visually you want a glossy surface, not matte and powdery.
- Use a ladle to scoop the hot chocolate into your serving cups and top them however you please: When ladling, the liquid should flow smoothly and coat the ladle, leaving a slow drip rather than a thin stream, which shows the proper viscosity. Pour carefully to avoid spills on rims that could harden into sticky spots. This step is about presentation and experience, so think about pairing textures, like a cloud of whipped cream or a scatter of marshmallows that melt in biting moments, releasing soft sweetness. The sound is the soft clink of the ladle against ceramic and the gentle splatter as toppings land. A mistake people make is overfilling cups, causing splashes and temperature issues, so leave room for toppings. Serve immediately after topping so hot and cold textures contrast delightfully.
- top them however you please! Enjoy!! 🙂: The final flourish invites creativity and personal preference, and it is the sensory punctuation of the recipe, whether you choose crunchy crushed candy canes , nutty sugared almonds , or a glossy drizzle of chocolate sauce . These toppings add color, texture, and aroma, and they change the first sip into a layered tasting experience. Avoid preparing toppings too far in advance that will weep or melt before service; assemble at the last minute for best visual and textural contrast. This joyful step is when guests react, comment, and sometimes debate their favorite combination, and that reaction is as much a part of the recipe as the cup itself.
Notes
- Increase chocolate intensity by adding more chocolate chunks for pockets of molten chocolate that create a richer cup.
- Make it lighter by reducing cream and increasing milk slightly, which keeps the flavor but lowers richness for guests who prefer a gentler mouthfeel.
- Swap toppings for contrast by using crushed candy canes for a minty bite, or sugared almonds for a nutty crunch to complement holiday themes.
- Serve in a bar format by keeping the hot chocolate in the slow cooker and setting toppings like marshmallows and chocolate sauce in bowls for guests to customize their cups.
- Warm your sauce slightly before drizzling so chocolate sauce glides smoothly and creates attractive patterns on whipped cream.
- Keep a stirring schedule during long service to maintain texture and prevent separation, especially when serving to a crowd over time.