Homemade Greek Yogurt Recipe
Homemade Greek Yogurt Recipe is a creamy, tangy, and easy to make staple that transforms simple milk into thick, spoonable yogurt. Perfect for an easy weeknight breakfast or portable snack, this method yields rich texture and clean flavor while saving money. Make a batch to enjoy versatile, natural yogurt that elevates breakfasts and recipes, and keeps you stocked with wholesome goodness.
Equipment
- Large Pot
- Thermometer
- Whisk
- Cheesecloth
- Strainer
Ingredients
- 1 gallon milk skim, 1%, 2% or whole Provide the liquid base for the yogurt, contributing fat, protein, and body that determine creaminess and texture; heat and cool to proper temperatures to denature proteins for optimal set and consistency, and to ensure food safety before culturing.
- 1/3 cup plain greek yogurt Act as the live culture starter to inoculate the milk with beneficial bacteria, supplying strains that ferment lactose into lactic acid to thicken and tangify the yogurt; measure precisely to achieve reliable tang, set time, and desired viscosity.
Instructions
- Pour 1 full gallon of milk into a large pot and set over medium heat uncovered.: You will notice the milk shimmer and tiny bubbles forming at the edges as it warms, a visual cue that the proteins are waking up. Heating in an uncovered pot helps moisture escape and prevents pressure build up. Use a heavy bottom pot to avoid hot spots and stirring frequently helps distribute heat. A frequent error is using too high heat which scorches the bottom, creating an off taste and uneven heating, so patience here sets the stage for smooth texture.
- Place a thermometer into the milk and whisk frequently to heat it evenly and so the bottom of the pot doesn’t scorch.: The whisking rhythm changes the sound of the milk from quiet to a steady swish, and the thermometer becomes your guide to precision. Even heating prevents proteins from denaturing unevenly, which influences creaminess. If you skip the thermometer, you risk overshooting the target temperature; overheating can create a cooked flavor and make the final yogurt grainy, so always monitor the heat closely.
- Let the milk come up to 185 degrees. It NEEDS to reach this temp if you want it to work!: At this point you will see gentle rising steam and the surface may ripple, and reaching 185 degrees denatures whey proteins so they can trap water and thicken the final yogurt. This step is crucial for a stable set. A common mistake is assuming bubbling equals the right temperature, but visual cues can be misleading, so rely on the thermometer for accuracy.
- Remove milk from heat and let it cool to 110-120 degrees.: As the milk cools you will notice the surface calming and the steam subsiding, and the thermometer will slowly fall into the safe range for adding culture. Cooling to 110 to 120 degrees avoids killing the live cultures while also allowing the milk to be warm enough to activate them. If you rush and add the starter too hot, you will kill the bacteria and the yogurt will not set, so be patient with the cooling period.
- Whisk in 1/3 cup room temperature plain greek yogurt.: When you stir, the aroma shifts subtly to a faint tang, and the starter blends into the milk creating a uniform mixture. Whisking distributes cultures evenly so fermentation proceeds consistently throughout the pot. A typical pitfall is adding cold starter straight from the fridge which can shock the milk and slow fermentation, so ensure the starter is near room temperature before mixing.
- Cover pot with tight lid and either wrap it well in towels or blankets or place it in a warm spot in your house. It needs to stay warm and undisturbed for 10-12 hours so the yogurt can work it’s magic and turn that gallon of milk into yogurt. Cathy placed hers on her stove with the oven light on for a small heat source.: During incubation the air becomes still and a faint tang develops, and the slow, steady warmth allows bacteria to metabolize lactose into lactic acid. Wrapping the pot retains gentle heat and encourages a consistent set. Avoid frequently checking or moving the pot, as temperature fluctuations can lead to uneven set or a thin texture, so resist peeking until the time is up.
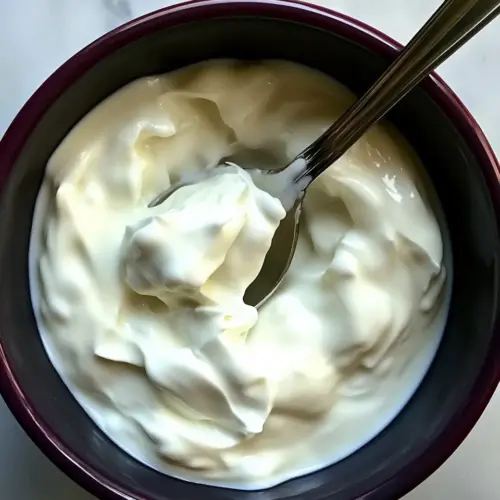
- After 10-12 hours, milk should have thickened and turned into yogurt. Pour off any excess liquid and then scoop yogurt into a cheesecloth lined strainer. Place into refrigerator until yogurt is the desired consistency you want. This will continue to remove they whey still left in the yogurt.: When you lift the lid you may see a custard like surface and a slightly tangy scent, and pouring off whey begins concentrating the solids for a true Greek texture. Straining in cheesecloth over a bowl yields a silkier mouthfeel as liquid drains away. A frequent oversight is not chilling the yogurt before straining; cooling helps the curds firm up so they hold together and strain more cleanly, so refrigerate first for best results.
- Spoon yogurt into air tight containers and keep in refrigerator.: The final jars should feel cool to the touch and the aroma will be mildly tart and clean, with a thick creamy body that holds a spoonful. Airtight storage preserves freshness and slows further fermentation, keeping flavor stable for days. Leaving containers loosely covered can allow flavors to change and the yogurt to develop excessive tang, so always seal containers well for consistent quality.
Notes
- Warmth tip Use an oven with the light on or wrap the pot in towels to create a gentle, consistent heat source for incubation, avoiding spotty temperature that can lead to thin yogurt.
- Starter care Always use a plain yogurt with live cultures as a starter; if left too long between batches your starter can weaken, so refresh it periodically with a new store bought plain yogurt.
- Milk choice Whole milk produces the richest end result, while 1 percent or 2 percent will be lighter; choose based on the mouthfeel you prefer and do not dilute with non dairy milks which will not set the same way.
- Timing flexibility Incubation of 10 hours yields mild tang, while 12 hours gives a stronger flavor, so adjust within that window to match your taste without altering other steps.
- Straining control For very thick Greek style yogurt, strain longer in the refrigerator; for a spoonable, creamy texture, strain briefly until you reach the mouthfeel you like.