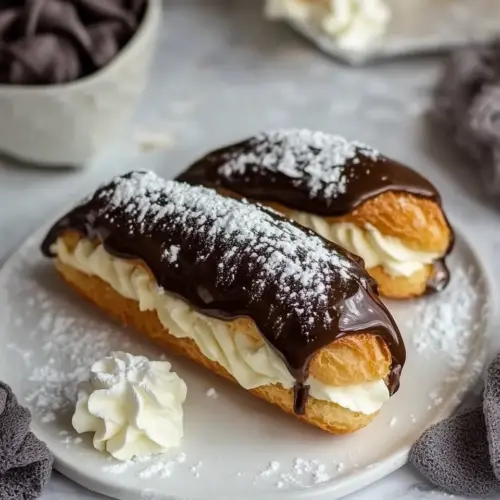
Homemade Eclairs
Homemade Eclairs bring airy, crisp choux shells filled with creamy pastry cream and finished with a glossy chocolate glaze. This classic dessert is creamy yet light, visually impressive, and surprisingly approachable for home bakers, making it a memorable treat for gatherings or an indulgent weeknight baking project. Try it for a reliably elegant result that rewards careful technique.
Equipment
- Saucepan
- Whisk
- Fine mesh sieve
- Mixing Bowl
- Piping Bag
- Piping tips
- Baking Sheets
- Parchment Paper
- Microwave-safe Bowl
- Spatula
Ingredients
- 1/2 cup (100 g) granulated sugar Provide sweetness and structure to the pastry cream while helping with texture balance; measure by weight for consistency and dissolve into milk before cooking to avoid graininess.
- 3 tablespoons cornstarch Thicken the custard mixture by gelatinizing starches when heated; whisk thoroughly with sugar before adding liquid to prevent lumps and ensure a smooth cream.
- 1/4 teaspoon (Pinch) kosher salt Enhance overall flavor by balancing sweetness and promoting flavor clarity; dissolve into the custard base to help stabilize the final pastry cream.
- 4 (5) egg yolks Enrich the custard with fat and add a rich mouthfeel while aiding emulsification; temper slowly into hot milk to prevent curdling and ensure a silky texture.
- 2 cups (473.18 ml) whole milk Supply liquid and creaminess to the custard base while contributing to a rich flavor; heat gently with sugar and cornstarch to activate thickening and pasteurize.
- 2 tablespoons (4 tablespoons) unsalted butter Add richness, shine, and a silky texture to the pastry cream when stirred in off the heat; use at room temperature to incorporate evenly.
- 2 teaspoons (1.5 teaspoons) vanilla extract Contribute aromatic sweetness and deepen flavor profile; stir in after cooking to preserve volatile aromatic compounds and avoid bitterness.
- 1/2 cup (2 tablespoons) water Provide steam and moisture for the choux dough and assist with pan release; combine with milk and bring to a rolling boil before adding flour.
- 1/2 cup (2 tablespoons) whole milk Add liquid and a bit of richness to the choux dough while controlling final texture; warm with water for consistent steam generation during baking.
- 6 tablespoons (5 tablespoons) unsalted butter, cut into 1/2-inch cubes Give fat and structure to the choux dough while contributing to a tender crumb and glossy exterior; cut into cubes to melt evenly into the boiling liquid-flour mixture.
- 2 teaspoons (1.5 teaspoons) granulated sugar Add a touch of sweetness to balance flavors in the dough and aid in browning during baking; sprinkle into the dough mixture to help caramelization.
- 1/2 teaspoon (0.25 teaspoon) kosher salt Enhance savory balance and flavor depth in the dough; incorporate with other dry ingredients to ensure even distribution.
- 1 cup (62.5 g) all-purpose flour, sifted Provide body and structure to the choux by gelatinizing starches and creating a cohesive dough; sift to remove lumps and help achieve an airy interior.
- 4 (2) eggs Act as a leavening and binding agent for the choux, creating steam and lift; add eggs one at a time to properly emulsify and achieve the right batter consistency.
- 4 ounces (56.7 g) dark chocolate, finely chopped Melt into the chocolate glaze to provide richness and a smooth, glossy finish; chop finely to ensure quick, even melting and a homogeneous ganache.
- 4 tablespoons unsalted butter, cut into cubes Contribute creaminess and shine to the chocolate glaze; add in small cubes and stir until fully incorporated for a smooth texture.
- 1 tablespoon (2 teaspoons) light corn syrup Improve sheen and prevent sugar crystallization in the chocolate glaze while adding slight sweetness; stir in after chocolate melts for a glossy finish.
- Pinch (1 tablespoon) salt Enhance and balance the chocolate glaze by bringing out flavors and rounding sweetness; add a small pinch at the end to brighten the overall taste.
Instructions
- Make the Pastry Cream: Fill a large bowl with ice water, then set a fine-mesh sieve over a medium bowl. Set both aside.: The ice bath should be cold enough that when you rest the medium bowl over it you feel an immediate chill under the mixing bowl, this will stop cooking quickly when the hot custard is strained. The sieve catches any solids or cooked egg bits creating a silky finished cream, which is why I always prepare this station first. If the ice water starts to warm, refresh it so cooling is efficient. A common mistake is skipping the ice bath, which can lead to overcooking and a grainy texture.
- In a 3 to 4-quart saucepan, whisk together the sugar, cornstarch and salt. Whisk in the egg yolks until thoroughly combined and all of the dry ingredients have been incorporated. Then, whisk in the milk to combine.: As you whisk these together, you should notice the mixture becoming glossy and homogeneous, with no streaks of yolk or dry powder. The cornstarch needs even distribution so it activates uniformly once heated, which is why thorough whisking matters. When you add the milk, pour gradually while whisking to ensure a smooth emulsion. If you rush and the dry mix forms lumps, strain early to rescue the cream.
- Place the saucepan over medium heat, whisking constantly, until the pastry cream begins to noticeably thicken, about 4 to 8 minutes. When it reaches this point, look for large bubbles to break on the surface. Once they do, whisk constantly for 1 minute, then remove from the heat.: You will see the custard thicken progressively then suddenly start to coat the whisk, and large bubbles indicate it is close to full activation of the starch. Keep whisking so the heat distributes evenly, which prevents sudden curdling. Remove promptly after the extra minute to avoid overcooking, as that leads to a cooked egg flavor. If you see small peppery bits, that means the eggs have cooked too much and you should strain and fold in a little extra butter to smooth the texture.
- Whisk in the butter and vanilla until melted and completely smooth.: As the butter melts into the hot custard you will notice a silky shine and the mixture will taste rounder and richer. Vanilla brings aromatic lift, which transforms the flavor beyond simple sweetness. Stir until the butter is fully incorporated and the surface looks glossy. If the butter does not blend, the cream may separate slightly; gentle whisking and allowing the mixture to cool briefly before vigorous stirring fixes that.
- Strain the pastry cream through the fine-mesh sieve into the medium bowl. Immediately press a piece of plastic wrap against the surface of the pastry cream to prevent a skin from forming. Place the bowl of pastry cream into the ice bath to cool for 30 minutes. Transfer to the refrigerator and chill for at least 4 hours or overnight.: Straining refines the texture, and pressing plastic directly on the surface keeps air from forming a film. The ice bath quickly brings down the temperature, locking in a smooth custard, and chilling overnight lets the flavors meld. If you skip chilling, the cream will be too soft to pipe and may squirt out of the shells. If the cream seems loose after chilling, give it a quick whisk to restore sheen before piping.
- Make the Pate a Choux (Choux Pastry): Preheat oven to 350 degrees F. Line two baking sheets with parchment paper.: The oven temperature is crucial for initial rise and browning; a steady 350 F creates the right steam and color. Lining sheets ensures even browning and easy release. Preheating fully gives consistent results across batches. A common error is baking on a cold sheet, which can make the eclairs spread instead of rising, so always preheat the oven with racks in place.
- Place the water, milk, butter, sugar, and salt in a medium saucepan. Place over high heat and bring to a full rolling boil.: Watch for a true rolling boil where bubbles move vigorously across the surface, that steam is what will puff the dough. The butter should be fully melted and the sugar dissolved by this point. If you underheat this mixture, the dough may not transform properly when you add the flour, producing a dense pastry. If you see too much foaming, reduce heat briefly before adding the flour.
- Remove from the heat and add the flour all at once. Using a wooden spoon or stiff silicone spatula and stir until the flour is thoroughly mixed in and no lumps remain, pressing and smashing the dough against the sides of the pan.: Adding the flour in one go and working quickly creates the characteristic paste that dries slightly against the pan, which is essential for proper structure. You are looking for a homogeneous dough that pulls away from the pan. If you don’t mix enough, lumps will remain and the dough may not hold shape. Conversely, overworking after the flour is incorporated can make the dough too dry.
- Return the pot to medium-high heat and cook, stirring frequently, until the dough comes together into one mass and there is a dry film on the bottom and sides of the pan. If you have an instant-read thermometer, it should register 175 degrees F.: This step removes excess moisture, and you will hear a subtle change in sound as the dough becomes tacky then forms a film on the pan. The temperature cue of 175 F is a helpful guide, and the visual of a dry sheen means the exterior proteins have set enough to hold steam pockets during baking. Stop once you see that film, because overcooking will lead to overly dry shells that crack.
- Transfer the dough to a mixing bowl and beat on medium speed for about 2 minutes to cool the dough down. It should register 145 degrees on an instant-read thermometer.: Beating cools the dough slightly and lets trapped steam escape, which helps when you add the eggs. The target temperature prevents the eggs from cooking on contact. If the dough is too hot, temper by beating a bit longer; too cool and you may not incorporate the eggs smoothly. If you add eggs to dough that is too hot you’ll wind up with scrambled bits.
- Add the eggs one at a time, ensuring each one is fully incorporated before adding the next. Once all of the eggs have been added, scrape down the bottom and sides of the bowl and mix again to ensure everything is fully incorporated, an additional 5 to 10 seconds.: This staged addition controls the dough’s consistency and liquidity. Each egg should be mixed until the dough comes back together and looks glossy before the next egg. The final dough should pipe smoothly but hold its shape, with a thick ribbon when lifted. If you add eggs too quickly you risk an overly runny dough, and if you add too many eggs or not enough you will struggle to pipe correctly.
- Use immediately or keep at room temperature for up to 2 hours in a piping bag or with a piece of plastic wrap pressed against the surface.: Fresh choux works best, as it puffs most vigorously when baked right away, but you can hold it briefly if necessary. Keep it covered to prevent a skin. If you must hold longer than 2 hours, refrigeration changes the dough’s hydration and can affect rise, so use sooner when possible. If the dough separates while waiting, a few quick beats will bring it back together.
- Bake the Eclairs: Transfer the choux pastry to a piping bag fitted with a 1/2-inch round piping tip (I recommend Ateco #866). Hold the pastry bag at a 45-degree angle and lightly drag the tip along the surface of the parchment paper to create 1-inch wide by 4-inch long lines of pastry dough. Pipe 12 eclairs onto each baking sheet. Dip a finger in cold water and gently pat down any bumps.: As you pipe, the dough should glide smoothly and hold neat ridges from the tip. The wet finger trick removes peaks that would brown unevenly. Aim for consistent length and spacing so the shells bake uniformly. Inconsistent piping leads to uneven baking and odd shapes that can collapse.
- Bake the sheets one at a time until the eclairs are puffed, golden brown, and feel light and hollow when picked up, 28 to 32 minutes.: You will see a dramatic oven spring as steam inflates the shells, and the color should develop to a deep golden brown, which signals proper caramelization. The hollow feel on lift tells you the interior has dried sufficiently. Opening the oven before the color develops can cause collapse, so resist the urge to peek early. If shells are pale, they may be soggy inside.
- Remove from the oven and while the eclairs are still hot (you may need to use a paper towel to handle them), and using a paring knife, make two 1/4-inch holes in the bottom of each eclair (one near each end) by inserting the tip and turning in a circular motion.: Making holes while hot allows steam to escape and prevents sogginess as they cool, creating clean cavities for filling. Use caution when handling hot pastries, as they can be fragile. If you wait until cool, the interior will steam and become chewy; if you cut too deeply you might split the shell, so aim for just puncturing to allow airflow.
- Once both sheets have been baked and holes poked in the bottom, return both pans to the still-warm oven. Prop the door open with a wooden spoon and allow the eclairs to set in there for 30 minutes. Remove from the oven and cool completely before filling.: This drying step consolidates the interior crispness without additional browning, and the gentle airflow helps evaporate residual moisture. It yields shells that stay crisp even after filling. Forgetting this step can cause the filling to make the shells soggy quickly. If your oven cools too much during this phase, extend the time slightly but watch carefully.
- Fill the Eclairs: Place the chilled pastry cream in a pastry bag fitted with a 1/4-inch round piping tip (Ateco #802 is perfect for this). Insert the tip of the bag into the holes you created on the bottom of the eclairs, and gently squeeze until filled (the cream will start to come back out of the hole on the bottom). Wipe off excess cream from the bottom and continue until all eclairs are filled.: When you pipe the chilled cream you should feel gentle resistance, and the shell will firm up as it fills. The sound is faint, a soft sigh as the cream displaces air. If the cream oozes too much, the filling is oversoft; chill briefly and try again. Piping too forcefully can split the shell, so apply steady even pressure.
- Alternative Filling Method: You can also slice the eclairs in half horizontally and pipe (I love a large closed star tip for this - Ateco #853) the pastry cream onto the bottom half, and then cover with the top half of the puff. This is a pretty presentation but a bit messier to eat!: This method creates a fuller looking eclair and is visually elegant, but it can be messier to eat. When slicing, use a serrated knife and a gentle sawing motion to avoid crushing the shell. If the cream is too soft it will squeeze out; chill the cream firmer or use less per eclair. Some people prefer this for presentation, though it requires steadier hands.
- Make the Chocolate Glaze: Place the chopped chocolate, butter, corn syrup, and salt in a medium bowl. Microwave in 15-second increments, stirring after each, until completely melted and smooth. Working one at a time, hold each eclair upside down and dip the top in the glaze, then return to the tray. Repeat with all of the puffs. Allow the glaze to set at room temperature, about 20 to 30 minutes. Serve immediately.: The glaze should be glossy and pourable but not runny, coating the top with a satiny film. Dipping upside down lets the glaze settle on top rather than dripping down the sides. Let the glaze set uncovered so it forms a tender shell; chilling can dull the sheen. If the glaze thickens before you finish, gently rewarm in short bursts to restore fluidity without overheating the chocolate.
Notes
- Store components separately — Follow the storage notes and keep the shells and pastry cream apart until serving, this preserves crispness and prevents the filling from softening the shell prematurely. For longer storage freeze shells, and refrigerate the cream, thawing the shells before glazing.
- Use room temperature eggs — Bring eggs to room temperature before adding to the choux, they incorporate more easily and produce a smoother dough, reducing the chance of an uneven texture after baking.
- Pipe test shapes — Before filling a whole tray, pipe one test eclair and bake to check oven performance, this helps you adjust temperature or spacing and reduces batch risk when you have limited time.
- Keep a consistent oven temperature — Avoid opening the oven during the first half of the bake, as that can collapse the rising shells. Trust the process and only check near the end of the specified time window.
- Warm the glaze gently — If the chocolate glaze seizes or becomes thick, gently warm and stir in a touch of extra butter or corn syrup to restore fluidity without overheating the chocolate.
- Alternate presentation — For a fancier look slice the eclairs horizontally and pipe the cream onto the base before replacing the top for a fuller, more dramatic presentation that works well for plated desserts.