Homemade Cookie Dough Oreos
Homemade Cookie Dough Oreos are rich, chocolatey sandwich cookies with a creamy, brown sugar filled center studded with mini chips, offering a crispy shell and soft, buttery filling. Easy to make and deeply satisfying, they blend cocoa intensity with nostalgic cookie dough texture for a crowd pleasing treat. Make them for parties or weeknight baking and enjoy a reliable, irresistible indulgence.
Equipment
- Mixing Bowls
- Electric Mixer
- Baking Sheet
- Parchment Paper
- Measuring Cups
- Whisk
Ingredients
- 1 cup (2 sticks) unsalted butter, melted and slightly cooled Melted and slightly cooled to bind dough and add rich buttery flavor while ensuring other ingredients incorporate smoothly; use measured sticks for accuracy and avoid overheating to prevent scrambling eggs when combined.
- 3/4 cup sugar Granulated sugar provides sweetness and helps create a tender crumb through creaming or melting with butter; dissolves into wet ingredients to balance bitterness from cocoa and chocolate.
- 1 tsp vanilla extract Aroma-rich vanilla enhances overall flavor profile by adding warm, sweet notes and rounding out chocolate and butter components; stir in with wet ingredients for even distribution.
- 8 ounces (1 cup) semisweet chocolate or chocolate chips, melted and slightly cooled Melted and slightly cooled semisweet chocolate or chips intensifies chocolate flavor and contributes to a fudgy texture; temper temperature to avoid seizing when mixed with other fats.
- 1 large egg Beaten egg adds structure and moisture while helping emulsify fats and dry ingredients for cohesive cookie dough; use at room temperature to promote even mixing.
- 1 1/2 cups all-purpose flour All-purpose flour provides structure and bulk, forming the gluten network that gives cookies body; measure accurately and avoid overmixing to keep cookies tender.
- 3/4 cup dark or Dutch-processed cocoa powder Dark or Dutch-processed cocoa powder supplies deep chocolate flavor and darker color while contributing dry cocoa solids that affect texture and acidity balance; choose based on desired intensity.
- 1 teaspoon kosher salt Kosher salt enhances and balances sweetness while amplifying other flavors; sprinkle evenly to avoid salty pockets and to highlight chocolate notes.
- 1/2 teaspoon baking soda Baking soda acts as a leavening agent that helps dough spread and creates slight lift, contributing to a tender crumb; ensure fresh soda for reliable rising.
- 1/2 cup (1 stick) unsalted butter, room temperature Room temperature unsalted butter yields creamier texture in fillings and doughs while controlling salt level; soften properly to incorporate smoothly without melting.
- 3/4 cup packed light brown sugar Packed light brown sugar adds moisture and caramel-like flavor from molasses while promoting chewiness and color in the cookie filling; pack firmly for consistent sweetness.
- 1/2 cup all-purpose flour Additional all-purpose flour in the filling or dough provides structure and thickness, preventing overly soft or runny texture; sift if clumpy for even mixing.
- 1/4 cup milk or cream Milk or cream contributes moisture, richness, and a smoother mouthfeel, helping to achieve desired filling consistency; adjust quantity slightly to thin or thicken as needed.
- 1 teaspoon vanilla extract Vanilla extract deepens flavor and adds sweet aromatic complexity to the filling, complementing the cookie components; add in small amounts and taste for balance.
- 1/4 teaspoon salt Salt balances sweetness and enhances depth of flavor in the filling, making the chocolate and butter notes more pronounced; use measured quantity to avoid overpowering taste.
- 1/2 cup mini semisweet chocolate chips Mini semisweet chocolate chips provide bursts of chocolate texture and pockets of melty sweetness throughout the filling and cookies; fold in gently to distribute evenly without melting completely.
Instructions
- In a medium bowl, mix together the melted butter and sugar until combined. Whisk in the vanilla and melted chocolate. Add the egg and whisk until incorporated.: When you stir this mixture you'll notice a glossy consistency and a warm chocolate aroma, signaling the melted chocolate has blended with the sugars. I always let the melted butter and chocolate cool until just warm so the egg folds in without cooking, and whisk until the mixture feels smooth under the whisk, not grainy. If the mixture looks separated, keep whisking gently and let it rest for a few minutes so temperatures equalize. A common mistake is adding the egg to hot butter which can create scrambled bits, so double check temperature by touching the bowl. The sound is quiet, but you may hear a slight glug as air incorporates, and the color deepens to a uniform chocolate brown.
- In another bowl, whisk together flour, cocoa, salt, and baking soda. Stir flour mixture into the chocolate mixture, using your hands if needed to form a smooth dough. Divide the dough in two, and either roll each piece to 1/4-inch thick between two pieces of waxed paper, or roll into two 2 1/2-inch diameter logs. Refrigerate at least two hours or until firm.: As you whisk the dry elements, the cocoa will puff and the combined aroma becomes earthy. When you add these to the wet, expect the batter to thicken rapidly; the texture should change from glossy to pliable and slightly tacky under your fingers. Press a piece between your palms to check cohesion, it should hold without crumbling. Rolling between waxed paper yields an even thickness and fewer fingerprints, while logs are convenient for slicing; whichever you choose, chill time firms the fat crystals and prevents spreading during baking. Overworking here will yield a tough cookie, so handle with gentle, decisive motions. The dough chilling is crucial, and if it remains sticky after two hours, pop it back in until firm to the touch.
- Heat oven to 325 degrees and line baking sheet with parchment paper or a silicone baking mat.: The oven set to 325 degrees produces a gentle bake that allows the edges to set while the centers remain tender, minimizing cracked shells. Lining ensures easy release and even browning; you should hear a faint hiss of settling heat when you slide the tray in. If the oven has hot spots, rotate the tray halfway through to keep color consistent. A common pitfall is using a dark pan which accelerates browning, so prefer light colored pans or use an extra minute less baking time and watch the edges. The smell before baking is mostly neutral, but once in the oven you will begin to detect toasty cocoa notes.
- Cut dough logs into quarter inch thick slices, or cut out 2 1/2-inch diameter circles from dough sheets. Arrange on prepared baking sheet, leaving at least 1 inch between cookies. Bake for 15 minutes or until cookies are set and just starting to darken around the edges.: The slices should hold their shape as you place them, and the spacing allows air to circulate so each cookie bakes evenly. In the oven you will observe the edges firming first and a faint rise before settling, and the smell becomes deeper, almost brownie like. The surface will lose its glossy sheen and feel slightly dry to the touch when done. Avoid overbaking which will make cookies crisp rather than tender; remove them when the centers still look slightly soft because carryover cooking will finish them. A typical mistake is crowding the tray, which leads to uneven baking and merged cookies.
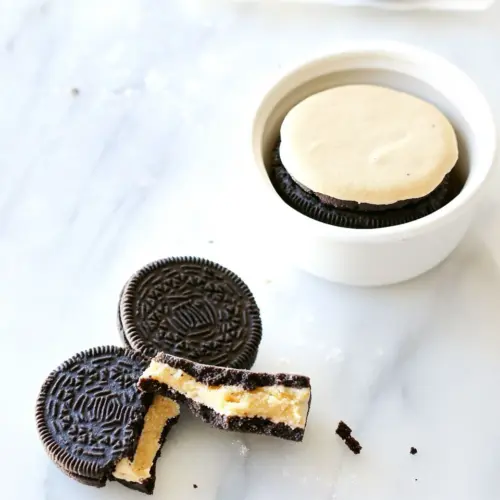
- To prepare filling, beat butter and brown sugar in a large bowl with an electric mixer on medium speed until light and fluffy. Mix in flour, salt, and vanilla extract on low speed until incorporated. Add cream and beat until fluffy, about 2 minutes, adding more cream if necessary to achieve desired consistency. Stir in chocolate chips. Spread or pipe about 1 tablespoon of filling onto underside of half of the cooled cookies, then top with remaining cookies and press lightly to adhere.: As you cream the butter and brown sugar, you will notice the mixture lighten in color and develop air pockets, which is the visual cue for fluffiness. Adding the flour on low prevents dusting and keeps the filling smooth rather than grainy. The cream adjusts texture, and the filling should be creamy and hold soft peaks before adding chips. When folding in mini semisweet chocolate chips , you will see little specks throughout and taste bursts of chocolate in each bite. Pipe or spread the filling evenly, feeling for slight resistance that tells you there is enough body to hold the cookie sandwich together. A trap to avoid is over beating after adding the liquid which can thin the filling excessively, so pause frequently to check consistency. After assembling, press just enough to see the filling spread to the edges, ensuring each bite has balance of shell and center.
- Cookies will keep, refrigerated in an airtight container, for up to one week; let come to room temperature before eating.: Proper storage maintains texture and flavor, and refrigeration keeps the filling firm and safe. When you remove them from the fridge, allow 20 to 30 minutes at room temperature so the filling softens and flavors bloom; the aroma becomes more pronounced and the texture more tender. If you notice condensation forming, let them sit briefly uncovered on a rack before sealing to avoid sogginess. A common error is leaving them at room temperature for long stretches, which can shorten shelf life, so keep them chilled if not eaten within a day or two.
Notes
- Swap the cocoa intensity by using darker Dutch processed cocoa for a deeper, less acidic chocolate note; this alters color and aroma slightly but keeps structure identical.
- Adjust mini chip amount to suit preference, folding in more for extra chocolate pockets or less if you want a smoother filling texture.
- Make smaller sandwiches by slicing thinner discs, reducing bake time slightly to maintain tenderness and creating bite sized treats for parties.
- Use cream instead of milk for a richer filling that holds shape better at room temperature, which is ideal when you expect the cookies to sit out for a bit.
- Chill assembled cookies briefly before serving to help the filling set, which improves transportability for gifting or bringing to events.