Homemade Chicken Broth
Homemade Chicken Broth is a clear, golden stock full of savory, herbal, comforting flavor. This easy to make, nutrient rich broth is perfect for soups, risottos, and weeknight dinners, delivering rich mouthfeel and natural goodness from a whole chicken and simple aromatics. Make a big batch to freeze and transform ordinary meals into something deeply satisfying.
Equipment
- Large stock pot
- Slotted Spoon
- Fine mesh sieve
- Instant read thermometer
Ingredients
- 1 whole chicken, about 6 pounds Roasted or simmered whole to provide rich, gelatinous body and deep savory flavor; includes bones and skin that release collagen during long simmering which yields a silky mouthfeel. Use a 6-pound bird to ensure sufficient meat, marrow, and connective tissue for a full-flavored broth. Trim excess fat if a clearer broth is desired, but some fat enhances mouthfeel and carries flavor.
- 1 yellow onion, chopped Sautéed or added raw to contribute sweet, aromatic base notes and natural sugars that balance savory chicken; chopping increases surface area for flavor extraction. Browned or softened onions add depth and a subtle caramelized complexity to the finished broth. Remove large pieces before serving for clarity if desired.
- 2 whole carrots, cut into 2 inch pieces Reduced by simmering to impart gentle sweetness and earthy aroma; cutting into 2-inch pieces exposes interior to extract carotenoids and natural sugars. Contributes body and a rounded vegetable flavor that complements chicken and aromatics. Can be left larger to facilitate easy straining and removal.
- 4 celery stalks, including leaves, cut into 4 inch pieces Simmered to contribute bright, vegetal backbone and fresh savory flavor; including leaves adds aromatic nuance. Cutting into 4-inch pieces preserves texture during long simmer and simplifies removal at the end of cooking. Celery’s natural salts help balance overall seasoning without overpowering.
- 4 whole garlic cloves Crushed or left whole to release a mellow garlic aroma without overpowering; whole cloves provide a subtler, slower-extracting garlic presence. Adds savory depth and a faint sweet pungency after long simmering, enhancing overall complexity. Easily removed with other solids during straining.
- 1 bunch of parsley Added as a bundle or roughly chopped to provide bright, herbaceous freshness and green notes that lift the broth; stems contribute flavor during simmering while leaves add delicate aromatics. Parsley brightens the finish and balances richer elements from the chicken and roasted vegetables. Tie as a bouquet garni for easy removal if desired.
- 10 sprigs of thyme Tied or scattered into the pot to impart concentrated earthy, floral, and slightly minty notes; sprigs release essential oils gradually during simmering. Use ten sprigs to ensure the thyme’s herbal backbone complements rather than competes with other aromatics. Remove after cooking to avoid bitterness from over-extraction.
- 5 sprigs of rosemary Bruised or left whole to contribute piney, resinous, and aromatic depth; sprigs release robust essential oils that add savory complexity. Rosemary adds a savory, slightly camphor-like note that pairs well with chicken and long simmering times. Use sparingly and remove before serving to prevent bitterness.
- 2 tablespoons salt Dissolved during cooking to season and help extract flavors from solids; measured salt controls the overall savory balance and enhances other aromatics. Two tablespoons provide a starting point for a rich broth but can be adjusted after reduction or when used in recipes. Consider reducing added salt if planning to concentrate or reduce the broth further.
- 1 tablespoon whole peppercorns Added whole to impart warm, peppery aromatic notes and subtle heat; whole peppercorns release flavor steadily without clouding the broth. Using whole peppercorns allows their oils to infuse during long simmer and simplifies removal when straining. Crush lightly if you want a more pronounced peppery character.
- water Filled to cover ingredients and act as the extraction medium to dissolve flavors, collagen, and nutrients; quantity depends on pot size and desired concentration. Use cold water to start which helps draw out proteins and collagen from the chicken and bones during gentle heating. Simmer gently to clarify and concentrate flavors before straining.
Instructions
- Place the chicken in the bottom of a large stock pot. Add the rest of the ingredients on top and around the chicken.: The aroma that greets you as the pot warms is gently meaty and comforting, a low, promising scent that signals the start of extraction. You'll see the pale skin and bone submerged, which will slowly release collagen and flavor. Stirring is unnecessary here, let gravity and heat do the work. A common mistake is using a pot that is too small, which can lead to uneven simmering and inefficient extraction.
- Cover everything completely with water and bring to a boil over high heat.: As you tuck the onion , carrots , celery , herbs, whole garlic , and spices around the bird, notice how the mixture looks layered and abundant. The visual is important, because even distribution ensures uniform flavor as everything steeps. Avoid crowding the pot; ingredients should be surrounded by water so heat flows evenly.
- Once your water has come to a rolling boil, reduce heat to medium-low and simmer, uncovered, for about 4 hours. The cooking time will depend on the size of the chicken. The internal temperature of the chicken should be 165 degrees Fahrenheit.: At this stage the sound changes from stillness to an escalating chorus of bubbles, finishing with a full, glossy boil. Starting with cold water helps draw soluble proteins out methodically. A pitfall here is leaving the heat at high once full boil is reached, which can cause a rolling boil that emulsifies fat and clouds the broth.
- Carefully remove the whole chicken from the pot. Shred and debone the chicken and use it as desired for recipes.: Simmering softly is where clarity and depth are achieved; you should see gentle, steady ripples rather than violent bubbling. The smell will transform from raw to roasted sweet and herbaceous as connective tissues break down. Keep an eye on liquid levels, topping with hot water if needed, but avoid vigorous boiling which can make the stock cloudy.
- To strain the chicken stock, remove all of the ingredients from the pot using a slotted spoon. Carefully strain the chicken stock into a large container. Continue to strain if needed to remove any remaining ingredients.: Larger birds release collagen over time, so a heavier chicken may need a little longer to yield the same body. Use visual cues like the meat pulling away from the bone and the broth developing a richer color. A common error is undercooking, leaving gelatin under extracted, resulting in a thin broth.
- Use the chicken stock as needed for recipes or store in the refrigerator for later use.: This safety check ensures the chicken is fully cooked and safe to handle. When you test, insert an instant read thermometer into the thickest part of the bird and note the quiet click of completion, reassuring and decisive. Overcooking beyond the necessary time can make meat dry, but for stock the primary goal is flavor extraction rather than texture.
- Carefully remove the whole chicken from the pot: When lifting the bird out you will feel the weight lighter, bones more exposed; the aroma is richer and slightly sweet. Use tongs or a slotted spoon to avoid splashing. Let the chicken cool just enough to handle; a typical mistake is trying to shred while it is too hot, which increases risk of burns.
- Shred and debone the chicken and use it as desired for recipes: The meat will be tender and easily pull apart, with a comforting, juicy texture that pairs well with broth or salads. Taste a bit to check seasoning and texture, and reserve any pieces for quick dishes. One trap is leaving tiny bone fragments in the shredded meat, so inspect carefully as you pull it apart.
- To strain the chicken stock, remove all of the ingredients from the pot using a slotted spoon: As you scoop solids out the surface becomes clearer, and the smell becomes concentrated and clean. Remove large pieces first, then pour the remaining liquid through a fine mesh sieve or cheesecloth to catch smaller bits. Avoid rushing this step, as hurried straining can leave unwanted sediment in the final stock.
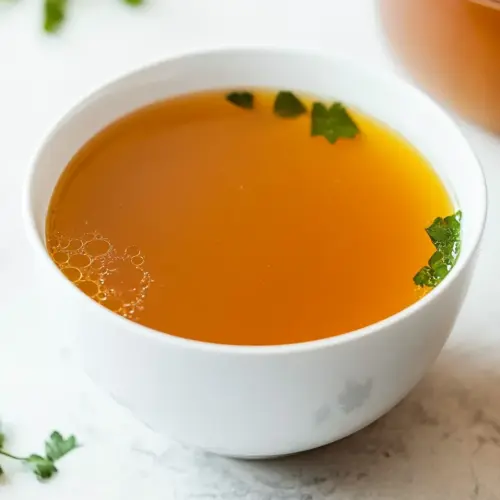
- Carefully strain the chicken stock into a large container: The visual payoff is a translucent, golden liquid that shimmers as it settles. Pour slowly to reduce agitation and prevent suspended particles from clouding the stock. A frequent mistake is skipping a second strain; if you see tiny particles, strain again for pristine clarity.
- Continue to strain if needed to remove any remaining ingredients: If the broth still shows specks or cloudiness, run it through cheesecloth a second time. Patience here yields a cleaner flavor and a prettier jarred stock. Overlooking this can result in a stock that looks fine from afar but has an uneven mouthfeel.
- Use the chicken stock as needed for recipes or store in the refrigerator for later use: As it cools the aroma will mellow and the fat may rise to form a cap, which you can skim if you prefer a leaner stock. I like to portion into jars for future soups, sauces, and risottos. A storage misstep is leaving the stock at room temperature too long before chilling, which can affect safety and flavor.
Notes
- Use dark meat only if you want a richer, slightly fattier stock; using legs and thighs concentrates flavor and gelatin but will produce a heavier mouthfeel, so adjust reduction accordingly.
- Make a lighter version by removing the skin from the chicken before simmering, which reduces fat while retaining much of the savory richness, ideal when you want a cleaner broth for delicate soups.
- Herb bundle tie thyme and rosemary in kitchen twine or a sachet for easy removal, which keeps the aromatic profile intact without loose stems in the finished liquid.
- Vegetable forward if you prefer, increase the ratio of carrots and onion to push the stock toward a sweeter, more aromatic profile, which pairs wonderfully with winter stews.
- Low sodium prep use half the salt called for and finish seasoning in the final dish, which gives you more control and avoids over salting when the broth reduces.
- Quick version if you are short on time, simmer for 1 to 2 hours, which gives reasonable flavor, though longer simmering will extract more body and depth.
- Roasted bones roast the whole chicken or bones first for a deeper, brown stock flavor, but be aware this will darken the color and add toasted notes that change delicate recipes.
- Clarify if desired use egg white raft clarification for a jewel clear consommé, but know this adds steps and a slightly different texture to the final liquid.
- Freeze smart cool completely then portion into labeled containers so you can grab small amounts for sauces without thawing large jars.
- Infuse with aromatics add a strip of lemon peel or a few peppercorns for subtle brightness, but add them in the last hour to avoid bitterness or overpowering the herb balance.