Homemade Cherry Pie
Homemade Cherry Pie is a bright, flaky classic, filled with glossy, jammy cherries and a tender double crust. The combination of sweet fruit, a touch of lemon, and a sugared lattice creates a crispy top and a luscious interior, perfect for an easy weeknight dessert or a festive gathering. Make it for its nostalgic flavor and simple, showstopping finish.
Equipment
- Oven
- 9 inch deep pie pan
- Mixing Bowls
- Rolling Pin
- Pizza Cutter
- Pastry Brush
Ingredients
- 6 cups sweet cherries, pitted (2 1/4 to 2 1/2 lbs) Provide juicy, sweet fruit filling when pitted and measured; contributes bulk, natural sugars, and bright cherry flavor throughout the pie. Cook down to release juices that combine with starch to thicken the filling, and offer textural contrast to the crust. Choose ripe, firm cherries for best color and taste.
- 1 tbsp lemon juice Add bright acidity and balance to the sweet filling, preventing the pie from tasting flat or overly sugary. Help preserve cherry color and enhance overall flavor complexity when stirred into the fruit before cooking.
- 3/4 cups sugar, use 1 cup for sour cherries Sweeten and help create a syrupy filling; adjust amount based on cherry tartness to achieve desired sweetness. Dissolve into the fruit juices during cooking so the filling tastes harmonized rather than cloying.
- 5 tbsp corn starch Thicken the cherry juices into a glossy, sliceable filling by absorbing liquid and creating a gel when heated. Mix with the sugar and fruit early to prevent a runny pie and to ensure even distribution of thickening power.
- 1/2 tsp cinnamon Warm and enhance the fruit flavor with subtle spice notes, adding depth without overpowering the cherries. Sprinkle sparingly to complement sweetness and provide aromatic complexity in every bite.
- 1 tbsp unsalted butter, diced, to dot the top Dot and enrich the top of the filling with small butter pieces that melt during baking to add richness and a silky mouthfeel. Place evenly so melted butter integrates into the fruit for a more luxurious texture.
- 1 Recipe for Double Pie Crust Provide the prepared dough needed for both bottom and top crusts to encase the cherry filling properly. Ensure dough is chilled and rolled to the correct size to create a flaky, structured pastry that holds the filling.
- 1 egg Bind and add richness when beaten and brushed onto the dough as an egg wash to promote browning and a glossy finish. Use whole egg for color and sheen and apply evenly before sprinkling sugar.
- 1 tbsp milk, or water Thin the egg wash slightly to make a smooth glaze that spreads easily over the pastry surface, aiding even browning and sheen. Choose milk for extra color and tenderness, or water for a lighter finish.
- 1 tbsp coarse sugar Add a crunchy, sparkling finish to the crust that enhances presentation and provides a pleasant textural contrast. Sprinkle over the egg-washed pastry so it caramelizes slightly during baking for attractive sparkle.
Instructions
- Make pie crusts and refrigerate 1 hour before using. Arrange oven rack in the lower third of the oven.: The aroma of butter and flour mingling is subtle but satisfying, and the dough will feel cool and slightly tacky to the touch when properly mixed. Chilling for an hour firms the fat and relaxes gluten, which yields a flakier, more tender crust once baked. If you skip or under chill the dough, the crust may shrink or become tough during baking, so resist the urge to hurry this step. A common mistake is rolling immediately after mixing, which can lead to tearing and poor texture.
- In a small bowl, whisk together 3/4 cup sugar, 5 tbsp corn starch and 1/2 tsp cinnamon.: Placing the rack in the lower third helps the bottom crust cook through without overbrowning the top too quickly. You will notice the underside of the crust gaining a light, toasty color when it is properly baked. If the rack sits too high, the top will finish before the filling sets, leaving a soggy bottom. Avoid repositioning the rack once the pie is in to prevent uneven baking.
- Pit cherries and transfer to a large bowl. Stir in 1 tbsp lemon juice. Sprinkle on sugar/cornstarch mixture and stir together until evenly moist.: When these dry ingredients are whisked together, you will see a uniform pale mixture with no lumps, which ensures even thickening when mixed with the cherries. Corn starch needs even distribution so it does not clump in the filling, and whisking accomplishes that. A common error is dumping the dry mixture into the cherries without combining it first, resulting in pockets of undercooked starch in the pie.
- Roll the first pie crust disk into a 13" circle and transfer to a 9" wide, deep pie pan. The edges should hang a little over the edge of the pan. Pour the cherry mixture over the bottom crust along with any accumulated juices. Dot with butter.: As you remove each pit, you will notice the cherries release a little juice into the bowl, staining your hands and the bowl a vivid red. Work steadily so the fruit stays intact, keeping most cherries whole for texture in the finished pie. If cherries are crushed or overhandled, the filling can become overly liquid, so be gentle when pitting. Ensure no pits remain, as they are unpleasant and potentially harmful if left in.
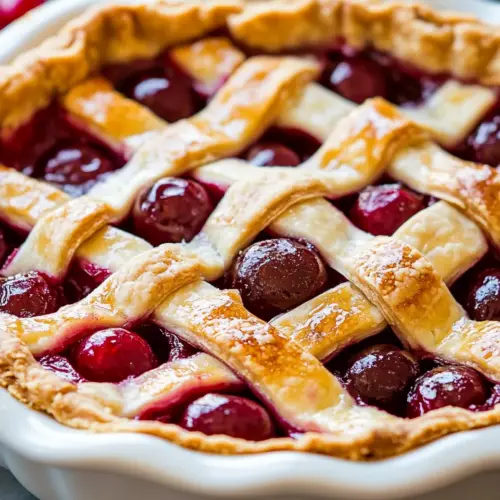
- Roll the second crust into a 12" circle and use a pizza cutter to slice into ten 1-inch strips. Using the 10 strips of dough, create a lattice crust over the top (see photo tutorial on Natasha's Kitchen). Tuck in the excess dough at edges then pinch the edges to seal or crimp edges if desired. Refrigerate pie 30 minutes (or freeze 15 minutes) while preheating oven to 425˚F.: The bright scent of citrus will lift the cherry aroma immediately, and the acid helps amplify the fruit's natural taste while slightly slowing down excessive sugar dominance. Lemon juice also helps maintain a fresh color in the filling as it cooks. Be careful not to add more than directed, which could impart a sour note that masks the cherry sweetness.
- Beat together 1 egg and 1 tbsp milk or water and brush the egg wash over the lattice crust and edges. Sprinkle the top with 1 tbsp coarse sugar. Bake in the lower third of the oven at 425˚F for 25 minutes.: As you fold the dry mixture into the cherries, the fruit will glisten and begin to release more juice, creating a glossy coating. Mixing until every cherry is evenly coated ensures consistent sweetness and thickening throughout the pie. Overmixing can break cherries open and create too much liquid, so stir gently until evenly moistened and stop once the coating looks uniform.
- Place a sheet of foil on the bottom rack to catch drips, reduce oven temperature to 350˚F, and bake an additional 35-40 minutes, or until crust is golden and cherry juice has been bubbling through the lattice top for at least 5 minutes.: Rolling reveals the faint lamination of butter in the dough, and the dough should glide under your rolling pin with light resistance. Transferring the dough into the pan, you will hear a soft rustle as it settles, and the edges will hang slightly over the rim. Properly fitting the crust prevents gaps that could leak juices. If the dough tears, press it gently to mend or re-roll a small scrap to patch.
- Pour the cherry mixture over the bottom crust along with any accumulated juices: As the filling hits the crust, a bright, syrupy pool forms and the cherries nestle into place. Pour slowly to avoid splashing onto the rim, and distribute the fruit so the surface is even. Too much accumulated juice can overwhelm the structure, which is why the next step of dotting with butter and creating a lattice is important for controlled evaporation during baking.
- Dot with butter: The small yellow dots will gleam against the cherries and melt into the filling as it heats, enriching the flavor and promoting a glossy finish. As it melts, the butter infuses pockets of savory richness that contrast with the fruit. Skipping the butter sacrifices a layer of flavor and can result in a flatter taste profile.
- Roll the second crust into a 12" circle and use a pizza cutter to slice into ten 1-inch strips: The rhythm of rolling and slicing creates uniform strips that weave into a tidy lattice. The strips should be evenly sized so the top bakes uniformly and the visual pattern looks intentional. If strips are uneven, some will brown faster and others might not crisp properly, so take time to measure or eyeball consistently.
- Using the 10 strips of dough, create a lattice crust over the top: The lattice will sigh softly as you weave strips over and under, and the pattern allows steam to escape while showcasing the bubbling filling. A well-woven lattice encourages even reduction of juices and presents a beautiful top. Common mistakes include spacing strips too tightly, which limits evaporation, or too loosely, which invites spills down the sides.
- Tuck in the excess dough at edges then pinch the edges to seal or crimp edges if desired: Sealing ensures the filling stays contained and the edges brown attractively. As you pinch, the dough should feel supple yet hold its form. Poor sealing can lead to leaking, and the crust edge may separate during baking, so make sure the fold is firm and continuous.
- Refrigerate pie 30 minutes or freeze 15 minutes while preheating oven to 425˚F: Chilling firms the fats in the crust, helping the structure hold during the initial high heat blast, which produces flakiness. You will notice the dough feels noticeably firmer after chilling. If you skip chilling, the crust can slump and the lattice can lose shape as it hits the hot oven.
- Beat together 1 egg and 1 tbsp milk or water and brush the egg wash over the lattice crust and edges: Brushing the wash yields an immediate sheen and glues any stray pieces of dough together. The surface will look wet and glossy before baking and will turn golden in the oven. Uneven brushing creates patchy browning, so use a small pastry brush and even strokes.
- Sprinkle the top with 1 tbsp coarse sugar: The coarse sugar will sparkle and create small crunchy highlights on the crust. The sugar also aids in browning on the exposed pastry. Using fine sugar here will dissolve and not provide the same decorative crunch.
- Bake in the lower third of the oven at 425˚F for 25 minutes: At this initial high temperature, the crust begins to set and color quickly, and you may hear a gentle pop as fruit juices start to warm. This step jumpstarts browning and flaky lift. Watch for rapid darkening, which would indicate the oven is running hot; tent with foil if the edges are coloring too fast.
- Place a sheet of foil on the bottom rack to catch drips, reduce oven temperature to 350˚F, and bake an additional 35 to 40 minutes: Lowering the temperature allows the filling to thicken and the juices to reduce without burning the crust. You will see the filling bubble through the lattice, and that five minute bubbling is a sign the filling has reached adequate temperature to activate the starch. A common mistake is pulling the pie out too early before bubbles have appeared, which can leave the center runny.
- Bake until crust is golden and cherry juice has been bubbling through the lattice top for at least 5 minutes: The visual cue of steady bubbling and a uniformly golden crust is the best confirmation of doneness. The sound may be a low steady simmer as juices thicken and evaporate. If the crust is golden but the filling has not been bubbling, continue baking and tent the top if it is browning too quickly.
Notes
- Adjust sugar by cherry sweetness: If your cherries taste very sweet, reduce the sugar slightly; for tart cherries, increase to the suggested one cup. Taste a spoonful of chopped cherries with a pinch of sugar to preview the final balance before combining everything.
- Deal with extra juice: If cherries release a lot of juice, increase the cornstarch by one tablespoon to help thicken, or drain a few tablespoons of excess liquid before mixing. Excess liquid can make the filling loose and lead to leaking during baking.
- Firmer lattice results: Chill the assembled pie for the full thirty minutes rather than quick freezing when you can, it firms the lattice so strips hold shape while in the oven. Quick freezing is fine if you are pressed for time, but chilling is gentler on dough texture.
- Swap milk for water in the egg wash: Use water if you prefer a slightly lighter sheen, milk gives a deeper color. Both work, so choose based on the finish you prefer.
- Prevent uneven browning: Rotate the pie once midway through the final bake for more uniform color, especially if your oven has hot spots. Use oven mitts and be gentle to avoid jostling the filling.
- Freeze for make ahead: Wrap the assembled, unbaked pie tightly and freeze up to one month, then bake from frozen adding 10 to 15 minutes to the total bake time. Freezing helps plan ahead for gatherings without sacrificing quality.