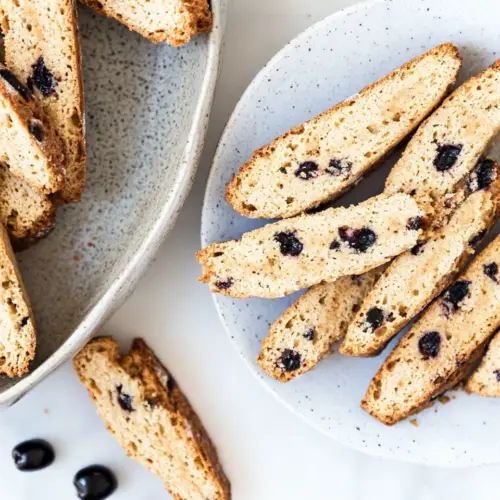
Homemade Cherry Biscotti
Homemade Cherry Biscotti crisps to a perfect snap with bright Montmorency tart cherries, toasty sliced almonds, and a lemon almond aroma. These easy twice baked cookies are ideal for morning coffee or gifting, offering a crunchy, flavorful treat that keeps well. Make a batch for cozy gatherings or an easy weeknight baking win, they reward patience with irresistible texture and tang.
Equipment
- Mixing Bowl
- Whisk
- Baking Sheet
- Parchment Paper
- Serrated Knife
- Cooling rack
Ingredients
- 2 cup s00 flour or bread flour Combine into the dry base to provide structure and chew; all-purpose or bread flour contributes gluten development that holds biscotti together. Adjust flour type slightly to control crumb density and texture during baking and slicing.
- 1 cup sugar Sweeten and tenderize the dough while assisting with browning; sugar balances tart cherries and enhances flavor. Dissolve partially into wet ingredients to create a consistent, cohesive batter.
- 1 teaspoon baking powder Leaven gently to create lightness and subtle lift; baking powder releases gases that prevent biscotti from being overly dense. Ensure even distribution by sifting or whisking into the flour before adding liquids.
- 1/2 teaspoon salt Enhance flavor balance and control yeastlike activity; salt amplifies other flavors and tempers sweetness. Measure carefully to avoid overpowering the delicate almond and lemon notes.
- 2 eggs Bind and enrich the dough while contributing moisture and structure; whole eggs provide lift and help set the biscotti during the initial bake. Beat briefly to incorporate air and ensure even distribution throughout the mixture.
- 1 egg yolk Enrich and add silkiness to the dough; the extra egg yolk increases fat content for a richer, tender crumb. Whisk in with the whole eggs to deepen flavor and improve texture without adding excessive moisture.
- 1/2 teaspoon almond extract Impart concentrated almond aroma and complement the sliced almonds; almond extract adds depth and an intensified nutty note. Use sparingly because the extract is potent and can dominate other flavors if overused.
- zest of 1 lemon Brighten and add fresh citrus fragrance; lemon zest contributes aromatic oils that lift the overall flavor profile. Grate finely to avoid bitter pith and mix thoroughly so the zest is evenly dispersed.
- 1/2 cup sliced almonds Introduce crunch and toasted nuttiness while reinforcing the almond flavor; sliced almonds add texture contrast to the twice-baked cookies. Toast lightly before mixing to enhance aroma and prevent sogginess from residual moisture.
- 1/2 cup Montmorency tart cherries Provide characteristic tart fruitiness and chewy bursts; Montmorency tart cherries deliver a bright contrast to the sweet dough. Chop if desired and pat dry to remove excess juice so biscotti maintain a crisp texture.
Instructions
- Preheat the oven to 350°.: The room fills with a warm hint of caramel as the oven comes to temperature, which sets the stage for gentle browning during the first bake. A correctly warmed oven ensures even rise and consistent color, and if you skip preheating the logs can spread unevenly and underbrown. Make sure your oven dial is accurate, an oven thermometer helps avoid surprises.
- In a large bowl mix together the flour, sugar, baking powder, and salt using a whisk until well combined.: When you whisk these dry ingredients, you create an even distribution of leavening and salt so every bite tastes consistent. The flour should look homogenous and slightly aerated, with no visible clumps of baking powder or sugar pockets. Over mixing the dry ingredients is not a problem, but failing to combine them can cause uneven texture in the final biscotti.
- Form a well in the center of the dry ingredients using the back of your hand.: Building a well helps control how the wet ingredients are introduced, so the dough comes together smoothly without overworking. Visually, you should see a clear depression ready to receive eggs and extracts. If you skip the well, you may end up adding liquids unevenly which makes pockets of wet dough that require more mixing.
- Add the eggs, lemon zest, and almond extract to the center of the well and whisk or use a fork to scramble the eggs.: As you whisk, the aroma of lemon zest becomes pronounced and the egg mixture looks glossy. This pre-mixing helps emulsify the eggs with the extracts before they meet the flour, creating a more cohesive dough. If the eggs are too cold they will not combine as smoothly, causing small bits of egg to remain unincorporated.
- Using a fork start to slowly bring the dry ingredients into the wet ingredients in the bowl to form a dough.: You will feel the texture shift from shaggy to a loose ball as flour hydrates, and the scent of lemon and almond will lift. Working methodically prevents overmixing which can make biscotti tough. A common mistake is rushing and adding too much handling, which tightens the gluten and ruins the desired crumb.
- Lightly knead the dough for 2 to 3 minutes.: The dough should feel slightly tacky but not sticky, and a gentle knead makes the dough cohesive while developing a moderate structure. You will notice a subtle elasticity return as gluten aligns, which helps the logs keep shape. Avoid vigorous kneading, because that causes a dense, bread like texture.
- Add in the sliced almonds and some Montmorency tart cherries and mix it in until they are well combined.: The fruit and nuts should be evenly distributed so every slice gets a balance of textures and flavors, and you will see spots of red cherries against the pale dough. Folding them in by hand preserves the chunkiness and prevents over chopping. If you use large clumps of cherries the dough can come apart when slicing, so even distribution is key.
- Split the dough in half and transfer them to a cookie sheet tray lined with parchment paper and flatten to make two 4” by 8” logs.: The logs should be smooth on top and even in thickness, which helps them bake uniformly to a golden hue. Pressing and shaping determines the final cookie width, so take care for symmetry. A frequent error is making logs uneven, which leads to slices with inconsistent thickness and baking times.
- Bake them in the oven at 350° for 25-30 minutes or until golden brown and firm and then let cool on the sheet tray for 20 minutes.: During this bake you will smell toasted almonds and a faint citrus perfume, and the tops will firm and take on a warm golden color. Cooling on the sheet for 20 minutes lets the structure set so the logs hold together during slicing. If you slice too soon the logs may crumble because the interior is still fragile.
- Slice the baked dough using a serrated knife longways about a 1/3” to a 1/2” thick.: A serrated knife gives clean cuts without crushing, and you will see cross sections studded with cherries and almonds. Make confident, even strokes to avoid ragged edges. Cutting too thin can lead to overbaked, brittle pieces in the second bake, while cutting too thick prevents the biscotti from drying out properly.
- Place the sliced cookie cut side up back on the cookie sheet tray lined with parchment paper and bake at 350° for another 10 to 15 minutes.: The second bake is when crispness develops, and you will hear a faint crackle as moisture leaves the cookies. Watch for light browning on the cut edges, which indicates they are nearing perfect texture. Overbaking will produce an overly hard cookie that shatters, so check early and often during the final minutes.
- Cool the biscotti on a cooling rack to room temperature.: Cooling allows the final crisp to set and the aromas to marry, resulting in a firm, crunchy bite. The biscotti will feel solid to the touch and have a clear snap when broken. Storing before fully cooled can trap steam and soften the cookies, so patience pays off here.
Notes
- Swap flours carefully If you prefer a slightly tender crumb, use all purpose styled flour instead of bread style, and expect a softer interior that will still crisp in the second bake.
- Toast the almonds Lightly toasting the sliced almonds in a dry skillet before folding them in adds depth and a warm aroma that complements the cherries.
- Adjust cherry size Chop large cherries into uniform pieces so they distribute evenly and do not create wide cavities that weaken slices during the second bake.
- Control sweetness Reduce the sugar by one quarter cup if you want a less sweet biscotti, keeping in mind this will slightly alter browning and crispness.
- Make smaller logs Forming three thinner logs instead of two creates narrower biscotti that bake faster and are perfect for dainty servings or gift boxes.
- Brush with egg wash For a glossier top, lightly brush the logs with a beaten egg before the first bake, which yields a more golden exterior.
- Storage tips Keep the biscotti in an airtight tin at room temperature, layering parchment between rows to prevent abrasion and maintain glossy surfaces.