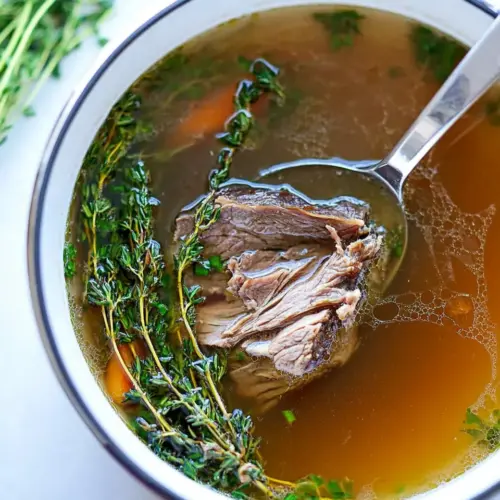
Homemade Beef Broth Stock
Homemade Beef Broth Stock is a rich, savory base with deep beefy notes and silky mouthfeel, perfect for soups, stews, and sauces. This easy make ahead recipe yields a gelatinous, flavorful broth that elevates weeknight dinners and special occasion dishes alike, giving you a versatile kitchen secret worth the slow simmer.
Equipment
- Dutch Oven
- Large stock pot
- Fine-mesh strainer
- Large colander
Ingredients
- 1 tablespoon canola oil Sear in a heavy pot to develop deep brown fond and concentrated flavor before adding liquids; contributes fat for mouthfeel and helps brown the meat evenly.
- 1 1/2 pound beef chuck roast or beef shank Provide rich meaty body and collagen that breaks down into gelatin during long simmering; choose chuck or shank for balanced marbling and connective tissue.
- 5 -6 pounds beef neck bones bouillon or soup bones Add substantial collagen and beefy depth when simmered long; use neck bones or soup bones to create a deeply flavored, gelatinous stock.
- Kosher salt and freshly ground black pepper Season lightly during cooking to help draw flavors out of the bones and vegetables; balance with additional salt after reducing for proper seasoning.
- 1 onion quartered Add aromatic sweetness and umami when caramelized; quartered onion releases natural sugars and savory compounds during long simmering.
- 2 carrots cut into 4-5 sections Contribute sweetness and earthy notes while adding body to the stock; cutting into sections exposes more surface area for flavor extraction.
- 1 celery cut into 4-5 sections Introduce aromatic vegetal complexity and subtle bitterness that balances richness; chopping into sections helps release celery's savory compounds.
- 1 parsnip cut into 4-5 sections (optional) Optional boost of sweet, nutty, and slightly peppery flavor that deepens the stock; parsnip adds complexity similar to carrot when included.
- 1 head of garlic sliced in half Impart mellow roasted garlic sweetness and savory depth when halved to expose cloves; sliced head accelerates flavor release into the broth.
- 2 bay leaves Provide subtle herbal bitterness and a bay-like aromatic backbone that supports the savory profile; remove leaves after cooking for balance.
- Bunch of thyme leaves Add bright, floral herbal notes and a faint peppery edge that lift the heavy beef flavors; use whole sprigs so leaves can be removed easily.
- Small bunch of parsley Contribute a fresh green herbal lift and slight earthiness; parsley stems and leaves help clarify and brighten the finished stock.
- 1 tablespoon beef bouillon base Boost overall savory intensity and help emulate concentrated meaty flavors; dissolve into the stock to reinforce beefy umami.
- 6 -8 whole peppercorns Provide a subtle spiced warmth and aromatic complexity; whole peppercorns infuse the broth slowly without adding cloudiness.
- 1/2 tablespoon kosher salt plus more after cooking to taste Preserve and control seasoning during and after cooking; initial amount seasons the simmering liquid while more can be added to taste after reduction.
Instructions
- Warm the oil in a dutch oven or large stock pot over medium high heat. Season the chuck roast with kosher salt and freshly ground black pepper and brown in the pot on all sides then transfer to a plate or platter. Add the bones and brown in batches on all sides. Add the chuck roast to the pot with the browned bones, carrot, celery, onion, garlic halves and parsnip (if using). Add 4 quarts cold water, covering the beef and veggies by at least 1-2 inches. Add a handful of the parsley (with leaves and stems intact), thyme sprigs, peppercorns, bay leaves, beef bouillon and kosher salt.: The moment the oil begins to shimmer but not smoke is your cue to begin. You'll hear a satisfying sizzle when the first piece of beef hits the surface, and the aroma of caramelizing protein will start to fill the kitchen. Browning forms the Maillard crust, which creates rich, savory notes in the finished stock. If the pot is too cool you'll get no browning, and if it is too hot the oil will burn and the meat will char bitterly. A common mistake here is crowding the pan, which causes steaming instead of browning, so work in batches for an even mahogany color.
- Bring to a boil, then reduce to a simmer and skim the stock with a fine mesh strainer every 30 minutes or so. Cook partly covered for 120 up to 480 or until the stock is rich and brown and tastes well flavored. Add more salt to taste if necessary.: As the beef sears, watch for edges turning deep brown, not black, and listen for a steady sear sound that indicates proper caramelization. The seasoning helps draw flavor to the surface and form a savory crust. Transfer to a plate once each side has developed color, because overcooking at this stage wastes those concentrated flavors. A common error is leaving meat in too long, which produces dry shreds rather than rich fond for deglazing later.
- Turn off the heat and allow the broth to cool or if using immediately, place a large colander over a Pyrex 4 cup glass measuring cup and slowly drain the broth from the rest of the aromatics so the colander catches any veggies or bones that may fall from the pot. Then, use a fine-mesh strainer to strain the stock into your next recipe's soup stock pot. Or, if storing to use later, strain into 1 quart wide-mouth glass canning jars and cool before adding a tight fitting lid. Refrigerate for up to 5 days or freeze in gallon bags for up to 6 months.: When bones hit the hot oil they should hiss and begin to color at the points of contact, signaling the release of deeply roasted aromatics. Proper browning of bones builds the backbone of the stock, giving it a nutty, roasted character. Turn them so each nook sees color, and be careful not to overcrowd which will steam the bones. One mistake to avoid is rinsing away the fond in the bottom of the pot; instead, scrape it up later for maximum depth.
- Add the chuck roast to the pot with the browned bones, carrot, celery, onion, garlic halves and parsnip (if using): Once everything is in, the interplay of browned meat and fresh aromatics begins. You will immediately smell the sweetness of the carrot and the savory lift from the onion . This combination of roasted and raw ingredients layers flavor, allowing sweetness and umami to develop during simmering. A mistake here is chopping vegetables too small, they can disintegrate and cloud the stock, so keep chunky pieces to maintain clarity.
- Add 4 quarts cold water, covering the beef and veggies by at least 1 to 2 inches: Using cold water encourages gradual extraction of gelatin and flavor as the pot warms, so you will see small bubbles form before a steady simmer. Keep the water level consistent to prevent exposed bones from burning and to ensure even extraction. Too much water dilutes flavor, while too little risks over reduction and saltiness; top up as needed during long simmers.
- Add a handful of the parsley (with leaves and stems intact), thyme sprigs, peppercorns, bay leaves, beef bouillon and kosher salt: Dropping whole herbs and spices in at this stage infuses the simmering liquid slowly, so you will notice the aroma deepen as the pot progresses. The parsley stems, thyme, and bay shape the herbal profile without becoming overpowering. Avoid adding ground spices which cloud the stock; whole spices are easier to remove and make for a cleaner finish.
- Bring to a boil, then reduce to a simmer and skim the stock with a fine mesh strainer every 30 minutes or so: As the liquid rises to a boil you will see foam and scum collect on the surface, which should be skimmed to keep the stock clear and bright. The simmer will settle into a gentle rhythm, and you may hear occasional soft rolling bubbles. Skimming is a simple ritual that improves clarity and taste; neglecting it will lead to a cloudy, less refined broth. A common misstep is maintaining a hard boil which emulsifies fat into the stock, making it greasy.
- Cook partly covered for 120 up to 480 or until the stock is rich and brown and tastes well flavored: Over long hours the liquid will deepen in color and mouthfeel as collagen breaks down into gelatin. The aroma becomes more concentrated and meatier, and the texture turns silky on the tongue. I taste periodically, because the ideal endpoint is a deeply flavored broth rather than an arbitrary time. One pitfall is reducing too far without checking salt, which can make the final stock overly intense. If you see the liquid reduce too quickly, lower the heat and add a bit of water.
- Add more salt to taste if necessary: After lengthy cooking, flavors concentrate and the correct salt level emerges. Taste a lukewarm spoonful and adjust, remembering you can always add more but cannot remove excess. The right seasoning lifts all the components and makes the broth sing. Rushing this step and salting at the beginning without rechecking is a frequent mistake, because the final concentration will be different after reduction.
- Turn off the heat and allow the broth to cool or if using immediately, place a large colander over a Pyrex 4 cup glass measuring cup and slowly drain the broth from the rest of the aromatics so the colander catches any veggies or bones that may fall from the pot: Cooling slightly helps solids settle and makes straining safer. When draining, move slowly so you capture clear liquid while leaving behind bits that cloud the broth. If you pour too quickly you risk allowing small particles through, which will require a re-strain and can muddy the presentation.
- Then, use a fine-mesh strainer to strain the stock into your next recipe's soup stock pot: A fine-mesh strainer removes small particulates for a clean, polished broth. The liquid should look translucent with a deep brown hue and smell savory and inviting. If the stock seems cloudy, line the strainer with cheesecloth for an extra clear finish. Skipping a fine strain will leave sediment that settles in storage and affects texture.
- Or, if storing to use later, strain into 1 quart wide-mouth glass canning jars and cool before adding a tight fitting lid: Cooling jars slightly before sealing prevents pressure buildup and preserves flavor. Once cooled to near room temperature, seal and refrigerate promptly. Properly cooled and stored stock keeps well in the fridge for the specified window, but sealing hot jars can cause condensation and shorten shelf life. Always cool partially before capping.
- Refrigerate for up to 5 days or freeze in gallon bags for up to 6 months: Chilled stock will set slightly because of the gelatin and tastes richer reheated. When freezing, leave headspace in bags and lay them flat to save freezer space; thaw in the fridge overnight. A common mistake is refreezing thawed stock, which affects texture and safety, so portion thoughtfully to avoid waste.
Notes
- Boost Umami by adding a tablespoon of tomato paste when you brown the bones and beef, it deepens color and adds savory complexity without tasting tomato forward.
- Lean Stock Option remove excess fat after chilling so the broth keeps longer in the fridge and pours cleanly for sauces and soups.
- Herbal Variation swap thyme for rosemary sparingly for a pine like lift that complements roasted beef, but use less because rosemary is more assertive.
- Quick Stock if short on time, simmer for a minimum of 120 minutes to capture essential flavor, then concentrate later by reducing gently if you need a punchier base.
- Gelatin Forward prioritize marrow rich bones like knuckles or neck bones and longer cooking to produce a stock that gels when chilled, signaling rich mouthfeel.
- Clearer Broth strain through cheesecloth after initial fine straining to remove tiny particulates for a crystal clear presentation in consommés.