Homemade Baby Rice Cereal
Homemade Baby Rice Cereal is a creamy, easy to blend first food made from short grain brown rice, offering a gentle, comforting texture for early eaters. This simple, budget friendly recipe yields a silky puree you can thin with water, breastmilk, or formula for the perfect consistency. It is perfect for introducing solids and gives you full control over texture and sourcing, making it worth trying today.
Equipment
- Calphalon 5-Quart Pot
- Storage Containers
Ingredients
- 1 cup short grain brown rice Rinse and soak to soften before cooking; provides the whole-grain base and texture for the cereal. Brown rice contributes fiber, vitamins, and a mild nutty flavor that develops with gentle simmering. Grind or blend after cooking to achieve a smooth, baby-friendly consistency.
- 2 1/2 cups water Bring to a boil then simmer to cook the rice evenly; controls the cooking liquid and final thickness of the cereal. Water ensures proper hydration so the grains become soft and safe for pureeing. Adjust amount slightly during cooking to maintain a porridge-like texture.
- 1 -1 1/2 cups water, breastmilk, or formula, divided Thin or enrich the finished cereal to feeding consistency using measured liquid; determines the serving texture and nutritional profile. Breastmilk or formula adds familiar flavor and additional calories, while extra water keeps the mixture mild and hypoallergenic. Reserve and add gradually to reach a smooth, spoonable texture suitable for baby consumption.
Instructions
- Optional: Add rice to a pot or bowl and cover with an inch or two of water. Let soak for 2-8 hours.: Add rice to a pot or bowl and cover with an inch or two of water. Let soak for 2 to 8 hours : The aroma of soaking rice is faint but slightly sweet, and allowing the grains to rest helps shorten the final cooking time and can make the texture silkier. I like the extra patience on busy days when I can soak overnight, because the rice swells and softens, which leads to a quicker, more even simmer later. One common mistake is skipping the rinse after soaking, which can leave surface starch that clumps during cooking; always drain and rinse well.
- Drain rice in a fine-mesh sieve, rinsing thorough.: Rinsing removes excess surface starch and any dust or debris, and the sound of the water running over the grains is oddly reassuring. When I pour the rice into the sieve and run cool water until it runs clear, I know I am preventing gummy textures. A frequent misstep is using too coarse a strainer, which lets small grit through, so opt for a fine mesh sieve for cleanliness and peace of mind.
- Add rice to a medium pot with 2 1/2 cups water. Set over high heat and bring to a boil. Reduce heat to medium and simmer for 20-25 minutes or until rice is very soft and fluffy and the water is fully absorbed. (If the rice is not very soft, add 1/2 cup additional water and cook a little longer.) Remove from heat and cover. Let sit for at least 10 minutes.: You will hear an energetic simmer turn into gentle bubbling, and the smell will become warmly toasty. The visual cue to watch for is when the grains look plump and start to break apart at the edges. This long but gentle simmer ensures the rice becomes tender enough to puree without gritty bits, and reducing to medium heat keeps the pot from scorching. If you rush this with too high heat, the exterior may overcook while the center stays hard, so maintain a steady simmer for even softness.
- (At this point, you can store the rice in the fridge for 3-5 days in an airtight container until ready to proceed if desired.): A small splash of extra water helps coax stubborn grains into full tenderness, and you will notice the pot steaming more as the grains absorb the additional liquid. I always check by pressing a grain between two spoons; if it squashes easily, it is done. A common error is to avoid adding water and instead crank the heat, which can lead to uneven cooking and clumped rice. Gentle persistence and small additions of liquid are the safe route.
- Add 2 cups of the rice to a blender with 1 cup water, breastmilk, or formula. Blend, starting on low and working up to high, adding up to an additional 1/2 cup water to make a thin puree. Stop and scrape down the sides of the blender as needed.: Covering traps steam and allows the rice to relax, the finished texture becoming more cohesive and easier to blend. The aroma during this rest is mellow and reassuring, and you will notice steam fogging the lid, which is a good sign. Letting it sit also helps the liquid redistribute, preventing overly dry pockets. Rushing to blend while piping hot risks splattering and a less even puree, so wait for the brief rest period.
- Serve or store for later.: Cooling the rice and storing it chilled locks in safety and convenience, and when you open the container later you may smell a mild, toasted fragrance. I use this option when I plan meals ahead, because refrigerated rice blends quickly when I am ready. A typical mistake is leaving the rice at room temperature too long; prompt chilling in airtight containers prevents bacterial growth and preserves texture.
- Add 2 cups of the rice to a blender with 1 cup water, breastmilk, or formula. Blend, starting on low and working up to high, adding up to an additional 1/2 cup water to make a thin puree: As the blender starts, the gentle whoosh turns rice into a soft cloud, and the smell becomes faintly sweet and warm. I always begin on low to avoid loud splatters, then increase speed to achieve a silky consistency, stopping occasionally to scrape the sides. The reason for gradual blending is that it helps break down any remaining grainy bits and yields a smoother mouthfeel for baby. If you blend too aggressively from the start, the mixture can splatter and make a mess, and you may overheat the puree slightly.
- Stop and scrape down the sides of the blender as needed: Using a spoon to scrape ensures every grain gets incorporated and you can see any stubborn bits clinging to the walls. The texture will visually shift from grainy to homogeneous, and that last scraping often reveals a glossy, uniform puree. One common oversight is not scraping enough, which results in uneven texture with thicker clumps at the bottom, so take the extra moments to be thorough.
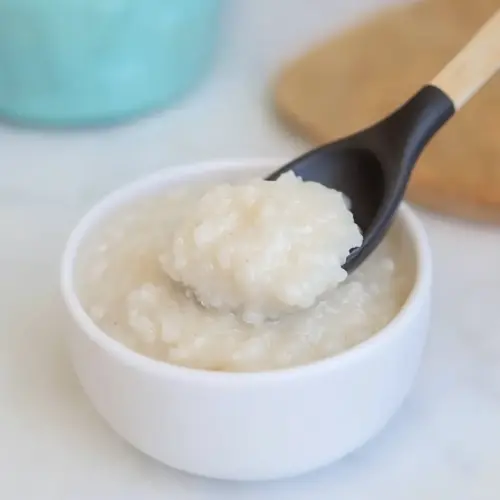
- Serve or store for later: The final cereal should look smooth and slightly glossy, and depending on the added liquid it may be pourable or spoonable. I always taste a tiny amount to check temperature, and add a touch more warm liquid if it has thickened while standing. If storing, portion into airtight containers or freeze in ice cube trays for convenient single servings. A frequent mistake is to leave stored portions unmarked; I label dates to avoid confusion and ensure freshness.
Notes
- Soak when you can, soaking for 2 to 8 hours softens the grains and shortens cooking time, which often leads to a smoother puree and less active time at the stove.
- Rinse thoroughly, rinsing until the water runs clear reduces excess starch and helps prevent a gummy final texture, an easy step that makes blending more effective.
- Check grain tenderness visually, press a grain between spoons to confirm it squashes easily, that tactile check prevents gritty cereal and ensures safety for little mouths.
- Add liquids gradually when blending, this lets you achieve the exact consistency you want because the cereal thickens once it sits, so start with less and thin as needed.
- Label storage portions, writing dates on containers or freezer bags prevents confusion and keeps feedings safe and organized over several days or months.