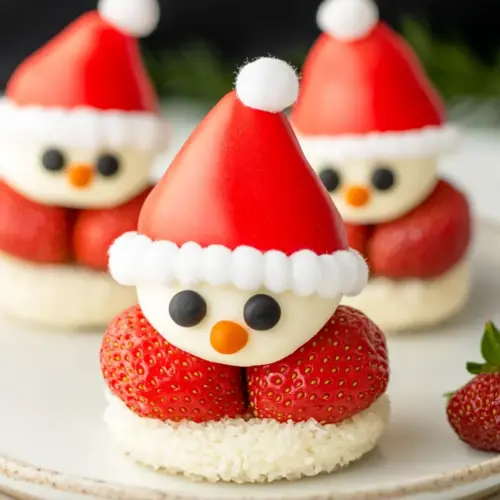
Healthy Strawberry Santas
Healthy Strawberry Santas are a charming, easy to assemble holiday bite that pairs juicy, bright strawberries with creamy ricotta and sweet banana for a light, festive treat. Perfect as a playful appetizer or kid friendly snack, these fresh, low fuss Santas make an excellent easy party finger food and a quick addition to any holiday spread.
Equipment
- Sharp Knife
- Cutting Board
- Gel icing pen
- Serving plate
Ingredients
- 12 strawberries Wash and hull before assembling to ensure clean, juicy fruit; provides natural sweetness and a festive red color that forms the Santa body and hat. Quartering or slicing heightwise yields stable bases for filling and stacking, while firmer berries hold shape better during serving. Rich in vitamin C and low in calories, strawberries add bright flavor and visual appeal to the dessert.
- 1 banana Peel and slice into rounds to create a creamy mid-layer or decorative accent; offers mellow sweetness and a soft texture that contrasts with the berries. Use firmer ripe fruit to avoid sogginess, and chill briefly if needed so slices maintain shape while assembling. Supplies potassium and natural sweetness, helping bind and balance the overall flavor profile.
- 1/4 cup ricotta cheese or alternative: cottage cheese, cream cheese, coconut yoghurt Whip or mix until smooth to create a light, creamy filling that mimics the trim of Santa outfits; serves as the primary binder and adds richness. Choose the listed alternatives if dietary needs require: cottage or cream cheese for a tangier profile, or coconut yoghurt for a dairy-free option, each affecting texture and flavor subtly. Adjust sweetness and consistency with a small splash of milk or a touch of sweetener to reach desired spreadability.
Instructions
- Take the top off a strawberry (ie the leaves).: At this point you should notice the clean, green contrast against the red, with the fresh scent of strawberries filling the air; removing the leaves creates a stable base and exposes the inner flesh so the pieces will sit neatly, which helps prevent wobbling when stacked; a common mistake is cutting too far down and wasting fruit, aim to remove only the leafy cap so most of the berry remains.
- Slice a second slice from the top of the strawberry.: You will hear a soft, satisfying sound as your knife glides through the flesh, and the thin disc will serve as the hat brim, offering a slight change in texture; this thin slice should be even so the hat sits flush, or it will tip when assembled, so use a steady hand and a sharp knife to avoid jagged edges.
- Slice a disc from a banana.: The banana yields a pale, firm disc that provides a neutral canvas for the white filling; its mild aroma should mingle with the berry scent, and selecting a banana that is ripe but firm prevents mushy slices that can collapse under weight; avoid using overly soft bananas as they will not hold shape during assembly.
- Spread one side of the banana with ricotta cheese (relatively thickly, as this will become the beard).: When you spread the ricotta cheese you will feel its cool, slightly grainy texture; apply a generous layer so the beard looks full and holds the facial features, because a thin spread will not create the same visual impact and may slide off, so be bold with the amount and gently press it to adhere.
- Place the strawberry slice on the serving plate. Add the slice of the banana on top, cottage cheese side down.: As you layer the pieces the colors will contrast strikingly, red then pale yellow then white; placing the banana with the filling side down anchors the beard to the plate and makes assembly stable, which helps prevent collapse when you add decorative details later; a frequent slip up is misaligning pieces so they tumble, take a moment to center each element.
- Take the gel icing pen and add 2 dots on the edge of the banana slice to look like eyes.: The fine tip of the gel pen allows for precise dots, and the small dark points create immediate personality against the white filling; apply gently so the dots remain neat and do not smear into the filling, because pressing too hard spreads the pigment and obscures the face, so hold the pen lightly and let the ink sit a moment to set.
- Place the remaining part of the strawberry on top as the hat. Repeat for as many Santas you wish to make.: Finishing the hat creates the full silhouette, and stacking the red cap completes the iconic look; as you repeat the motion, a rhythm develops, the sight of neat rows is satisfying, and you can adjust each hat angle to vary expressions, but watch for uneven stacking which can topple plates during transport, so keep the center of gravity low and place them snugly close together.
Notes
- Pick firm berries: Select strawberries that are firm and evenly sized so your Santas look uniform; soft or misshapen berries can cause uneven stacking and moisture release, which will weaken the structure of each bite.
- Banana firmness matters: Choose a banana that is ripe enough to be sweet but firm enough to hold its disc shape; if the banana is too soft the filling may slip and cause the Santa to collapse during handling.
- Adjust the filling texture: If you prefer a silkier beard, blend ricotta cheese briefly to smooth out any curds; for a thicker texture, use a slightly drier alternative like well drained cottage cheese or chilled cream cheese.
- Prep ahead carefully: You can slice the components up to an hour ahead and keep them chilled separately, but assemble just before serving to avoid moisture making the strawberries soggy.
- Use a fine tip decorator: A precise gel icing pen creates small, neat eyes quickly; if you do not have one, a toothpick dipped in a safe edible color will work in the same way with a bit more patience.