Healthy Chocolate Peppermint Cups
Healthy Chocolate Peppermint Cups are silky coconut butter centers surrounded by crisp dark chocolate shells, offering a creamy, mint kissed bite that's both easy and elegant. These low ingredient treats are naturally flavored and gluten free friendly, perfect for holiday gifting or an easy weeknight dessert. Make them to enjoy a sophisticated, healthier sweet that still feels indulgent.
Equipment
- High Speed Blender
- Small Saucepan
- Heatproof Bowl
- Muffin Tin
- Parchment paper or silicone liners
Ingredients
- 2 cups unsweetened shredded coconut Provide a chewy, slightly sweet base and fiber when shredded finely, binding textures together in the cups and offering a naturally nutty flavor profile that complements chocolate.
- 1 tablespoon coconut oil Melt to act as a liquid fat that helps bind the coconut mixture and adds a subtle tropical richness while improving mouthfeel and helping chocolate set smoothly.
- 1 tablespoon maple syrup Sweeten gently and add depth of flavor without refined sugar, helping to hold the coconut base together and balancing bitterness from dark chocolate.
- 1/2 teaspoon peppermint extract optional Brighten the flavor profile with a refreshing coolness when used, enhancing the chocolate's taste and cutting through richness; omit if a mint flavor is undesired.
- 1 -1/2 cups about 10 ounces dark chocolate chips (72% or higher) Melt into a glossy coating that provides rich cocoa intensity and structure to the cups; choosing high cacao percentage delivers less sugar and a stronger chocolate character.
- 2 teaspoons coconut oil Smooth and thin melted chocolate slightly for easier pouring and glazing, improving sheen and helping the chocolate shell set with a tender bite.
Instructions
- Place unsweetened coconut and coconut oil in the basin of a high-speed blender. Blend together, until smooth and creamy, scraping down the basin as needed. This can take anywhere from 7-15 minutes. If your blender is getting too hot at any point, shut it off and let it rest for 30 seconds or more. Once it has reached a smooth texture, blend in maple syrup and extract. Transfer to a bowl and let it cool for 10 minutes.: As the blades start working, you will notice a progression from dry flakes to clumps and finally to a glossy, almost spreadable paste, and the aroma becomes intensely coconut forward. This transformation is sensory rich the sound shifts from a coarse grind to a smoother whir and the mixture warms slightly. The reason this step matters is that thorough blending releases oils, creating the creamy body that defines the filling. If your blender seems to stall, stop and scrape down the sides so everything processes evenly, and avoid overheating by working in short bursts if needed, because excessive heat can cause separation. A common mistake to avoid is assuming the coconut is done too soon; under blended coconut yields a grainy texture that will not hold together as a butter.
- Place parchment paper or silicone muffin liners in a 12 cup muffin tin and set aside.: When the mixture reaches creamy silk, you will feel a heavier, more cohesive mass under the blades, and the sound will become quieter and more uniform. This is the point where texture shifts from particulate to paste, and it is essential for creating a velvety center that melts pleasantly. I always scrape down the basin a few times to ensure even blending, because pockets of unblended flakes will create inconsistency. If the blender warms up too much, pause and let it rest briefly; overheating can thin the paste too much and make it less stable when chilled. People sometimes add too much extra oil early on; resist that urge, because you can always add a teaspoon later if needed.
- Melt chocolate using a double-boiler method: Bring a small saucepan of water to a boil with a heatproof bowl over the top. Add the chocolate and the coconut oil to the bowl and slowly stir together the chocolate, as it melts. Alternatively, you could melt the chocolate in the microwave at 20-second intervals, whisking in between until it's fully melted.: Expect a patient window here, during which you will slowly observe the mixture change both visually and texturally, and that duration depends on your blender power. The long blending time rewards you with a decadent mouthfeel, and knowing this upfront prevents you from interrupting the process prematurely. If you rush through this step, the result will be coarse and crumbly rather than spreadable, which affects how the filling sits within the chocolate. A technique to prevent stalling is to pulse periodically and scrape down often, which keeps the blade engaged with fresh material.
- Place 2 teaspoons of chocolate into each of the molds with a spoon and gently push the chocolate 1/3 of the way up the sides of the parchment paper. Place in the freezer to harden for 10 minutes.: Heat buildup signals friction and prolonged motor strain, and letting the machine rest prevents overheating and preserves texture. While it cools, the mixture may firm slightly, which is normal, and pausing helps avoid a greasy, separated butter. I always keep an eye on the blender base to feel for warmth and listen for labored sounds. A common misstep is continuing to run the machine when it smells hot, which risks damage and yields off flavors; take breaks and be patient.
- Roll coconut butter into 1" balls and then flatten to a disk shape.: Adding the maple syrup and optional peppermint extract at this point lets the sweetener integrate without thinning the paste excessively, preserving the luscious consistency. As you stir them in, inhale the gentle sweetness and cooling peppermint top notes, and taste to adjust intensity if needed. The why behind this timing is balance, you want flavor without weakening structure. Avoid overmixing after adding liquids, as that can make the filling too loose to form discs properly.
- Remove chocolate cups from the freezer and drop in coconut butter disks in the center of the chocolate.: Cooling slightly helps the coconut butter firm just enough to be rollable, and you will notice it become tackier and easier to shape. This short rest also allows flavors to meld and aromas to settle, making it more pleasant to handle. If you skip cooling, the filling might be too soft to shape, leading to misshapen centers. A mistake I see is trying to work with filling that is too hot, which will stick to hands and tools, so give it that brief chill.
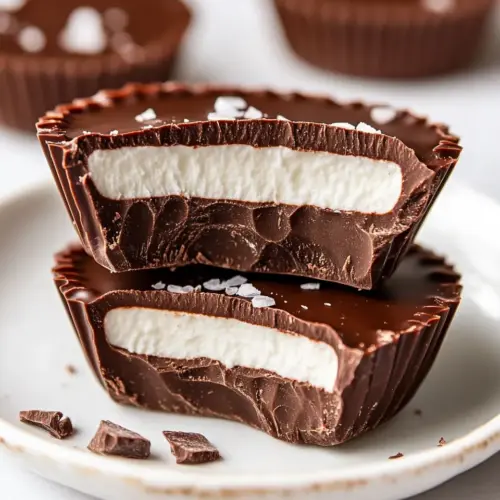
- Top the coconut with melted chocolate and let sit for a few minutes before sprinkling with coarse sea salt.: Preparing the molds ahead creates a clean workspace and ensures smooth removal later, and the liners prevent the chocolate from bonding to metal. I love using silicone if I want extra ease in popping cups out, the flexibility helps, while parchment liners make a tidy presentation. The goal here is to minimize fuss when unmolding, so take this setup seriously. People sometimes skip liners and then struggle to remove delicate chocolate cups, leading to breaks and wasted effort.
- Store in the refrigerator for 1 week or in the freezer for 3 months.: As the chocolate warms over simmering water, watch it slowly become glossy and fluid, and stir gently to maintain an even melt. The gentle heat preserves the temper and keeps the texture smooth, preventing graininess. The sound of a quiet simmer and the aroma of toasted cacao will tell you things are progressing well. This method matters because it prevents burning, which ruins both flavor and mouthfeel. If you overheat, the chocolate may seize into a grainy mass; avoid boiling the water vigorously and never let steam touch the bowl.
- Alternatively melt the chocolate in the microwave at 20 second intervals whisking in between until it's fully melted: Using short bursts prevents scorching and gives you control, and you will see the pieces soften then coalesce into a glossy pool. Whisking between intervals distributes heat and helps create a smooth pourable texture. This faster route is handy, but it requires attention; skip long intervals or the chocolate can burn. A common error is microwaving too long at once, which can cause separation and a dull finish, so be methodical and patient.
- Place 2 teaspoons of chocolate into each of the molds with a spoon and gently push the chocolate 1/3 of the way up the sides of the parchment paper: The tactile process of pressing the chocolate up the sides creates a thin, even shell that will harden with a satisfying snap, and you will see the sheen flatten to a set surface when chilled. This technique matters because a consistent shell thickness ensures structural integrity when you fill the cups. Work deliberately so the base is covered and the sides are even; uneven walls may crack when unmolding. Avoid using too much chocolate at this stage because thick shells feel heavy and mask the coconut center.
- Place in the freezer to harden for 10 minutes: The cups will set quickly and you will notice the chocolate go from glossy and soft to matte and firm, which is your cue to proceed. Rapid chilling gives a crisp shell without encouraging bloom, and it makes the cups easier to fill. A mistake to avoid is leaving them too long and allowing condensation to form when returning to warm air; ten minutes is typically ideal. If condensation appears, briefly pat dry with a paper towel before filling.
- Roll coconut butter into 1 inch balls and then flatten to a disk shape: Rolling forms tidy portions and flattening creates a disk that nests well inside the chocolate cup, and you will feel the texture firm as it cools slightly. This step matters because consistent sizing yields neat, uniform candies, and it helps with assembly speed. One common issue is making disks too large or too thin, which can cause overflow or a disproportionate filling to chocolate ratio. Keep them uniform for the best look and mouthfeel.
- Remove chocolate cups from the freezer and drop in coconut butter disks in the center of the chocolate: As you press the disks in, you will feel the cold chocolate yield just enough to seat the filling, and the contrast between the firm shell and the soft disk is satisfying. This matters because proper seating prevents the filling from shifting and ensures a clean top when you add more chocolate. Avoid forcing the disk down too deep which can break the shell, and if the disk is sticking, dust your hands with a touch of coconut or chill the disk briefly.
- Top the coconut with melted chocolate and let sit for a few minutes before sprinkling with coarse sea salt: Pouring a thin layer of melted chocolate seals the cups and creates a smooth finish, and as it cools you will see it level out and take on a refined sheen. The final sprinkle of sea salt amplifies the chocolate and coconut flavors, adding a pleasant pop. Let the top settle slightly so the salt adheres without sinking. A common mistake is adding salt while the chocolate is still very fluid, which causes it to sink and look uneven; wait until the surface is tacky but not fully set.
- Store in the refrigerator for 1 week or in the freezer for 3 months: Proper storage preserves texture and flavor, and chilled cups keep their snap and filling integrity. I like to separate layers with parchment to prevent sticking and to bring them to slightly below room temperature before serving for the best mouthfeel. A storage mistake is leaving them at room temperature for long periods, which can soften the chocolate and make the filling ooze; keep them chilled until just before enjoyment.
Notes
- Make it richer — Stir an extra teaspoon of coconut oil into the melted chocolate for an even silkier coating that spreads and polishes beautifully.
- Adjust sweetness — Reduce or omit the maple syrup in the filling to let the dark chocolate shine; alternate with a keto friendly sweetener if you need a low sugar option.
- Change size — Make mini cups by using a mini muffin tin to double the batch count and create bite sized portions ideal for parties.
- Switch textures — Pulse a small portion of the shredded coconut less so you retain a bit of chew in the filling for contrast against the crisp shell.
- Store smart — Layer finished cups between sheets of parchment when refrigerating or freezing to prevent them from sticking together and to keep presentation intact.