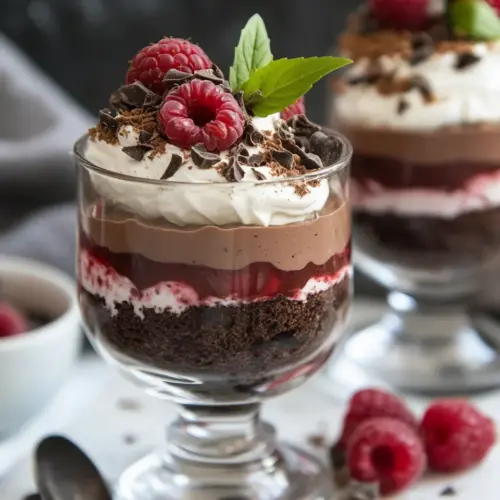
Healthy Brownie Chocolate Raspberry Mousse Parfaits
Healthy Brownie Chocolate Raspberry Mousse Parfaits combine creamy avocado mousse with chewy brownie pieces and bright raspberries for a creamy, tangy, and crunchy treat. This easy no fuss dessert is naturally dairy free and gluten free friendly when you use store bought gluten free brownies, perfect for gatherings and weeknight celebrations, promising a crowd pleasing finish that feels indulgent yet balanced.
Equipment
- Food Processor
- Microwave-safe Bowl
- Parfait glasses
- Small plates
Ingredients
- For the Rim: optional Optional garnish for the glass rim that adds visual and textural contrast to the parfait; helps frame each serving for a more elegant presentation and can hint at flavors inside.
- 1/2 ounce Ghirardelli 60% cacao bittersweet chocolate baking chips Adds deep, bittersweet chocolate flavor and melts smoothly into warm components; provides rich cocoa notes to balance sweetness in both mousse and garnish applications.
- 3 tablespoons sweetened coconut flakes Provides a crunchy, tropical-sweet texture and aroma when toasted or sprinkled; enhances mouthfeel and complements chocolate and raspberry flavors with light chew.
- For the Mousse: Label for the mousse component indicating a creamy chocolate-raspberry filling; groups the ingredients and signals the beginning of the preparation steps for the silky layer.
- 1/2 cup Ghirardelli 60% cacao bittersweet chocolate baking chips Delivers intense chocolate backbone to the mousse, melting into a glossy, velvety base; contributes structure, depth, and balanced bitterness to offset sugar.
- 1 cup avocado mashed Supplies creamy body and healthy fats that create a smooth, custardy mousse texture when blended; offers natural richness and a mild, neutral flavor that supports chocolate and raspberry.
- 1/2 cup fresh raspberries Contributes bright, tangy fruit flavor and natural pectin to lighten the mousse; adds freshness and a slight tartness that balances sweetness.
- 5 tablespoons sugar Adds sweetness to the mousse and helps achieve a stable, cohesive texture when combined with avocado and chocolate; adjusts overall sweetness level to taste.
- 1/2 teaspoon vanilla extract Provides warm, aromatic vanilla notes that enhance chocolate and fruit flavors; rounds out the mousse and improves perceived sweetness without extra sugar.
- 1/4 cup unsweetened vanilla almond milk Offers a touch of liquid and subtle vanilla flavor to thin and loosen the mousse for easy whipping; helps achieve a smooth, spoonable consistency while keeping dairy-free.
- For the Layers: Label for the parfait layers indicating assembly ingredients and order; signals the components that will create contrasting textures and flavors in each serving.
- 1 1/3 cups fresh raspberries Supplies fresh, juicy layers with bright color and tartness for contrast against rich chocolate and creamy mousse; adds natural sweetness and visual appeal between layers.
- 1 1/2 cups store-bought (gluten-free) brownie torn into chunks Provides ready-made brownie texture and intense chocolate flavor in bite-sized chunks; creates chewy, fudgy pockets and adds indulgent depth to the parfait.
- 1/4 cup sweetened coconut flakes Adds a final sprinkling of sweet coconut flakes to the layers, echoing the rim garnish and providing extra crunch and tropical sweetness between textures.
Instructions
- Melt the baking chips in your microwave for 20 second intervals, stirring between each interval, until melted.: As you warm the Ghirardelli 60% cacao bittersweet chocolate baking chips in short bursts the aroma of deep chocolate will rise, and stirring after each interval helps the residual heat finish the melting without scorching. You want a glossy, smooth texture and no grainy lumps. If the chocolate seems thick, let it sit a few moments off heat to even out. A common mistake is overheating so it seizes, which makes it dull and clumpy; rescue seized chocolate by adding a tiny bit of warm almond milk and stirring until smooth, but prevention is better by using short bursts.
- Pour the melted chocolate on a small plate and sprinkle the sweetened coconut flakes on a separate small plate.: Spreading the warm melted chocolate onto a flat plate creates a workable rim dipping surface, and a parallel plate of sweetened coconut flakes keeps assembly tidy. The chocolate will cool slightly and thicken on the plate, giving you control when dipping. Place both plates near the glasses so you can work quickly. Avoid pouring chocolate into a deep bowl that traps heat, which can overheat the rim and make the coconut slide off when pressed.
- Dip two large parfait glasses, rim side down, in the chocolate, followed by the coconut. Allow to chill in the refrigerator until hardened and ready to assemble.: When you invert the glass into the chocolate you will feel the melt coat the rim, and pressing into the flakes should leave a neat, even band of texture. Refrigerating the glasses sets the chocolate shell and keeps the rim intact while you build the layers. If you handle the rim before it hardens, fingerprints and smudges are likely; let it chill fully so the coating does not smear during assembly.
- Melt the baking chips using the same method as the rim.: Repeating the gentle melting method ensures you have enough warm chocolate for the mousse preparation and that the chocolate stays glossy. The smell will become a comforting background in your kitchen, and letting the melted chocolate cool slightly before combining with cold ingredients prevents accidental heating that could alter texture. Do not pour boiling hot chocolate into the food processor as it may warm the avocado too much and affect the final chill and set.
- Pour the melted chocolate, avocado, raspberries, sugar, vanilla extract, and vanilla almond milk into a food processor. Process until completely smooth and well combined.: As the blade whirls you will see the mixture turn from chunky to a uniform deep color, and the sound will shift to a steady hum. The processing distributes the melted chocolate evenly, breaks down the raspberries seeds into the puree, and emulsifies the avocado for a mousse that is silky yet scoopable. If the mixture looks granular, scrape down the sides and process again. A common pitfall is underprocessing which leaves fibrous avocado bits, so keep blending until visually smooth and aromatic.
- Take the chilled glasses out of the fridge and spoon 1/4 of the mousse into each glass.: The first layer of mousse should set a foundation that is cool and light, and you will notice a delicate sheen on the surface when it is properly whipped. Spoon carefully to avoid splashing warmed spoon marks onto the chilled rim area. If the mousse seems too loose, a brief chill will help it firm slightly before adding fragile fruits. Avoid overfilling; you want space for subsequent layers to create attractive contrasts.
- Top each layer of mousse with 2/3 cup of fresh raspberries.: Adding fresh raspberries now introduces bright acidity and a juicy texture. The berries will release a little juice when pressed, so distribute them gently to maintain distinct layers. Look for berries that are plump and not overly soft to prevent immediate collapse into the mousse. A typical mistake is piling too many berries which can cause the following brownie layer to slide, so keep to the measured amount.
- Follow the raspberries with 1/2 cup of brownie chunks per glass.: Nestle the torn brownie pieces onto the berry layer so they sit partly embedded but visible. The brownies add chew and concentrated chocolate flavor, giving the parfait satisfying substance. Breaking the brownies into varied sizes creates interesting bites. Avoid using fresh out of the oven brownies that are warm, which will soften the mousse and make the layers blend prematurely.
- Sprinkle 2 tablespoons of coconut over the brownie chunks per glass.: A light scattering of sweetened coconut flakes adds contrast and a hint of sweetness that pairs with both chocolate and berries. The coconut provides a slight toasted aroma if previously warmed, and when layered it prevents the brownies from sitting bare against the next mousse portion. Do not over-sprinkle as too much coconut can dominate the texture and distract from the mousse's creaminess.
- Finish by dividing the remaining mousse and, finally, the remaining brownie chunks.: The final mousse crowns the parfait with a smooth cap while remaining brownie chunks on top introduce bite right at the surface. The assembled glasses should feel balanced visually, with fruit, mousse, and brownie showing through. Chill briefly before serving to allow layers to settle. A frequent error is rushing to serve; a short rest in the fridge helps flavors marry and the mousse hold its shape when scooped.
Notes
- Tip 1 Always let melted chocolate cool slightly before combining with cold ingredients to prevent warming the avocado and changing the mousse texture. Cooling helps maintain a stable emulsion and keeps the mousse aerated.
- Tip 2 Use a food processor rather than a blender for the smoothest mousse because it handles the thick avocado mass without overworking, producing an even, velvety texture that holds its shape when spooned.
- Tip 3 Press the sweetened coconut flakes into the rim immediately after dipping in chocolate to ensure they adhere firmly while the chocolate is tacky, creating a neat, crunchy edge that will not fall off when chilled.
- Tip 4 Reserve a few whole raspberries for garnish on top so the parfait looks fresh and vibrant; they also provide an immediate hint of tartness with the first spoonful.
- Tip 5 If you need to make these ahead, assemble through the brownie layer and hold chilled, adding the final mousse and brownie pieces shortly before serving to preserve the freshest textures.