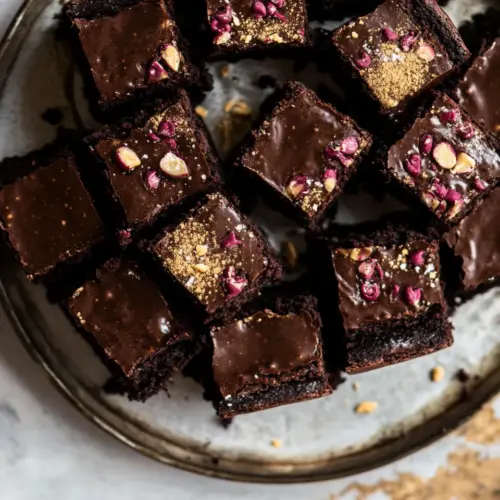
Healthier Buckeye Brownies
Healthier Buckeye Brownies blend fudgy chocolate richness with a creamy peanut layer, offering a cleaner twist on a classic treat. They are chewy, slightly glossy, and easy to make for an easy weeknight dessert or shareable party tray. Use pantry friendly swaps like almond flour and coconut oil for a lighter feel that still satisfies.
Equipment
- 8x8-inch Baking Pan
- Parchment Paper
- Large Mixing Bowl
- Medium Pot
- Offset Spatula
- Microwave-safe Bowl
Ingredients
- 2 eggs, at room temperature Whisk together to provide structure and lift, helping the brownies set while adding moisture and richness; room temperature eggs incorporate more evenly into the batter for a smoother texture.
- 1/2 cup melted coconut oil Replace conventional butter to contribute healthy fats and a subtle tropical aroma; melted coconut oil blends easily with wet ingredients to create a fudgy crumb and helps bind the batter.
- 1/3 cup pure maple syrup Add natural sweetness while keeping refined sugar out of the recipe; pure maple syrup also lends a hint of caramel-like depth that complements the chocolate.
- 2 teaspoons vanilla extract Enhance overall flavor by adding aromatic warmth and rounding out the sweetness; vanilla extract amplifies chocolate notes and gives the brownies a more complex profile.
- 1/3 cup almond flour Provide a tender, slightly nutty crumb and act as the primary dry base without using wheat flour; almond flour keeps the texture moist and adds protein and healthy fats.
- 1/2 cup unsweetened cocoa powder Deliver deep chocolate flavor and color while contributing a dry, slightly bitter backbone that balances sweetness; unsweetened cocoa powder intensifies the brownie’s cocoa richness.
- 1/2 teaspoon baking powder Lightly aerate the batter to ensure a slightly lifted texture without making the brownies cakey; baking powder helps create a tender crumb and prevents excessive density.
- 1/2 teaspoon kosher salt Season the batter to enhance and balance sweetness and chocolate intensity; kosher salt also subtly highlights the nutty and savory notes in the recipe.
- 3/4 cup , plus 2 tablespoons creamy peanut butter (just peanuts and salt) Create a creamy, rich layer and introduce a classic peanut-butter element while maintaining simplicity with just peanuts and salt; the specified amount ensures proper texture for swirls or filling.
- 3 tablespoons pure maple syrup Sweeten and loosen the peanut butter for better spreadability and a balanced sweet-salty contrast; additional maple syrup integrates the flavors and keeps the center moist.
- 3 tablespoons melted coconut oil Soften and thin the peanut butter mixture for a silky, spreadable topping or swirl; melted coconut oil ensures a smooth consistency and helps the peanut butter layer set.
- 6 ounces dark chocolate, chopped Melt into a glossy, indulgent topping or garnish that adds intense chocolate richness and a smooth finish; chopped dark chocolate offers depth and a slightly bitter counterpoint to the sweeter components.
- sea salt Sprinkle sparingly to create a bright, savory contrast that enhances the chocolate and peanut butter flavors; sea salt also adds a finishing touch and elevates the overall taste experience.
Instructions
- Preheat the oven to 350° F. Line an 8×8 inch pan with parchment paper. In a large bowl, whisk the eggs for 1 minute until bubbly on top. Add the coconut oil, maple syrup, and vanilla. Mix in the almond flour, cocoa powder, baking powder, and salt. Stir until just combined. Spread the batter into the prepared baking pan. Bake for 15 minutes or until the brownies are just set. Let cool. Meanwhile, make the peanut mix. In a medium pot, mix 3/4 cup peanut butter, the maple syrup, and coconut oil. Bring to a gentle boil over medium heat, stirring constantly. Cook 2 minutes, then remove from the heat. Pour over the brownies. Freeze 30 minutes, or until firm. Melt together the chocolate and 2 tablespoons of peanut butter in the microwave. Let cool 5 minutes and then spread the chocolate over the peanut butter mix. Return to the fridge to set, about 10 minutes, then slice. The chocolate will not be totally set, but slicing is easier this way. Keep in the fridge.: When you open the oven and feel that steady warmth, you know the dry ingredients will meet a consistent heat, which is essential for even rise and set. A correctly preheated oven creates a gentle initial lift, then settles so the center stays fudgy. Common trouble is not waiting for the oven to reach temperature, which can cause uneven baking and a soggy center. Use an oven thermometer if your appliance runs hot or cool to ensure accuracy.
- Line an 8×8 inch pan with parchment paper: The tactile act of smoothing parchment into the pan prevents sticking and makes removal effortless once chilled. The parchment also protects edges from overbrowning while allowing the middle to hold moisture. Rushing this step and skipping parchment often results in bars tearing when you try to lift them out.
- In a large bowl, whisk the eggs for 1 minute until bubbly on top: Whisking incorporates air that contributes subtle lift and a lighter structure to the final brownie. You should see tiny, glossy bubbles appear and the eggs will take on a slightly paler sheen. Underwhisking leaves the batter dense, while overwhisking can create too much aeration and a cakier texture.
- Add the coconut oil, maple syrup, and vanilla: At this stage you will notice the aroma shift as the coconut oil loosens and the maple melds with the eggs, creating a smooth, glossy mixture. These fats and syrups help dissolve the dry ingredients more evenly. A common mistake is adding ingredients that are too cold, which can cause the coconut oil to solidify; ensure the oil is melted and warm but not hot.
- Mix in the almond flour, cocoa powder, baking powder, and salt: As you fold these dry elements in, watch the batter change from glossy to rich and chocolatey. The almond flour gives a slightly grainy silkiness that disappears with gentle folding. Overmixing here develops a tighter crumb, so stop once combined and you no longer see streaks of dry cocoa or almond flour .
- Stir until just combined: The batter should hold together and look cohesive, without a glossy wet sheen left from unmixed ingredients. This restraint ensures the brownies stay fudgy rather than turning cake like. A typical error is vigorous mixing, which traps too much air and leads to a drier finished product.
- Spread the batter into the prepared baking pan: The batter will be dense and spreadable, and smoothing it with the back of a spoon or an offset spatula creates an even foundation for the peanut layer. Look for a uniform surface with no thin spots, which helps the peanut layer sit evenly. If you press too hard you may compact the batter and cause uneven baking.
- Bake for 15 minutes or until the brownies are just set: You'll smell deep chocolate as the oven works, and edges will pull away slightly from the pan while the center looks set but still slightly glossy. This timing yields a fudgy interior rather than a dry one. Overbaking is the biggest misstep here, leading to crumbly bars, so check early and rely on visual cues more than the clock alone.
- Let cool: Cooling allows the crumb to firm and internal steam to settle, making it easier to add the peanut mix without sinking into the base. The surface will lose its sheen and feel springy but not wet. Cutting too soon risks disturbance of the structure, while leaving it too long before the next step can make spreading the warm peanut layer harder.
- Meanwhile, make the peanut mix: In a medium pot, combine 3/4 cup peanut butter, the maple syrup, and coconut oil, then warm them together to form a smooth, glossy blend. The heat loosens the peanut butter , making it spreadable and infusing it with the maple aroma. Stirring constantly prevents scorching on the pot bottom; neglecting this causes bitter burnt notes.
- Bring to a gentle boil over medium heat, stirring constantly: As the mixture begins to shimmer and small bubbles form at the edges, you will see it transform from thick to glossy. This brief heat helps the oils meld and creates a cohesive layer that will firm when chilled. Boiling too vigorously can separate oils and change texture, so keep it gentle and attentive.
- Cook 2 minutes, then remove from the heat: A short cook time stabilizes the mixture, slightly concentrating flavors and making the peanut mix easier to spread. You should smell a deepened nutty aroma, and the texture will thicken a touch once off the heat. Leaving it on the stove longer can overcook and make the mix grainy.
- Pour over the brownies: The warm peanut mix will seep just a little into the brownie surface, creating an appealing meld between layers, while still sitting atop as a distinct band of flavor. Pour evenly and use a spatula to nudge it toward the edges so every square will have a peanut ribbon. Pouring when the peanut mix is too hot can overly melt the brownie surface and cause the layers to blur.
- Freeze 30 minutes, or until firm: Chilling sets the peanut layer quickly, making it stable for the next chocolate coat. You'll feel the pan get cold and notice the peanut layer become matte and firm to the touch. Skipping this step or shortening it can make spreading the chocolate messy, and the peanut layer may slide when you try to cut.
- Melt together the chocolate and 2 tablespoons of peanut butter in the microwave: Melt in short bursts, stirring between each, until glossy and silky; the dark chocolate and peanut butter combine into a glossy ganache that will spread easily. The aroma here is intoxicatingly deep and bittersweet. Overheating causes the chocolate to seize into a grainy paste, so watch it closely and stir frequently.
- Let cool 5 minutes and then spread the chocolate over the peanut butter mix: Waiting ensures the chocolate is slightly thickened for even spreading without sinking into the peanut layer. Spread with a gentle hand to create a smooth, shiny finish. If you spread while the chocolate is piping hot it can melt the peanut layer and ruin the clean separation of textures.
- Return to the fridge to set, about 10 minutes, then slice: The chocolate will firm enough to slice cleanly while maintaining a tender bite. Slicing after this short chill yields neat bars with visible layers. If the chocolate is not firm enough, pop it back in for a few more minutes; if you chill too long until rock hard, the bars can fracture when sliced.
- The chocolate will not be totally set, but slicing is easier this way: Slightly soft chocolate provides a pleasant mouthfeel and prevents a hard snap that isolates the layers. You will notice the surface give a tiny amount under your knife as you cut. If you prefer firmer tops, chill longer, but be mindful of teeth sensitivity for very hard chocolate.
- Keep in the fridge: Chilled storage preserves the structure and keeps the peanut layer firm, particularly in warm kitchens. Stored in an airtight container these bars stay fresh and maintain their layered integrity for several days. Leaving them at room temperature risks softening and potential oil separation from the peanut butter.
Notes
- Room temperature ingredients: Bringing the eggs and nut butter closer to room temperature helps them blend more uniformly, which reduces streaking and yields a smoother batter and peanut layer.
- Gentle mixing: Folding the dry ingredients just until combined preserves the fudgy texture, preventing the bars from becoming cake like or dry.
- Even spreading: Use an offset spatula to level the brownie batter and peanut layer evenly so every slice has the ideal balance of chocolate and peanut.
- Short microwave melts: Heat the dark chocolate and 2 tablespoons peanut butter in 20 second bursts, stirring in between to keep the chocolate glossy and prevent seizure.
- Chill times matter: Freezing for 30 minutes before adding the chocolate top keeps the peanut layer stable and makes slicing cleaner and neater.
- Slice with a hot knife: Run a sharp knife under hot water, wipe dry, and cut quickly for crisp edges and neat squares.