Halloween Poke Cake
Halloween Poke Cake is a festive, moist dessert bursting with citrus pockets and a silky chocolate buttercream. This easy make ahead treat combines a boxed fudge marble cake with bright orange gelatin for surprising texture and fun. Perfect for parties and potlucks, it delivers creamy frosting, playful toppings, and an impressive look with minimal effort.
Equipment
- 9×13-inch Cake Pan
Ingredients
- 1 package fudge marble cake mix, plus ingredients to make cake Provides a moist, flavorful base for the poke cake and supplies the dry and wet components needed to bake according to package directions; follow package instructions for mixing and baking times to ensure proper texture. Adds the primary cake structure that will absorb gelatin and fillings when poked. Works as the central element that defines flavor and crumb for the finished dessert.
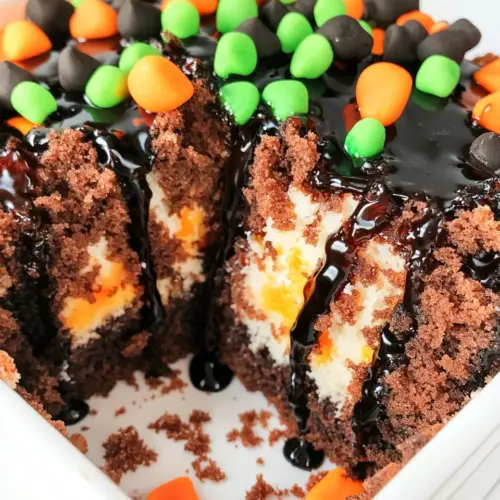
- 2 (3 oz) packages orange flavor gelatin Adds bright orange color and concentrated citrus flavor that soaks into the cake when poured over the poked holes, creating visible swirls and flavor pockets. Dissolve completely before pouring to ensure even distribution and avoid grainy spots. Enhances visual theme for Halloween while contributing sweet, jelled texture.
- 1 cup boiling water Provides the necessary heat to fully dissolve gelatin powder and activate its setting properties so it can be poured over the hot cake and absorbed into holes. Ensures complete dissolution of the gelatin for a smooth, evenly colored syrup that will set as it cools within the cake.
- 1/2 cup cold water Controls dilution and cooling of the dissolved gelatin mixture to help it set properly without being too hot when applied to the cake; adds the correct volume to achieve the desired gel strength. Helps moderate temperature so gelatin does not melt frosting or affect cake texture when applied.
- 1/2 cup butter, softened Adds richness and softness to the frosting when beaten with powdered sugar, contributing a creamy mouthfeel and helping the frosting spread smoothly over the cake surface. Provides fat that balances sweetness and helps stabilize the frosting structure for topping and decorating.
- 3 cups powdered sugar Sweetens and thickens the frosting to a spreadable consistency while providing structure and stability; sifting before use can prevent lumps and ensure a silky finish. Allows for controlling sweetness level and can be adjusted slightly for desired texture and taste.
- 1/3 cup baking cocoa Contributes deep chocolate flavor and a slightly bitter balance to the sweetness of the frosting when incorporated with powdered sugar and butter, creating a chocolate buttercream component. Adds color and cocoa aroma that complements the orange gelatin and overall Halloween flavor profile.
- 1/4 cup heavy cream, may need a few tablespoons more Adjusts frosting consistency and adds richness, enabling smooth spreading and the proper mouthfeel; additional tablespoons may be added to reach desired thickness. Helps emulsify butter and powdered sugar with cocoa for a glossy, creamy finish.
- 1 tsp vanilla extract Provides aromatic depth and a sweet, rounded vanilla note that enhances and rounds out the flavors in the frosting, making chocolate and citrus elements more harmonious. Small amounts boost perceived sweetness without adding sugar.
- Halloween sprinkles & candy corn Provides festive decoration, color contrast, and textural interest that finish the cake with a Halloween theme; sprinkles and candy corn add crunch and visual appeal. Allows customization of the final look and seasonal flair while offering small bursts of additional sweetness.
Instructions
- Prepare and bake the cake according to package directions, using a 9 X 13 baking pan.: The aroma as the cake bakes should be warm and slightly chocolaty, signaling the sugars caramelizing at the edges. This step builds the structure you will later infuse, so getting an even rise matters. You want a golden top with a springy center when gently pressed, not a wet or underbaked middle. A common mistake is overmixing the batter, which can lead to toughness. To avoid that, stir just until combined, and tap the filled pan on the counter to release large air bubbles so the cake bakes uniform.
- Cool on wire rack for 1 hour.: After baking, the cake needs time to settle so it does not crumble when you poke holes. Cooling on a wire rack allows air to circulate and prevents steam from condensing under the cake, which would make the bottom soggy. You are looking for a cake that is warm but not hot, comfortable to touch. Avoid slicing or poking too soon, as the crumb will tear and not absorb the gelatin properly.
- In small bowl, dissolve gelatin in boiling water and then stir in cold water.: When you pour boiling water over the 2 (3 oz) packages orange flavor gelatin , the powder will bloom and release a bright citrus scent. Stir until fully dissolved and no grains remain, then add the 1/2 cup cold water to bring the temperature down. This temperature control prevents the cake from becoming overly saturated with steam. If the gelatin is grainy, it will create uneven pockets in the cake, so ensure complete dissolution.
- With a meat fork or wooden skewer, poke holes in cake about 2 inches apart in all directions. Slowly pour gelatin over cake. Refrigerate 2-3 hours.: The sound here is subtle, a soft tapping as you pierce the surface, and the visual cue is a grid of holes across the top. Pour the gelatin slowly so it flows into the holes instead of running off the sides; you should see the liquid darken the top as it soaks in. Chilling until set is essential because it firms the gelatin inside the crumb, creating those delightful pockets. A common error is pouring hot gelatin too quickly, which can over-saturate one area; pour gently and rotate the pan to distribute evenly.
- For frosting, in a small mixing bowl cream butter until fluffy. Beat in confectioners sugar, cocoa, whipping cream and vanilla until smooth. Add any additional whipping cream until the buttercream is the desired consistency. Spread over cake. Top with Halloween sprinkles and/or candy corn.: Whipping 1/2 cup butter, softened until light traps air and creates a base for a silky frosting. You should see pale, billowy peaks form as the butter whips. This step sets the texture, so don't rush by starting with cold butter; it will remain lumpy. If your butter is too warm, the frosting can become greasy, so aim for room temperature.
- Beat in confectioners sugar, cocoa, whipping cream and vanilla until smooth.: As you add the 3 cups powdered sugar and 1/3 cup baking cocoa , the bowl will gradually turn into a thick, chocolatey mass. Pour in the 1/4 cup heavy cream, may need a few tablespoons more and 1 tsp vanilla extract , beating until the frosting becomes glossy and spreadable. You should smell the chocolate deepen and feel the frosting loosen to a creamy ribbon when lifted. If it is too stiff, add more cream; if too loose, add a little more powdered sugar. Avoid adding liquid too quickly, which can make the texture break down.
- Add any additional whipping cream until the buttercream is the desired consistency.: Adjusting texture here is about feel, a tactile decision that affects spreadability. Add a teaspoon at a time and watch how the frosting changes, aiming for a glossy, scoopable texture that holds shape but spreads easily. If the frosting splits or looks curdled, chill briefly and then rewhip. Over-thinning is a typical issue, which makes the frosting slide off the chilled cake, so proceed cautiously.
- Spread over cake.: Working with a cooled, set cake gives you a smooth surface to cover. Use an offset spatula to spread the frosting in gentle strokes, creating a thin, even layer that seals in moisture and provides a backdrop for decorations. You will feel a slight resistance as the frosting meets the chilled top, a good sign that it will adhere. Pressing too hard can compress the gelatin pockets, so be light handed.
- Top with Halloween sprinkles and/or candy corn.: This is the joyful sound of sprinkling, the small clatter as candies land on the frosting. Scatter them evenly or create patterns for visual interest. The candies add crunchy texture against the soft cake, and the colors make the presentation festive. A mistake is adding heavy decorations that sink; choose small sprinkles or light candies to keep the frosting intact.
Notes
- Choose the right cake mix: Pick a fudge marble cake mix that you trust for consistent texture, as the cake is the vessel for the gelatin. A denser mix will hold pockets of gelatin better, while a very airy mix might collapse if overpoked. Taste the baked cake so you know how strong the chocolate notes are, which informs how much frosting cocoa you'll want.
- Gelatin handling: Fully dissolve the 2 (3 oz) packages orange flavor gelatin in the boiling water to avoid graininess. If you notice granules, keep stirring off heat until smooth, then add the cold water. Using warm, not hot, gelatin when pouring reduces steam and improves absorption.
- Poke technique: Space holes about 2 inches apart and pierce all the way to the bottom without tearing the pan. Use a uniform motion so holes are similar depth, which helps the gelatin spread evenly. If holes are too deep in one area, that section can over-saturate and become mushy.
- Frosting consistency: Adjust the 1/4 cup heavy cream, may need a few tablespoons more slowly to reach a spreadable texture. If the frosting feels grainy, beat longer at medium speed to smooth it. For a stiffer finish that holds shapes, chill the frosting briefly before spreading.
- Make ahead strategy: Bake and inject the cake a day in advance and frost the next day for easier transport. Keep the unfrosted cake covered in the refrigerator to prevent drying, and add sprinkles right before serving to maintain brightness.