Halloween Oreo Frozen Hot Chocolate
Halloween Oreo Frozen Hot Chocolate combines creamy cold milk, crunchy Oreo cookies, and rich cocoa for a playful seasonal drink. This easy, indulgent treat blends into a velvety frozen beverage that is perfect for spooky parties or cozy nights. It is quick to make, delightfully textured, and a fun twist on classic hot chocolate, making it an irresistible reason to celebrate.
Equipment
- Blender
- Glasses
Ingredients
- 1 1/2 cups cold milk Provide a cold, creamy base that helps blend and thin the frozen drink while delivering dairy richness; choose whole or reduced-fat milk depending on desired creaminess and mouthfeel.
- 1 cup crushed ice or 2 cups ice cubes Add icy texture and chill to achieve a slushy consistency; crushed ice or ice cubes will determine how smooth versus chunky the drink becomes when blended with the other ingredients.
- 1 envelope hot chocolate mix Contribute concentrated chocolate flavor and sweetness while dissolving into the milk to create the hot chocolate backbone; measure the envelope to maintain balanced chocolate intensity.
- 1 tablespoon sweetened cocoa powder Enhance deep cocoa flavor and intensify chocolate notes while adding slight bitterness to balance sweetness; sweetened cocoa powder also contributes to the overall chocolate aroma.
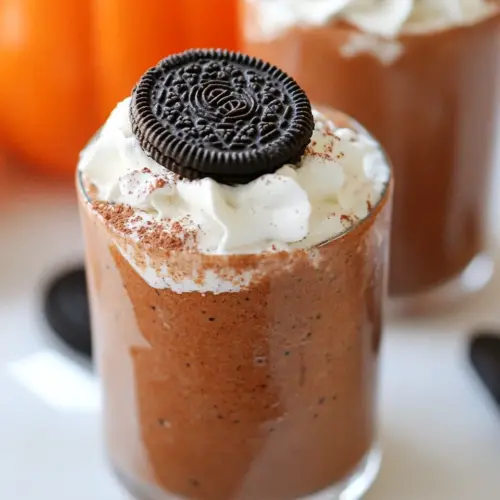
- 5 Halloween Oreo cookies broken into pieces {+ more for garnish, if desired} Introduce crunchy chocolate sandwich cookie pieces to add texture, Oreo flavor, and visual interest; folding or blending them creates cookie flecks throughout and a richer chocolate profile, while reserving extra for garnish if desired.
- spray whipped cream Provide a light, airy topping that adds creaminess and visual appeal; spraying whipped cream on top creates contrast with the dark chocolate drink and allows for additional garnish placement.
Instructions
- In a blender, pour in milk, ice, hot chocolate mix, cocoa powder and oreos. Blend until desired consistency is reached and no ice remains. Pour into glasses and top with whipped cream and oreo cookie pieces. Serve immediately.: The cold milk should hiss slightly as it meets the ice , and your blender will start with a loud whirl. You will smell the chocolate begin to bloom as the hot chocolate mix and sweetened cocoa powder hydrate, releasing those deep cocoa notes. I like to pulse first to break up large ice chunks, then blend on medium to high until the texture looks velvety. This hydration step matters because it ensures the dry powders dissolve evenly, preventing a gritty mouthfeel. A common mistake is adding everything at once and immediately cranking to high, which can cause the motor to struggle or leave pockets of dry mix. If that happens, stop, scrape down the sides, and blend briefly again, listening for a consistent, smooth roar from the blades rather than uneven rattling.
- If you do not have sweetened cocoa powder, substitute 1/2 tablespoon cocoa and 1/2 tablespoon granulated sugar OR another envelope of hot chocolate mix.: As the blender works, watch for the mixture to change from icy chunks to a glossy, milkshake like ribbon that falls smoothly from the blade. You should see tiny flecks of crushed Oreo , providing visual contrast. Smell will shift toward a concentrated chocolaty aroma, and the sound will move from a clunky thud to a steadier hum. This step is important to achieve the right mouthfeel; too little blending leaves annoying crunches of ice, while too much will overheat the motor and can melt the mixture into a thinner drink. If you notice uneven texture, let the blender rest for a moment, then pulse to finish. One trap is blending so long the mixture warms slightly, which dulls the refreshing cold sensation, so aim for smooth yet frosty.
- Pour into glasses and top with whipped cream and oreo cookie pieces: When you pour, you should see a creamy stream that holds its shape a little as it fills the glass, indicating a rich, well emulsified texture. The bright white of the spray whipped cream crowns the drink and traps cookie crumbs on top, creating an appealing contrast. I tap the glass gently on the counter to settle the mixture and then finish with a flourish of cookie crumbs. The visual layering matters because it cues the palate to the textures and flavors to come. Avoid assembling too early, as the whipped cream will lose its loft; add it right before serving. A frequent oversight is piling on too much garnish which makes it messy to sip, so aim for balance.
- Serve immediately: This drink is at its best when icy cold and freshly aerated, so pass the glasses right away. The sensory payoff is immediate the first time someone takes a sip, with the cool creaminess hitting the tongue, followed by crunchy cookie surprises. Serving right away also preserves the whipped cream top, the visual highlight of the drink. If you wait, the mixture can start to separate or melt, losing the distinct textures that make it special. If that happens, give the glass a gentle stir and top with a fresh dollop of whipped cream to revive its charm.
- If you do not have sweetened cocoa powder, substitute 1/2 tablespoon cocoa and 1/2 tablespoon granulated sugar OR another envelope of hot chocolate mix: This substitution balances sweetness and cocoa intensity, and you will notice the aroma deepen as the sugar dissolves and the cocoa disperses. I often use the extra envelope if I want a sweeter, more intense chocolate profile, whereas the cocoa plus sugar option lets me control sweetness more precisely. The why is simple, mixing dry sweetened cocoa with the other powders ensures flavor integration without adding clumping or graininess. A common error is failing to dissolve the sugar fully, which leaves gritty spots; to avoid this, blend a few extra seconds or add a splash more milk to help dissolve the granules. Be mindful of overall sweetness, especially if your hot chocolate mix is already sugary.
Notes
- Boost the cookie crunch by reserving more broken Oreo cookies and stirring half into the finished drink for added texture.
- Smoother texture comes from using crushed ice instead of whole cubes, which blends into a creamier, milkshake like consistency.
- Adjust sweetness by choosing between an extra envelope of hot chocolate mix for more sugar, or the cocoa plus sugar combo for finer control.
- Richer mouthfeel if you choose whole milk over lower fat options, it creates a silkier sip that clings pleasantly to the palate.
- Reserve garnishes like extra cookie crumbs and apply the spray whipped cream right before serving to maintain contrast and presentation.