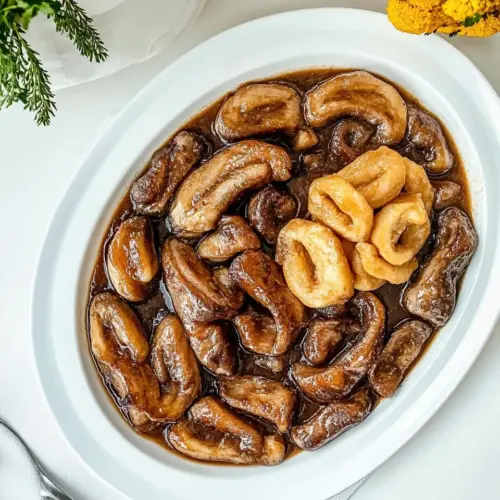
Gubana
Gubana is a tender, spiral filled loaf with a fragrant orange and buttery profile, offering a balanced sweetness and rich texture. This recipe yields a soft crumb with a glossy golden crust, perfect for easy weeknight baking or festive brunch gatherings. Each slice reveals a ribbon of aromatic filling, making it an inviting choice when you want to impress without fuss.
Equipment
- Stand mixer
- Paddle attachment
- Dough Hook
- 9-inch Springform Pan
- Offset Spatula
- Pastry Brush
- Instant read thermometer
Ingredients
- 1/2 cup (120 grams) warm whole milk (110°F/43°C to 115°F/46°C) Warm to about 110–115°F (43–46°C) and provide a cozy liquid base that activates yeast and helps hydrate the dough for a soft crumb.
- cup (80 grams) warm water (110°F/43°C to 115°F/46°C) Warm to the same temperature range to contribute additional hydration and adjust dough consistency while aiding yeast activation in conjunction with milk.
- 3 tablespoons (36 grams) granulated sugar, divided Granulate and divide to feed the yeast during proofing and to sweeten the dough mildly; reserved portion helps balance fermentation and final flavor.
- 1 (0.25-ounce) package (7 grams) instant yeast Instantly leaven the dough by converting sugars into carbon dioxide and alcohol, producing rise and structure without needing prior proofing of the yeast.
- 3 1/2 to 3 3/4 cups (438 to 469 grams) all-purpose flour, divided Sifted and measured across the indicated range to build the dough’s structure and gluten network; adjust quantity within the range to achieve proper dough texture.
- 2 1/2 teaspoons (7.5 grams) kosher salt Dissolve evenly to strengthen gluten structure, regulate yeast activity, and season the dough to enhance overall flavor balance in the finished bread.
- 1 teaspoon (2 grams) tightly packed orange zest Finely grate and pack to impart bright citrus aroma and subtle flavor that complements the sweet and nutty filling while lifting the dough’s profile.
- 1/4 cup (57 grams) unsalted butter, melted and cooled slightly Melted and cooled slightly to enrich the dough with tenderizing fat, improve mouthfeel, and add richness without killing the yeast when incorporated.
- 2 large eggs (100 grams), room temperature and divided Bring to room temperature and divide to provide moisture, structure, and richness; one portion often enriches the dough while the other can be used for wash or enrichment.
- 1 teaspoon (4 grams) vanilla extract Add aromatic depth by folding into the dough to enhance sweetness and complement citrus and nut flavors, contributing subtle floral-vanilla notes.
- Gubana Filling (recipe follows) Used to create the rich, nutty, spiced Gubana filling that layers into the dough; combines textures and flavors like nuts, chocolate, dried fruit, and liqueur.
Instructions
- In a small bowl, stir together warm milk, ? cup (80 grams) warm water, 1 teaspoon (4 grams) sugar, and yeast. Let stand until foamy, about 5 minutes.: The first aroma you will notice is the faint scent of yeast waking up, slightly sweet and yeasty, signaling fermentation is beginning; this step matters because a properly foamed yeast ensures a reliable rise, and if the liquid is too hot you will kill the yeast, so test it on your wrist, it should feel like a comfortable warm bath. One common mistake is using water that is too cold which will slow activity; if after five to ten minutes there is no foam, the yeast may be old or the liquid was wrong temperature, so discard and start with fresh yeast and correctly warmed liquids.
- In the bowl of a stand mixer fitted with the paddle attachment, combine 3 cups (375 grams) flour, salt, orange zest, and remaining 2 tablespoons plus 2 teaspoons (32 grams) sugar. Add yeast mixture, melted butter, 1 egg (50 grams), and vanilla. Beat at low speed until well combined; scrape sides of bowl.: The moment you mix these dry aromatics the orange oils perfume the air, and blending evenly prevents pockets of salt or sugar; using the paddle helps distribute ingredients before adding wet components for consistent dough texture, because even distribution at this stage allows the dough to develop uniformly, avoiding dense spots. A typical error is forgetting to scrape the bowl, which can leave dry islands; stop and scrape so everything incorporates smoothly.
- Switch to the dough hook attachment. Add 1/2 cup (63 grams) flour, and beat at low speed until a smooth, soft, somewhat tacky dough forms, 8 to 10 minutes, stopping to scrape sides of bowl and dough hook; add up to remaining 1/4 cup (31 grams) flour, 1 tablespoon (8 grams) at a time, if dough is too sticky. Turn out dough onto a lightly floured surface, and shape into a smooth round.: As the wet ingredients hit the dry mix you will see the dough begin to come together and the scent become richer, buttery and citrusy; adding the melted butter slightly warm but not hot prevents harming the yeast, and the single egg contributes fat and structure. Overworking at this stage with the paddle can create a tighter dough, so mix until combined and then switch to the dough hook to develop gluten more gently, avoiding a gummy texture.
- Lightly oil a large bowl. Place dough in bowl, turning to grease top. Cover and let rise in a warm, draft-free place (75°F/24°C) until doubled in size, 30 to 45 minutes.: The sound here is a soft, steady whir as the dough begins forming, and scraping ensures no flour pockets remain, which would cause uneven hydration; this matters because consistent hydration produces a uniform crumb. A common slip is ignoring the sides, which leaves dry streaks that never incorporate properly during kneading.
- Preheat oven to 350°F (180°C). Spray a 9-inch springform pan with cooking spray.: The dough hook will knead more efficiently, producing a smooth, elastic dough with a slight sheen when developed; you want to feel the dough change from shaggy to cohesive, which tells you gluten is forming correctly. If the dough clings excessively to the hook, pause and add a tablespoon of flour at a time, because overhydration will make shaping difficult later.
- Punch down dough. Cover and let stand for 5 to 10 minutes. Turn out dough onto a lightly floured surface, and roll into a 24×10-inch rectangle. Using a small offset spatula, spread Gubana Filling onto dough, leaving a 1/2-inch border on all sides. Starting with one long side, roll up dough, jelly roll style; pinch seam and ends to seal. Gently lift log at each end, and stretch to 28 inches long and even thickness. Lift log, and place, seam side down, in a spiral starting from edge of pan and ending in center. (It is important that the spiral is not tight and has room to grow as it rises and bakes. Make sure spiral is evenly spaced and ends in center of pan.) Tuck pinched ends under. Cover and let rise in a warm, draft-free place (75°F/24°C) until puffed, 15 to 20 minutes.: The extended kneading invites a gentle elasticity and a satisfying bounce when you press it; this tactile change is key to structure and oven spring, and allowing the dough to reach the slightly tacky stage ensures tenderness without collapse. A frequent mistake is adding all the extra flour at once, which will dry the dough; add gradually and trust the feel.
- In a small bowl, lightly whisk remaining 1 egg (50 grams). Using a pastry brush, brush egg on top and sides of dough.: When you work the dough by hand you will notice the surface tighten and become smooth, with a soft resistance when pressed; shaping into a tight round sets the stage for an even rise and a neat spiral later. Avoid overflouring the surface which can lead to dry spots; a light dusting is sufficient.
- Bake until golden brown and an instant-read thermometer inserted in center registers 190°F (88°C), 40 to 50 minutes, loosely covering with foil halfway through baking to prevent excess browning. (See Note.) Let cool in pan for 5 minutes. Carefully remove from pan, and let cool slightly on a wire rack. Serve warm or at room temperature.: Rubbing a little oil inside prevents sticking as the dough expands and produces a glossy exterior where the dough contacts the bowl, which helps you retrieve it easily after the rise; this small step contributes to a clean, undistorted loaf shape. Skipping oil can lead to tearing when you remove the dough, so do not skip it.
- Place dough in bowl, turning to grease top: Turning the dough to coat the top creates a thin film of protection against drying and forms a gentle sheen that shows fermentation progress; you will notice the dough feel bouncier as gases develop. Leaving the dough uncovered during this phase will form a dry skin, which limits proper expansion.
- Cover and let rise in a warm, draft-free place (75°F/24°C) until doubled in size, 30 to 45 minutes: During this time the dough will almost double, becoming pillowy and fragrant, and the air will carry a sweet, yeasty scent that tells you fermentation is doing its work; the warm, steady environment encourages even growth. Avoid placing it in a cold spot or near an open window, which will slow or stall the rise.
- Preheat oven to 350°F (180°C): Getting your oven to the right temperature ensures predictable baking and proper oven spring; when the oven hits temperature you can rely on the given bake time, and the heat will set the crumb while the exterior browns. An oven that is too cool will yield a pale, underbaked loaf, while too hot will brown the crust before the interior sets.
- Spray a 9-inch springform pan with cooking spray: A well-prepared pan prevents sticking and allows easy release, preserving the spiral form when you remove the finished loaf; springform sides give you space to place the log without compressing it. Using a regular pan without release can make extraction messy and may damage the loaf.
- Punch down dough: Deflating the dough gently expels large air pockets and redistributes yeast, creating a more even crumb; you will feel the dough relax and become pliable, which makes rolling easier. Overpunching and aggressively degassing will remove too much gas and lead to a dense final loaf.
- Cover and let stand for 5 to 10 minutes: This rest relaxes the gluten and makes rolling out the dough more forgiving, giving you time to prepare the filling and work deliberately; you will notice the dough becomes easier to shape, less springy. Rushing this step can make the dough fight back when you roll it out, increasing tearing.
- Turn out dough onto a lightly floured surface, and roll into a 24×10-inch rectangle: Rolling to a consistent rectangle creates even layers and prevents uneven filling distribution; you will hear the dough stretch softly and see a smooth surface with slight elasticity. Rolling too thin will cause tears during filling, while too thick will reduce the visual spiral effect.
- Using a small offset spatula, spread Gubana Filling onto dough, leaving a 1/2-inch border on all sides: Spreading the filling evenly gives each slice that signature ribbon of flavor and keeps the edges sealable; the contrast between the creamy filling and tender dough is central to the loaf. If you spread right to the edge you risk leakage, and too little filling will make the spiral disappointing.
- Starting with one long side, roll up dough, jelly roll style; pinch seam and ends to seal: Rolling tightly enough to hold shape but not so tight that the spiral cannot expand is the subtle art here; you will feel the log become denser as layers coil, and pinching the seam locks the filling inside. Rolling too loosely will cause the spiral to unravel, while overly tight rolling prevents internal steam expansion.
- Gently lift log at each end, and stretch to 28 inches long and even thickness: This stretching evens out the layers and helps the spiral sit neatly in the pan, you will feel the dough thin slightly and the filling distribute evenly. Avoid abrupt pulls that tear the seam or squeeze out filling; a patient, steady stretch is best.
- Lift log, and place, seam side down, in a spiral starting from edge of pan and ending in center: Placing the log into a loose spiral makes sure each coil has room to rise, creating that distinct layered look; you should see an even spiral with gaps that allow for oven expansion. A tight spiral will restrict growth and cause a dense center.
- It is important that the spiral is not tight and has room to grow as it rises and bakes: Allowing space ensures the loaf puffs and bakes evenly, producing tender layers and preventing the center from underbaking; you will notice the dough puff visibly during the short final rise. Crowding the coils is a frequent cause of uneven bake and compressed texture.
- Tuck pinched ends under: Concealing the ends prevents exposed filling from burning and helps the loaf hold a neat profile; this small finishing touch also improves the overall appearance. Leaving ends exposed can create burned edges that detract from the presentation.
- Cover and let rise in a warm, draft-free place (75°F/24°C) until puffed, 15 to 20 minutes: The short final rise gives the spiral a gentle lift and a softer crumb; you will see a subtle increase in volume and a light, yielding feel when touched. Overproofing at this stage will cause collapse in the oven, so watch closely rather than relying solely on time.
- In a small bowl, lightly whisk remaining 1 egg (50 grams): The egg wash will create a glossy, deeply colored crust that signals doneness and enhances visual appeal; whisking it smooth ensures even brushing. Skipping the egg wash results in a paler, duller finish.
- Using a pastry brush, brush egg on top and sides of dough: Brushing gives the loaf that irresistible golden sheen and helps the crust brown uniformly, adding the final visual flourish. Brushing too thickly can create burnt spots, so apply a light, even coat.
- Bake until golden brown and an instant-read thermometer inserted in center registers 190°F (88°C), 40 to 50 minutes, loosely covering with foil halfway through baking to prevent excess browning: As it bakes you will hear a soft crackle as moisture escapes and see a deepening golden color, while the interior sets; the thermometer ensures the center is fully cooked without overbrowning the exterior. A common error is removing it too early based on color alone; always confirm with a thermometer.
- Let cool in pan for 5 minutes: Allowing a brief rest stabilizes the crumb and makes removal safer, you will notice the loaf settle and steam diminish slightly, which helps maintain shape. Pulling it out immediately can cause the loaf to break apart.
- Carefully remove from pan, and let cool slightly on a wire rack: Cooling on a rack prevents a soggy bottom by allowing air to circulate, and the loaf continues to set while losing surface heat; you will smell that final burst of aroma as it rests. Cutting too soon will produce a gummy interior, so be patient.
- Serve warm or at room temperature: The texture and flavor vary slightly with temperature, warm slices offering a silkier filling and room temperature slices revealing firmer layers; both are delightful. Reheating gently if chilled will revive the soft interior without drying the crust.
Notes
- Adjust hydration carefully : If your dough feels too sticky, add flour a tablespoon at a time until it becomes manageable; this preserves tenderness while ensuring you can shape the log without tearing.
- Room temperature ingredients : Using room temperature eggs and slightly cooled melted butter helps ingredients combine smoothly and encourages even fermentation, which improves texture and rise.
- Proof in a warm, stable spot : Aim for about 75°F/24°C for reliable rising, such as an oven with just the light on or a warm corner; inconsistent temperatures cause uneven proofing.
- Prepare the filling ahead : Make the Gubana Filling in advance and chill slightly so it spreads without soaking the dough, helping maintain structural integrity during rolling.
- Watch the final rise : The short 15 to 20 minute puff before baking is about feel, not strict time; a light, slightly springy surface indicates readiness and prevents overproofing.
- Use a light egg wash : A thin, even coat of beaten egg creates a shiny, well browned crust without burning, apply gently and avoid pooling.
- Loosely cover if browning too fast : If the crust deepens quickly, tent with foil halfway through bake to prevent excessive color while the center finishes cooking.
- Slice after slight cooling : Cutting after a short rest yields cleaner slices and prevents a gummy interior; wait at least 10 minutes off heat for best texture.
- Make-ahead and freeze : You can shape the loaf and freeze before the final rise, then thaw and proof when ready to bake, which is handy for planning ahead.
- Warm before serving : Gently reheat slices in a low oven to revive the filling and refresh the crust for a just-baked experience.