Grilled Potato Wedges
Grilled Potato Wedges are crispy, smoky, and easy to make, delivering golden charred edges and a creamy interior. Perfect as an easy weeknight side or crowd pleasing appetizer, these wedges use simple pantry spices and Yukon Gold for best texture. Serve with lemon or chopped herbs for a bright finish, and you have a fast, satisfying dish worth repeating.
Equipment
- Grill
- Mixing Bowl
- Tongs
Ingredients
- 1 1/2 pounds Yukon Gold potatoes Peel if desired and cut into wedges to provide a tender, creamy base for grilling; Yukon Golds hold shape well and develop a golden crust when seared over high heat. Season wedges evenly so heat and smoke penetrate, creating a satisfying contrast between crisp exterior and fluffy interior. Keep sizes uniform to ensure even cooking and avoid underdone centers.
- 2 tablespoons olive oil plus more for oiling grill Coat wedges lightly to encourage even browning and to transmit heat from the grill; olive oil also helps spices adhere and promotes a crisp, caramelized surface. Use high-quality oil for a clean flavor that complements smoky notes and prevents sticking to grate. Reserve a little extra for brushing the grill grates before cooking.
- 3/4 teaspoon garlic powder Sprinkle evenly to impart a mellow garlic aroma that enhances savory depth without overpowering other flavors; garlic powder dissolves quickly and distributes consistently across the wedges. Use measured amounts to avoid bitter burnt garlic notes during grilling and to complement the potato’s natural sweetness.
- 3/4 teaspoon onion powder Dust across the wedges to add a subtle sweet-onion background that rounds out the savory profile and heightens overall flavor complexity. Onion powder rehydrates slightly with the oil, helping form a cohesive seasoning crust when grilled.
- 1/2 teaspoons smoked paprika Add a smoky, slightly sweet warmth that deepens the grilled character and mimics wood-smoke when used sparingly; smoked paprika contributes color and a gentle heat that pairs well with potatoes. Balance paprika with other spices to avoid overwhelming the dish and to accentuate charred edges.
- 3/4 teaspoons salt Salt evenly to enhance natural potato flavor and to draw out moisture slightly for a crisper exterior when grilled; salt is essential for seasoning through the wedge. Adjust quantity to taste, keeping in mind that grilling concentrates flavors and salt perception may intensify.
- 1/2 teaspoon black pepper Crack or measure to provide subtle heat and aromatic depth that lifts the overall seasoning blend; black pepper complements salt and adds a bright bite. Grind fresh if possible for the best aroma, but measured pepper works well when combined with other dry spices.
- Lemon wedges optional Squeeze over finished wedges to introduce a bright, acidic note that cuts through richness and refreshes the palate; lemon wedges allow diners to add brightness to taste. Offer wedges on the side so acidity can be applied selectively and won’t interfere with grilling.
- Chopped parsley or green onions optional Scatter finely to add fresh herbal fragrance and a pop of color that contrasts with golden potato wedges; chopped parsley or green onions bring a lively, oniony or herbaceous finish. Sprinkle just before serving to preserve vibrant color and fresh flavor.
Instructions
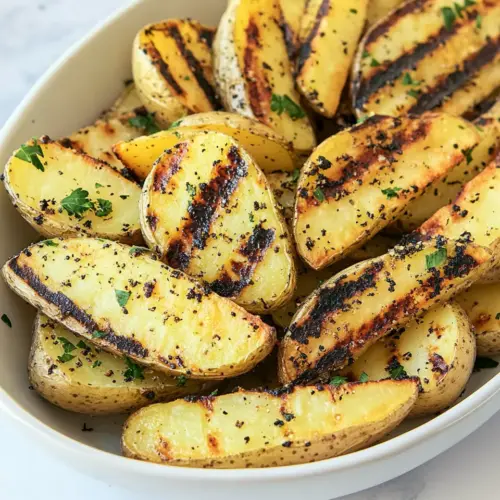
- Wash the potatoes well and cut them lengthwise into wedges.: The first sensory cue is the feel of the rustic skins as you scrub them, removing any grit until the surface feels smooth beneath your hands. As you slice into wedges, you should see a firm, creamy interior with a clean cut that holds shape. This matters because even, sized wedges cook at similar rates, preventing some from burning while others stay raw. A common mistake is cutting uneven pieces which leads to inconsistent cooking, so aim for uniform thickness and size for consistent results.
- Place the wedges in a bowl and toss with olive oil, garlic powder, onion powder, smoked paprika, salt, and black pepper until evenly coated.: When you toss, notice how the olive oil transforms the surface into a slightly glossy canvas, helping powders adhere. The aroma of the spices will emerge faintly, and the wedges should feel slick but not dripping. This even coating promotes uniform browning and ensures flavor on every bite. People often under-season or fail to toss thoroughly, resulting in clumps of spice; take time to mix so every wedge is equally seasoned.
- Preheat the grill to about 400°F. Oil the grill grates lightly and place the potato wedges on them. Grill for about 5-7 minutes on each side or until tender and grill-marked.: As the grill heats, you will hear the faint hum of burners or charcoal settling into a steady heat, and the grates will radiate warmth when you hover your hand an inch above them briefly and carefully. Reaching approximately 400°F is important because that high heat creates a quick sear and sharp grill marks while cooking the interior gently. If the grill is cooler, the wedges will take longer and can dry out before developing color, so resist placing them on too-weak a fire.
- Remove from the grill and, if desired, serve with lemon wedges and a sprinkle of chopped parsley or green onions.: When you oil the grates, a thin shimmer of olive oil reduces sticking and helps create clean grill marks, and the initial sizzle upon contact is the audible cue that the surface is hot enough. Arrange wedges spaced slightly apart so air circulates and steam does not accumulate, which prevents soggy results. A frequent error is crowding the grill, which lowers the surface temperature and prevents crisp edges, so leave some breathing room between pieces.
- Grill for about 5 to 7 minutes on each side or until tender and grill-marked: The sensory progression here is key, you will hear a steady sizzle that softens as moisture releases, and the smell will shift toward a toasty, almost sweet aroma. Visually, the exterior should develop deep golden brown char lines, and when probed with a fork the wedge should yield easily without collapsing. This timing creates a crisp exterior while preserving a creamy center. Avoid flipping too frequently, which interrupts searing and reduces crisping; let each side form color before turning.
- Remove from the grill and, if desired, serve with lemon wedges and a sprinkle of chopped parsley or green onions: As you lift the wedges off the grates there is a satisfying release of steam and a warm, earthy scent. A quick squeeze of lemon wedges adds bright acidity that cuts the oiliness, and a scattering of chopped parsley or green onions contributes fresh color and a pop of herbal flavor. This final step balances the dish and elevates the overall impression. One pitfall is letting the wedges sit too long before serving, which can soften the exterior, so plate them promptly for the best texture.
Notes
- Smoky Herb Twist Add a small sprinkle of smoked paprika and chopped parsley after grilling for an extra smoky note and fresh finish that complements the char.
- Zesty Lemon Finish Serve with lemon wedges on the side so guests can squeeze just enough bright citrus to cut the richness, elevating each bite.
- Extra Crispy Method Parboil wedges briefly before grilling to reduce overall cook time on the grill and encourage a crisper surface when seared at high heat.
- Garlic Forward Mix a pinch more garlic powder into the oil for a stronger allover garlic aroma without risking burnt fresh garlic on the grates.
- Herb Garnish Finish with chopped green onions or parsley to add vibrant color and a fresh herbal contrast to the smokiness.