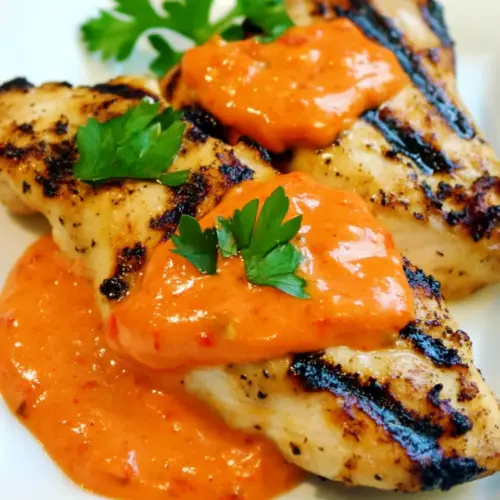
Grilled Garlic Chicken
Grilled Garlic Chicken is a bright, savory, and easy weeknight dinner with a citrus garlic marinade and a silky roasted red pepper aioli. The simple ingredients deliver juicy, charred breasts with bold flavor, perfect for quick family meals or casual entertaining. Make ahead friendly and versatile, it’s a go to when you want restaurant worthy results without fuss.
Equipment
- Grill
- Tongs
- Mixing Bowl
- Whisk
Ingredients
- 4 boneless, skinless chicken breasts Tenderize and provide the main protein for the dish, offering a lean, substantial base that grills quickly. Marinate easily and absorb flavors from the lemon, garlic, and oil to stay moist while developing a charred exterior.
- 2 T fresh-squeezed lemon juice Brighten and tenderize the chicken with acidic citrus, helping to balance richness and enhance overall flavor clarity. Use fresh-squeezed juice for a clean, natural tang that penetrates the meat during marination.
- 1 T garlic puree (or minced fresh garlic) Infuse robust aromatics throughout the meat by providing pungent, savory depth that complements the lemon and poultry seasoning. Use a puree for smooth distribution or minced garlic for textured bursts of flavor when grilled.
- 1 tsp . dried poultry seasoning Season and enhance poultry-specific flavors by adding warm, herby notes that pair well with garlic and lemon. Sprinkle evenly to create a balanced savory backbone without overpowering the other aromatics and sauces.
- 4 T olive oil Moisten and carry fat-soluble flavors while promoting even browning and preventing sticking on the grill. Drizzle into the marinade to coat the chicken, ensuring a glossy finish and helping to transfer heat for crisped edges.
- Roasted Red Pepper Aioli Sauce Complement the grilled chicken with a creamy, smoky element that adds richness and a contrasting flavor profile. Spoon or slather as a finishing sauce to introduce roasted pepper sweetness and garlicky tang alongside the grilled meat.
Instructions
- Trim all visible fat and tendons from chicken breasts, then cut small slits going down the length of each breast.: As you touch the raw chicken , you will notice connective bits that can tighten when heated and create uneven texture; removing them makes each bite tender. The small slits act like little flavor gates, letting the marinade seep deeper so the center tastes as seasoned as the exterior. You should feel the meat give slightly when you make these incisions, and the surface will look more receptive to liquids. One reason folks get dry results later is skipping this prep, so take the extra five minutes. Avoid cutting so deep that the breast falls apart, and keep your knife steady to create shallow, evenly spaced slits.
- Whisk together the lemon juice, garlic, poultry seasoning, and olive oil.: When you whisk these into a glossy emulsion, the aroma of garlic and citrus lifts immediately, offering a preview of the finished dish. The oil suspends the seasoning so it can cling to the meat, while the acid slightly softens the surface fibers. You will hear a faint rustling as the whisk moves and see the mixture thicken a touch, which signals a good marinade texture. If the mixture separates, whisk again and add a small splash of oil to bind it. A common mistake is using too aggressive an acid to oil ratio, which can make the surface tacky and overly cured, so measure closely.
- Put chicken in a Ziploc bag or plastic container with a tight lid that’s big enough to hold chicken in a single layer.: Placing the chicken in a single layer ensures even contact with the marinade and prevents crowding that traps cold air. The container should be roomy enough to allow turning, so each area gets coated. You will see the breasts laid flat, ready to receive the marinade like a gentle bath. Using an airtight vessel also prevents refrigerator odors from altering the flavor. Avoid piling the pieces on top of each other, because they will marinate unevenly and one side may remain under seasoned.
- Put chicken into bag or container, pour in marinade, seal it, and turn over a few times so the marinade is coating all the chicken.: As the marinade meets the meat, it should glisten, and the aroma of garlic and lemon will intensify. Turning the bag a few times physically moves the emulsion around each breast, guaranteeing surface coverage. You will notice the chicken take on a light sheen, and the herbs distribute uniformly. If you skip the turning, pockets of the meat can remain bare, resulting in uneven flavor. Also be mindful to remove as much air as possible if using a bag, this improves contact and reduces fridge space.
- Let chicken marinate in the refrigerator for 6-8 hours, or up to 24 hours if you need to start the marinating ahead.: During this time the lemon juice gently brightens the protein while the oil and garlic infuse flavor. You may catch a faint, pleasing citrus fragrance when you open the container after several hours. If you marinate too briefly, the flavors remain surface level, but over marinating longer than 24 hours can start to alter the meat texture. A practical pitfall is leaving it at room temperature; always refrigerate while marinating for food safety and best texture control.
- While chicken marinates, make Roasted Red Pepper Aioli Sauce and let it chill in the fridge.: Preparing the aioli ahead lets its flavors meld into a smooth, slightly smoky cream that contrasts with the hot grilled meat. As it chills, the sauce thickens and the red pepper aroma deepens; this is when it tastes brightest. Spoon a little onto a plate and notice the velvety mouthfeel that will complement the charred surface of the chicken . If you serve the aioli warm, it may separate and feel thin, so chilling stabilizes it. A mistake is to make it too early and forget it; a quick taste before serving allows you to adjust seasoning.
- When ready to cook, remove chicken from the fridge and let it come to room temperature.: Allowing the chicken to warm for a short time helps it cook more evenly and reduces the risk of the outside overcooking while the center is still cold. You will notice the chill lift and the meat soften slightly, which is a good cue. This step is especially helpful for uniform browning and a juicier interior. Avoid leaving it out for more than about 30 minutes to 45 minutes for safety reasons; too long at room temperature can invite bacterial growth.
- Oil the grill grates or grill pan with olive oil or non-stick spray.: A lightly oiled grate prevents sticking and encourages those attractive grill marks that indicate good searing. Brush a little olive oil on a paper towel and rub the bars, or use a high smoke point spray designed for grills. You should see a faint sheen on the metal and smell a hint of warmed oil. Using too much oil can cause flare ups, so only a light coating is necessary. A common error is neglecting this step, which makes the chicken adhere and tear when you try to flip it.
- Preheat the gas or charcoal grill or stove-top grill pan to medium-high.: Proper preheating creates the Maillard reaction that gives the exterior a golden brown sear, while sealing in juices. The surface should feel noticeably hot when you hover your hand above it for a moment, and you may hear a slight sizzle from a drop of water. A well heated grill shortens cooking time and improves texture. If the grill is not hot enough, the chicken will cook slowly and dry out, so patience here pays off.
- Cook chicken about 4-5 minutes on first side.: As the breast meets the hot grate, listen for a confident sizzle and watch for a golden brown edge forming. This initial sear creates flavor and a barrier that helps retain juices. After the first few minutes you can peek to seeWhether grill marks have developed and the meat releases easily. If you pry too early you risk tearing the surface, so let the sear set. A typical mistake is flipping repeatedly; one deliberate turn yields a better crust and juicier interior.
- Turn chicken and cook 4-5 minutes more on the second side, or until chicken is firm and lightly browned.: When you flip, expect another burst of sizzling, and count on the chicken firming up as proteins coagulate. Look for even coloring and a slight springiness when pressed gently; this indicates doneness without overcooking. If the breasts are very thick, finish with indirect heat or a moment of lower temperature to avoid charred exterior and raw center. The common error here is overcooking until the meat is dry; trust the visual and tactile cues for perfect texture.
- Serve hot, with Roasted Red Pepper Aioli Sauce.: The first bite should pair the warm, slightly charred surface with the cool, silky aioli, creating a satisfying contrast in temperature and texture. Present the chicken sliced or whole and offer the aioli on the side so guests can apply to taste. The sauce will cut through the grilled richness and round the meal. Avoid drenching the meat in sauce; a modest dollop enhances without masking the grilled flavors.
Notes
- Trim and slit first to help the marinade reach the interior, which results in evenly seasoned, juicier bites.
- Whisk until glossy so the marinade emulsifies and clings to the meat, ensuring every surface picks up flavor.
- Marinate in a single layer to avoid cold pockets where the marinade cannot reach, rotate the container occasionally for uniform coverage.
- Preheat thoroughly to encourage immediate searing, which locks in juices and gives you attractive grill marks.
- Make the aioli ahead so it chills and thickens, producing that silky texture that pairs nicely with hot, charred chicken.