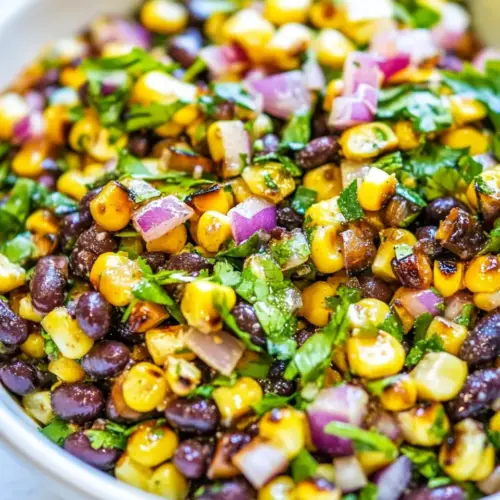
Grilled Corn and Black Bean Salad
Grilled Corn and Black Bean Salad blends smoky charred corn, creamy black beans, and bright lime juice for a fresh, easy summer side. This colorful salad is textural, zesty, and perfect for an easy weeknight dinner or a crowd pleasing barbecue. Make it warm or chilled for versatile serving and a simple reason to celebrate seasonal produce.
Equipment
- Grill
- Grill Basket
- Large Bowl
Ingredients
- 6 ears fresh sweet corn, husks and silks removed Shucked and grilled to develop sweet, smoky kernels that form the salad's flavorful base; cut from the cob and used warm or cooled to add texture and color.
- 8 tablespoons olive oil, divided Divided between grilling and dressing to add richness and help caramelize vegetables while providing a fruity backbone to the salad's flavors.
- 1 jumbo or 2 medium/large zucchini, cut into chunky bite-sized pieces Cut into chunky bite-sized pieces and charred for a tender, slightly smoky element that contrasts with the crisp corn and brightens the salad's vegetable mix.
- 1 large red onion, cut into chunky bite-sized pieces Cut into chunky bite-sized pieces and grilled until edges caramelize to contribute sharp, sweet-savory notes and robust texture contrast in the salad.
- 1/2 cup unsalted butter, diced into medium cubes Diced into medium cubes and used to add a rich, creamy mouthfeel and buttery flavor that enhances the salad's overall richness when tossed with warm ingredients.
- one 15-ounce can black beans, drained and rinsed Drained and rinsed to provide a hearty, protein-rich component with a creamy texture that balances the sweetness of corn and adds substantial body to the dish.
- one 4-ounce can fire-roasted green chiles, do not drain Included with its juices left in to provide a smoky, mildly spicy accent and extra liquid to help distribute flavors evenly throughout the salad.
- 1/4 to 1/3 cup fresh lime juice, or to taste Squeezed to taste to deliver bright acidity that lifts and balances the dish, tying together the richness of oil and butter with fresh flavors.
- 1/4 to 1/3 cup fresh cilantro, finely minced Finely minced to add fresh, herbaceous brightness and a citrusy, slightly peppery lift that complements the grilled vegetables and beans.
- 1 tablespoon kosher salt, or to taste Measured and added to season the salad, enhancing all flavors and helping to bring out the natural sweetness of the corn and vegetables.
- 2 teaspoons freshly ground black pepper, or to taste Freshly ground to provide a warm, slightly biting heat and aromatic depth that complements other seasonings while highlighting roasted flavors.
- 1 to 3 teaspoons red chile flakes, optional and to taste Adjusted to taste as an optional spicy element, providing layered heat and a touch of smoky red pepper that can elevate the salad's overall kick.
Instructions
- Preheat grill to medium-high heat. Tip– I recommend keeping the side with the corn slightly cooler than the side with the zucchini and red onion.: As the grill warms, notice the smell of clean heat and a faint metallic tang from the grates, a good sign they are ready. This tiered heat approach helps the corn develop even char without scorching, while the zucchini and red onion can take the higher temperature needed to get tenderness and sear. If you skip preheating, food will stick and you will not get proper caramelization, so be patient and ensure the grates are hot before adding ingredients. Check for steady glowing coals or a consistent gas flame rather than isolated hotspots.
- Add the corn to a large plate and evenly drizzle the corn with about 4 tablespoons olive oil, and rub it in evenly over the corn.: When you oil the corn , feel the cool slickness under your fingers, then watch as the surface turns shiny and ready for the grill. The oil promotes even browning and reduces sticking, producing those desirable charred kernels. Rub thoroughly so all sides are coated, and avoid using too much oil which can drip and cause flare ups. If the oil pools, dab it with a paper towel before grilling.
- To a grill basket, add the zucchini, red onions, evenly drizzle with about 4 tablespoons olive oil, and toss with your hands to coat evenly.: Tossing by hand lets you feel for even coverage and the warm scent of oil meeting fresh vegetables. The oil helps the zucchini and red onion sear and develop color in the basket, and the basket prevents smaller pieces from falling through the grates. An overly crowded basket steams instead of chars, so give pieces room and shake or stir every few minutes. If pieces cling together, separate them with tongs to promote even contact with heat.
- Place the corn on the grill on the cooler side and grill for about 7 to 8 minutes, turning the ears every minute or two by one-quarter turn, or as needed so that corn is cooking evenly and isn’t burning.: As the corn cooks, the smell will shift to a sweet, toasty aroma and you will see golden brown and black flecks appear. Turning frequently encourages uniform charring and prevents one side from burning; aim for even, patchy color rather than continuous black. If you leave ears in one spot too long, kernels can blister and dry out, so keep the rhythm of turning to avoid scorching. Also watch for flare ups from oil drips and move ears briefly to a cooler spot if flames intensify.
- Place the grill basket next to the corn on the warmer side, and toss the zucchini and red onion in the basket every few minutes to ensure even cooking. I find that they will take a few minutes longer to cook than the corn but grills vary widely so cook until all components are done to your liking.: You should hear a steady sizzle as the zucchini and red onion hit the hot basket, and visually they will develop translucent edges and browned surfaces. Turning keeps pieces from sticking and creates patchy, caramelized spots that add depth. Avoid leaving them untouched for long periods, which can cause one side to crisp excessively while others remain underdone. If pieces are browning too fast, move the basket to a slightly cooler zone to finish through.
- After the corn is cooked, cut the corn off the ears with a sharp knife and place into a large bowl. Tip– If you have rubber kitchen gloves, use them as heat protection for your hands or hold the tip of the corn with a pot holder. You want to start shaving the ears when the corn is still fairly warm so the butter will melt.: When you shave the kernels, you will see the sweet juices collect in the bowl and smell a warm, roasted sweetness. Cutting while warm helps the melted butter integrate smoothly and coat each kernel. Beware of a dull knife which can crush kernels instead of slicing them cleanly; use a sharp chef knife and a secure, steady hand. If the cob slips, stabilize it against a cutting board edge to avoid accidents.
- Add the butter cubes to the bowl and stir to combine.: As the warm kernels meet the butter , you will hear a soft sizzle and see the cubes begin to gloss over into a silky coat. The butter binds with the corn juices, creating a luscious mouthfeel that carries flavors through the salad. Stir gently so the melted butter emulsifies with the juices rather than pooling at the bottom. A common pitfall is adding cold butter to cold ingredients, which will not melt well; ensure the corn is warm enough for proper incorporation.
- Add the zucchini, red onions, black beans, green chiles, lime juice, cilantro, salt, pepper, optional chile flakes, and stir to combine.: At this stage various aromas will mingle: citrusy brightness from the lime juice , herb fragrance from the cilantro , and the warm umami from the black beans and green chiles . Stirring integrates textures and disperses seasoning so each bite is balanced. Taste as you go and adjust slowly, because it is easier to add than to remove seasoning. One mistake is over mixing vigorously which can break down the beans, so fold gently to keep the beans intact.
- Taste and decide what tweaks you need to make, i. e. more salt, pepper, lime juice, cilantro, pinch of cayenne, etc.: Use your palate as the final arbiter; the right balance will burst in the mouth with sweet, salty, tangy, and smoky notes. Add small increments of adjustments and let them meld a minute before tasting again, since acid and salt evolve with time. Over seasoning is a common problem, so add conservatively. If you oversalt, a squeeze more lime juice or a few extra beans can help rebalance.
- Salad can be served warm, at room temp, or chilled from the fridge.: Serving temperature changes texture and emphasis, with warm highlighting the melted butter and chilled allowing flavors to blend and mellow. When warm, the salad offers a silky, immediate comfort; when chilled, flavors settle and the salad becomes a refreshing accompaniment. If refrigerating, keep airtight and note the zucchini softens over time, which is normal. Avoid leaving at room temperature for extended periods in hot weather to prevent spoilage.
Notes
- Preheat thoroughly: Make sure your grill is properly preheated to medium high so the grates sear the corn and vegetables immediately, creating those classic charred spots. If you add the ingredients too early, they will stick and fail to caramelize, so wait for steady heat and a faint smoky aroma before cooking.
- Oil intentionally: Use the divided olive oil to coat items separately, which ensures the corn and the chopped vegetables get appropriate coverage. Over oiling can cause flare ups; apply just enough so surfaces are glossy but not dripping, and blot excess if necessary.
- Protect your hands: When shaving hot corn, hold the ear with a pot holder or heat resistant glove to avoid burns, and use a sharp knife to slice cleanly. A dull blade will mash kernels and make finishing less attractive.
- Control salt: Start with less than the full suggested amount and increase after tasting, since factors like salted butter or canned beans with salt will change needs. Taste multiple times, because the saltness becomes more pronounced after resting.
- Serve at the right temperature: If you want butter to coat the salad, serve warm; if you prefer melded flavors, chill it. Both are valid, but understand the trade off: chilling will soften zucchini texture while warming highlights richness.
- Store properly: Keep leftovers airtight in the fridge for up to five days. If freezing, note that zucchini texture will change upon thawing, so plan to use frozen portions in cooked dishes rather than as a cold salad garnish.