Grilled Chicken Recipe
Grilled Chicken Recipe delivers juicy, herb kissed chicken with a bright lemon garlic marinade. This easy weeknight dinner is creamy in mouthfeel from the olive oil, crisp on the outside from proper searing, and reliably flavorful for family meals or entertaining. Try it for fast meal prep or a satisfying backyard cookout, you will want to make it again.
Equipment
- Grill
- Large Skillet
- Baking Dish
- Meat Mallet
- Instant read thermometer
Ingredients
- 1 1/2 -2 pounds chicken breasts Provide lean protein as the main component of the dish, supplying a tender, juicy base when cooked properly; offers substantial flavor absorption from marinades and seasonings and ensures the meal is filling and satisfying.
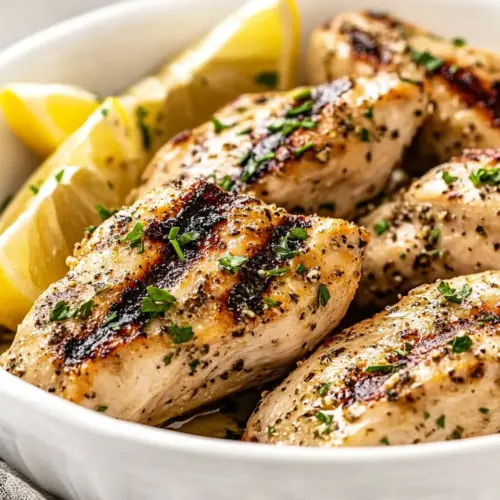
- Lemon wedges for serving Brighten and balance the grilled chicken with acidic, citrusy bursts when squeezed over each serving; add visual appeal and allow diners to adjust acidity to taste for a fresher finish.
- Fresh parsley for garnish (optional) Add a fresh, herbaceous finish and a pop of color as an optional garnish; enhance aroma and provide a mild, grassy contrast to the savory, smoky flavors of the grilled chicken.
- 1/3 cup olive oil Serve as the emulsifying fat in the marinade, helping to coat and tenderize the chicken while carrying and melding flavors; contribute richness and assist with preventing the meat from drying out during grilling.
- 3 tablespoons freshly squeezed lemon juice Introduce bright acidity to the marinade to tenderize the meat and cut through the oil’s richness; help amplify other flavors and add a clean, zesty note to the finished dish.
- Zest from one lemon Contribute concentrated citrus aroma and sharpness to intensify lemon flavor without extra liquid; enhance overall brightness and pair particularly well with garlic and herbs.
- 4 -6 cloves garlic, minced Impart pungent, savory depth and aromatic complexity when minced and combined with other marinade components; help create a robust, flavorful crust during grilling and provide umami-like richness.
- 1 tablespoon balsamic vinegar Add a touch of sweet-tart complexity and depth to the marinade, balancing acidity from lemon and sharpness from mustard; contribute subtle caramelized notes when exposed to heat.
- 2 teaspoons Dijon mustard Provide a tangy, slightly sharp binding element that helps emulsify the oil and acid in the marinade; add subtle piquancy that enhances overall flavor complexity.
- 2 teaspoons dried oregano Deliver classic Mediterranean herbal notes that complement lemon and garlic, adding savory, slightly peppery flavor to the chicken; help create an earthy, aromatic profile when grilled.
- 1 tsp EACH salt, pepper, dried basil, dried thyme, onion powder Season evenly to enhance overall taste: salt brings out natural flavors, pepper adds bite, dried basil and thyme lend sweet, savory herbs, and onion powder supplies mild savory depth; together these create a well-rounded base seasoning.
- 1/2 tsp EACH paprika, sugar Introduce mild warmth and subtle sweetness to the seasoning blend, with paprika adding color and sugar promoting caramelization and hinting at balanced sweetness on the grill.
- 1/4 teaspoon of red pepper flakes Provide concentrated heat in small amounts to add a subtle, lingering spicy kick; help elevate the overall flavor profile without overpowering the other herbs and citrus notes.
Instructions
- Working in batches as needed, place the chicken in a large freezer bag. Use the flat side of a meat mallet, the side of a can, or a rolling pin to pound to an even thickness, between 1/2 inch and 3/4 inch thick.: The moment the meat hits the bag you should already feel the plan taking shape, and the texture will benefit from controlled handling. Gently press out excess air so the marinade can surround each piece rather than trapping air pockets, which helps the flavors reach every surface. The bag method keeps cleanup simple, and it ensures the marinade contacts the chicken evenly which speeds flavor absorption. A common mistake is overfilling the bag so pieces stick together, making it hard to flatten them later. If that happens, separate into two bags and work in smaller batches.
- Whisk the marinade ingredients together in a freezer bag or a glass bowl. Add the chicken to the marinade and turn it to coat. Marinate in the refrigerator for up to 4 hours (the longer, the better).: When you pound the chicken you will hear a subtle change in sound as fibers loosen and the meat evens out, and the surface will look more uniform. This step is essential because it prevents thin edges from overcooking while the center finishes, giving consistent doneness. I press with moderate force so I keep the meat intact, if you press too hard the texture can become gummy. A frequent misstep is skipping this step entirely, which results in uneven cooking and a less refined mouthfeel.
- When you're ready to cook, remove the chicken from the refrigerator and let it rest for 15 to 30 minutes before cooking.: As you whisk, the aromas of minced garlic and lemon zest should bloom and the texture will change as the mustard emulsifies the oil and acid. This creates a cohesive mixture that clings to the chicken , ensuring even coverage. Scrape the sides of the bowl or massage the bag to fully incorporate the dried herbs so they do not clump. A common issue is under-mixing which leaves pockets of oil or dry seasoning that do not distribute well.
- Preheat the grill to 400°F, clean, and grease the grates.: When the pieces meet the marinade, the surface will slick and glisten, and you should use gentle motions to ensure the chicken is completely covered. Massage the bag or stir in the bowl for several rotations so the flavors settle into every crease. Avoid leaving the meat sitting in one area of the bag where it may not contact the liquid evenly. Uneven coating leads to patchy seasoning in the final dish.
- Grill the chicken undisturbed for 5-7 minutes per side, or until chicken is cooked through (an inserted thermometer should reach 160°F). Let it rest for 5 minutes before slicing to reach an internal temperature of 165°F. Serve with a squeeze of lemon juice and freshly cracked salt to taste.: During this time the lemon and seasonings will infuse the meat, and the aroma in the fridge will be a good hint of the final profile. I usually aim for at least 30 minutes for a noticeable lift and up to 4 hours for deeper flavor. Over-marinating in citrus can alter texture, so avoid going much longer than recommended, especially with thin pieces. A frequent oversight is assuming longer is always better which can make the chicken mealy.
- Heat one tablespoon of olive oil in a large skillet over medium-high heat. Once it's very hot, add the chicken and cook, undisturbed, for 3 to 4 minutes, or until it’s deeply golden on one side.: Allowing the chicken to sit at near room temperature helps it cook more evenly, and you will notice the cold edge warming slightly which reduces total cooking time. This resting step improves searing and keeps the interior juicier. Skipping this will often lead to a longer cook time and dryer meat, because a cold center requires more heat to reach the right temperature.
- Flip the chicken over, cover, and reduce the heat to medium. Cook for an additional 5-7 minutes, or until the chicken reaches an internal temperature of 160°F on a meat thermometer. Allow it to rest for 5 minutes before slicing to reach an internal temperature of 165°F. Serve with a squeeze of lemon juice and freshly cracked salt to taste.: As the grill comes up to heat you should get a steady searing roar and the grates will shed any residual debris. A clean, well oiled grate prevents sticking and encourages attractive grill marks that signal caramelization. Use a brush or an oiled towel to grease the grates before adding the chicken . A common mistake is grilling on a dirty grate which causes tearing and sticking, losing those lovely sear lines.
- Preheat oven to 425°F and lightly grease a baking dish with cooking spray.: While grilling you will see the surface go from glossy to matte and then develop golden to deep amber char where the sugars and proteins caramelize. Leave the pieces alone so the sear can form, flipping only when the surface releases easily. Use an instant read thermometer to confirm 160°F in the thickest part. A typical error is flipping too often which disrupts browning and prolongs cooking time.
- Drain the chicken from the marinade and add it to the prepared baking dish. Bake, uncovered, for 16-18 minutes, or until internal temperature reaches 160°F. (Baking time is for chicken that is approximately 1/2 inch thick; increase cooking time as needed for thicker chicken.): The resting period is when carryover cooking brings the center to its safe finished temperature, and juices redistribute so slices remain moist. You will feel the meat firm slightly, and the aroma will settle into a pleasant, savory citrus-herb note. Cutting immediately will let juices escape onto the cutting board, leaving drier meat on the plate, so patience here preserves texture and flavor.
- Let it rest for 5 minutes before slicing to reach an internal temperature of 165°F. Serve with a squeeze of lemon juice and freshly cracked salt to taste.: The final touch of lemon and a hint of finishing salt brightens and heightens the flavors, making the herbs pop and balancing the savory base. I always taste a small piece before adding more salt, because the marinade already seasons the meat significantly. Over-salting at the end is a common misstep, so add sparingly and adjust to preference.
- Heat one tablespoon of olive oil in a large skillet over medium-high heat: When the oil shimmers and moves like a slow wave across the pan, it is hot enough to create an immediate sear, and you will smell the oil's fruitiness. This heat level encourages the Maillard reaction which gives a deeply savory crust on the chicken . Avoid heating until smoking, because that can char flavors and produce bitterness.
- Once it's very hot, add the chicken and cook, undisturbed, for 3 to 4 minutes, or until it’s deeply golden on one side: As the chicken cooks you will hear a steady sizzle and see the edges take on a golden brown color, which signals flavor development. Keeping it still promotes an even crust. A mistake I see often is moving the meat too soon which prevents proper caramelization and creates uneven coloring.
- Flip the chicken over, cover, and reduce the heat to medium: Covering traps heat and moisture so the center reaches a safe temperature without burning the exterior, and reducing the heat avoids aggressive charring. You might see gentle steam under the lid which helps finish the cooking. Leaving the heat too high here risks drying the interior before the center is fully done.
- Cook for an additional 5 to 7 minutes, or until the chicken reaches an internal temperature of 160°F on a meat thermometer: During this stage the aroma will deepen and the surface will set into a tender crust, while the interior slowly warms. Aim for 160°F because carryover will raise it to 165°F during resting. A typical mistake is relying on timing alone rather than checking temperature, which can leave you with underdone or overcooked meat.
- Allow it to rest for 5 minutes before slicing to reach an internal temperature of 165°F: Resting is where the final texture lives, juices settle, and the taste becomes cohesive. The surface will cool slightly and the meat firms up to a pleasant bite. Cutting too early loses those juices, leading to drier slices, so hold to the rest time.
- Preheat oven to 425°F and lightly grease a baking dish with cooking spray: The oven method offers a hands off approach that still promotes gentle browning, and the hot environment shortens cooking time for even pieces. Greasing prevents sticking and helps the surface caramelize. A mistake is using a cold dish which increases bake time and alters the crust formation.
- Drain the chicken from the marinade and add it to the prepared baking dish: When you place the pieces in the dish, space them so air circulates and moisture can evaporate, encouraging a pleasant exterior. Excess pooled marinade can steam the surface, so drain well for better texture. Crowding the pan will produce soggy edges and uneven browning.
- Bake, uncovered, for 16 to 18 minutes, or until internal temperature reaches 160°F: In the oven you will notice the surface changing from pale to golden and the edges tightening slightly as proteins denature. Time varies with thickness, so use a thermometer to be certain. A common error is relying solely on time, without checking temperature, which risks undercooked centers.
- Let it rest for 5 minutes before slicing to reach an internal temperature of 165°F: Final resting lets juices redistribute and carryover heat complete the cooking, creating a juicier slice and a more cohesive flavor. The meat will look slightly firmer and the aroma will be steady and inviting. Cutting too soon is the most frequent mistake here, and it wastes beautiful juices.
Notes
- Emulsify the marinade, whisk the mustard in well so the oil and lemon juice combine into a cohesive mixture that clings to the chicken, improving coverage and consistent flavor.
- Pat the chicken dry before cooking, removing excess surface moisture gives you a much better sear and avoids steaming which inhibits proper browning.
- Measure the aromatics, mince the garlic finely so it disperses evenly and does not burn quickly on high heat, which can create bitterness.
- Use a reliable thermometer, aim for 160°F before resting to allow carryover to reach 165°F, this prevents undercooked centers and overcooked exteriors.
- Give it space on the grill or pan, overcrowding lowers surface temperature and causes steaming rather than searing, which affects texture and color.
- Finish with fresh lemon, a squeeze just before serving brightens the dish and ties the herb and garlic notes to the meat in a lively way.