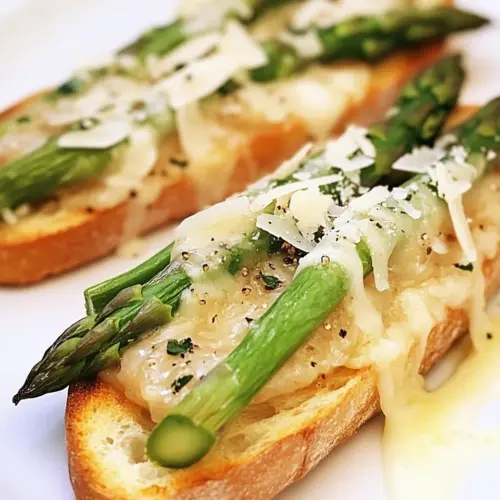
Grilled Bruschetta with Asparagus and Parmesan Cheese
Grilled Bruschetta with Asparagus and Parmesan Cheese blends crispy ciabatta bread, tender asparagus, and melted Monterey Jack cheese with nutty Parmesan cheese for a creamy, crunchy starter. This easy weeknight or spring entertaining dish is quick to assemble and delivers bright, savory flavors that guests love, making it a must try for seasonal gatherings.
Equipment
- Grill or Grill Pan
- Baking Sheet
- Saucepan
- Tongs
- Box grater
Ingredients
- 1 loaf ciabatta bread, sliced into 1/2-inch-thick slices Sliced to 1/2-inch-thick pieces to provide a sturdy, crispy base for the bruschetta; toasting brings out a nutty flavor and prevents sogginess from toppings. Ideal for holding grilled asparagus and melted cheeses while adding a chewy interior contrast to the crisp crust.
- 1 clove garlic, peeled and halved Peeled and halved to rub over warm toasted bread, imparting a subtle, aromatic garlic flavor without overpowering the other components. Used sparingly, it brightens the bruschetta and adds a fragrant finish that complements both olive oil and cheese.
- 2 tablespoons extra-virgin olive oil Measured and drizzled over bread and asparagus to add richness and help promote even browning while grilling; also acts as a flavor carrier for herbs and salt. Extra-virgin olive oil contributes fruity, peppery notes that enhance the overall savory profile.
- Coarse salt and freshly ground pepper Used to season both bread and asparagus to taste, providing essential flavor contrast and balance; salt enhances natural sweetness while freshly ground pepper adds warmth and mild heat. Applied lightly to avoid overpowering the delicate asparagus and cheeses.
- 30 thin asparagus spears, tough ends trimmed Trimmed to remove tough ends so spears cook evenly and remain tender-crisp; thin spears grill quickly and develop charred, smoky notes. Placed atop or alongside the toasted bread, they contribute a fresh, vegetal texture and bright green color.
- 6 ounces Monterey Jack cheese, grated Grated to melt evenly over grilled asparagus and bread, creating a gooey, creamy layer that binds toppings together and adds mild, buttery flavor. Monterey Jack provides a smooth, meltable character that contrasts nicely with the sharper Parmesan.
- 2 ounces Parmesan cheese Shaved or grated for a salty, umami-rich finishing touch that adds depth and a slightly granular texture; used sparingly to avoid overpowering the dish. Parmesan's savory, nutty notes elevate the overall flavor and provide a refined contrast to the milder cheese.
Instructions
- Grill bread slices over medium high heat until golden brown on both sides. Rub one side of the bread with garlic; brush lightly with oil. Place in a single layer on a baking sheet.: Close your eyes for a moment and imagine the sound, a confident sizzle as the ciabatta bread hits the grates, releasing a toasty, breaded aroma. The visual cue you want is a warm golden brown with little charred kiss marks, not blackened spots, which shows the sugars have caramelized and the crust is crisp. You should hear a steady sputter as steam escapes from the bread, and when you press gently with tongs the center should give slightly but remain firm. This step builds texture contrast that keeps the topping from making the bread soggy. A common mistake is leaving the bread too long, causing it to burn and taste bitter, so stay attentive and turn when you see the first golden patches.
- Preheat broiler. Bring a large saucepan of water to a boil over high heat; add a generous pinch of salt. Add the asparagus and cook until tender, 3 to 5 minutes. Drain the asparagus and set aside.: Right after grilling, while the bread is still hot, take the halved garlic and rub the cut surface over one side so the heat releases those fragrant oils. Then use a silicone brush to apply the extra-virgin olive oil sparingly, adding a sheen that helps the final broiling step and enriches the flavor. The scent should shift subtly, with a warm, savory garlic note mingling with the olive oil. Don't drench the slices, because too much oil will make them limp instead of crisp. Avoid the error of rubbing garlic on cold bread, it will not impart the same aromatic intensity.
- Combine the Monterey Jack and Parmesan in a bowl. Sprinkle two-thirds of the cheese evenly over the ciabatta slices. Arrange 3 asparagus spears on top of each slice. Sprinkle the remaining cheese over the asparagus, dividing evenly. Season with salt and pepper.: Arrange the prepared bread slices in one even layer so each slice gets consistent heat under the broiler. The visual cue is a neat grid with small gaps between pieces for air circulation. This staging step is essential to ensure even melting and browning of the cheese that will go on top. If slices overlap, the covered areas will not brown properly and the texture will suffer. A common pitfall is crowding the pan, which leads to uneven results, so give each piece enough space.
- Broil until the cheese has melted, 1 to 2 minutes. Remove from the oven and cut in half.: Set your oven to the broil setting and allow it to come to full intensity, so the element is glowing hot and ready to melt the cheese quickly. You'll know it is ready when the oven reaches its high direct heat state and the top element radiates a strong, even glow. This rapid blast of heat creates a bubbly, lightly browned cheese finish without overcooking the asparagus . A mistake is placing the tray under a cool broiler, which results in long heating times and dried out toppings, so preheat thoroughly.
- Serve warm.: As the broiler heats, fill a saucepan with enough water to cover the asparagus and bring it to a vigorous boil. Adding salt seasons the vegetable from the inside out and helps maintain that vivid green color. The water should be rolling, creating a rhythmic roar, which signals it's hot enough to cook quickly. This step sets the stage for bright, tender spears that will contrast with the grilled bread . Avoid using too little water, which can cause the temperature to drop and slow the cooking.
- Add the asparagus and cook until tender, 3 to 5 minutes: Slide the trimmed asparagus into the boiling water and watch them turn an intensified green almost immediately, a satisfying visual metamorphosis. You should see the stalks become slightly more pliable when pierced with a fork, and they will still retain a slight snap. The sensory cue here is a short, sharp scent of green vegetation released into the steam. This brief blanch keeps them tender yet structured, which matters because overcooked asparagus becomes mushy and loses its fresh flavor. Avoid boiling past the tender stage, as that will ruin the textural contrast.
- Drain the asparagus and set aside: After the brief cook, drain the asparagus thoroughly so no excess water dampens the bread . You might pat them gently with a towel to remove surface moisture, which helps the cheese adhere and prevents sogginess during broiling. The cooled spears should still feel slightly warm and firm, ready to be arranged. Leaving too much water on them will steam the cheese and make the finished dish watery, so ensure a good drain.
- Combine the Monterey Jack and Parmesan in a bowl: In a mixing bowl, toss together the grated Monterey Jack cheese and the grated Parmesan cheese , noticing the different textures as they mingle, one creamy and the other granular. The blend ensures an even melt and a complex flavor profile, where Monterey Jack cheese gives silky stretchiness and Parmesan cheese offers sharp, nutty notes. This combination contributes both to mouthfeel and to the attractive browning you want under the broiler. A typical oversight is under-grating the cheeses, which can lead to clumpy distribution, so grate finely for even coverage.
- Sprinkle two-thirds of the cheese evenly over the ciabatta slices: Distribute most of the cheese across the bread so each slice has a base of creamy melt. Visually you want an even carpet of cheese that will bind the asparagus to the bread when it melts. This base layer ensures the toppings do not slide and creates a cohesive bite. An error here is piling too much cheese in one spot, which can melt into puddles instead of forming a pleasing crust, so keep the spread uniform.
- Arrange 3 asparagus spears on top of each slice: Place three of the blanched asparagus spears per slice in a neat arrangement, which gives a balanced appearance and portion size. You should feel the gentle weight of the spears on the cheese, and visually the green should contrast with the pale melted Monterey Jack cheese . This placement ensures every bite gets vegetable and cheese together. Avoid stacking too many spears, as that can prevent even broiling and lead to uneven heating.
- Sprinkle the remaining cheese over the asparagus, dividing evenly: Finish with the reserved cheese so the tops of the asparagus are lightly covered, creating seeds for browning and a glossy finish once broiled. The top cheese should begin to glisten as it meets the warm surfaces, hinting at the melt to come. This final dusting gives a textural contrast once it bubbles and browns. A mistake is skimping here, which results in little browning and a less attractive finish.
- Season with salt and pepper: Add a light dusting of coarse salt and a few turns of freshly ground black pepper to taste, which will brighten the entire assembly. The seasoning amplifies the savory qualities of the cheese and the vegetal notes of the asparagus . Taste-wise, you should get an immediate lift from the pepper, and the salt will finish the mouthfeel. Over-salting is easy to do, especially with Parmesan cheese already in play, so season conservatively.
- Broil until the cheese has melted, 1 to 2 minutes: Slide the sheet under the preheated broiler and watch closely, because the magic happens fast as the cheeses bubble and develop golden brown flecks. Listen for a quiet hiss as moisture escapes and notice the surface transform from glossy to speckled and slightly blistered, which indicates the Maillard reaction is at work. This quick blast locks in creaminess while adding a toasty flavor from the browned cheese. Do not walk away, as seconds can mean the difference between perfect browning and burnt spots.
- Remove from the oven and cut in half: Once the cheese is melted and lightly browned, take the tray out and transfer the slices to a board if you like, then cut each piece in half for easy serving. The aroma will be warm and savory, a combination of roasted dairy and grilled bread . Cutting now preserves the textures you achieved and makes the portions bite sized. Cutting too early, while the cheese is still violently bubbling, can cause the topping to slide and look messy, so allow a moment to settle.
- Serve warm: Present the pieces on a platter while still warm so the melted cheese is inviting and the bread retains its crisp exterior. The sensory experience should be a slightly crackling crunch, a silky cheese pull, and a tender spear in each bite. Encourage guests to enjoy them right away, because as they cool the contrast between crisp and creamy diminishes. A common misstep is letting them sit too long, which softens the bread and dulls the textures you worked to create.
Notes
- Swap cheeses sparingly — If you want a slightly different flavor profile, you can shift the ratio of Monterey Jack cheese to Parmesan cheese to favor creaminess or sharpness. Keep the overall quantity the same so melting behavior remains consistent.
- Make it ahead — You can grill the bread and blanch the asparagus earlier in the day, then assemble and broil just before serving to save time while preserving texture.
- Adjust garlic intensity — Rubbing with one clove provides a gentle garlic note; rub more liberally if you prefer a stronger aroma, but be mindful of overpowering the delicate asparagus.
- Control the char — For a more pronounced smoky flavor, grill the bread a touch longer to deepen the char, but avoid burning by staying attentive and rotating slices as needed.
- Scale easily — The assembly is modular, so multiply the quantities to serve larger groups and use multiple baking sheets to broil in batches without crowding.