Green Beans with Lemon and Feta Cheese
Green Beans with Lemon and Feta Cheese delivers crisp tender green beans tossed with garlic and red onion, brightened by fresh lemon and finished with creamy feta. This easy weeknight side is vibrant, quick, and full of texture, perfect for spring meals and casual gatherings. Make it for a flavorful, no fuss vegetable dish that complements many mains.
Equipment
- Skillet
- Knife
- Cutting Board
- Lid
- Citrus Juicer
Ingredients
- 1 tablespoon olive oil Sauté gently in a skillet to provide a fragrant, savory base and help carry flavors throughout the dish. Use medium heat so the oil warms evenly and prevents burning of aromatic ingredients.
- 1/2 small red onion chopped Chop finely to add mild sweetness and a subtle crunch, contributing texture contrast to the tender beans. Cook briefly with aromatics to mellow sharpness while preserving a touch of color.
- 2 cloves garlic chopped Mince finely to release pungent, aromatic oils that enhance overall depth and savory complexity. Add toward the beginning of cooking and avoid high heat to prevent bitterness from burning.
- 1 lb . fresh green beans ends snapped and washed Trim, wash, and snap to offer fresh, crisp vegetal body and a bright green color as the main component of the recipe. Blanch or sauté until tender-crisp so they retain bite while absorbing lemon and feta flavors.
- Juice of one large lemon Squeeze freshly to add bright acidity and lift, balancing the richness of oil and feta while brightening all components. Add toward the end of cooking to preserve bright citrus notes and avoid bitterness from overcooking.
- 1/4 cup feta cheese Crumble over the finished dish to contribute creamy, tangy, and salty notes that complement the lemon and beans. Scatter evenly so each bite gets a bit of salty richness and textural contrast.
- Salt and pepper season to taste Season lightly and adjust to taste to enhance and balance natural flavors, bringing out sweetness, acidity, and savory elements. Add gradually and taste before serving to avoid over-salting, especially because feta adds saltiness.
Instructions
- In a large skillet, heat the olive oil and saute the garlic and onion until tender. Stir in the green beans. Add the lemon juice and stir again. Place a lid on the skillet and cook the green beans until tender, about 5 minutes. Make sure you stir the beans at least once.: The moment the chopped garlic and diced red onion hit the warmed olive oil , you should hear a soft sizzle that signals the aromatics are releasing their flavors. The aroma will change from sharp to mellow sweet as the onions become translucent and the garlic becomes fragrant, filling your kitchen with warm, savory notes. Keep the heat on medium to avoid browning too quickly, stir frequently to promote even softening, and watch for the garlic to take on a faint golden edge, which is the cue to proceed. If the garlic starts to darken rapidly, lower the heat immediately, because burnt garlic imparts bitterness that is hard to fix. This stage matters because it creates a flavored oil that coats the green beans , encouraging even seasoning and a layered taste in the finished dish.
- Pour the green beans into a bowl or onto a serving platter. Top with feta cheese and season with salt and pepper. Serve warm.: When you add the trimmed green beans , you will hear a livelier sizzle as the cool beans meet the hot pan. Their color will deepen to a vibrant green and the surface will glisten from the oil. Toss or stir to coat each bean with the flavored oil and softened aromatics, ensuring the onion and garlic distribute evenly. You want a quick, confident movement so the beans warm through and begin to blister slightly at contact points, which creates nuanced texture. Avoid crowding the pan if your skillet is small, because overcrowding steams the beans and prevents the slight sear that adds complexity. Properly seared beans give a more interesting bite and better mouthfeel.
- Note - I always squeeze additional fresh lemon juice on the green beans right before serving.: As you pour the fresh lemon juice over the warm beans, take note of the immediate lift in scent, a citrus brightness that cuts through the oil. The juice will create a light glaze on the beans and start to mingle with the pan juices, balancing the savory aromatics. Stirring now helps to distribute the acidity evenly so every bean gets a touch of brightness. The acid also slightly softens surface fibers, which contributes to a tender but still crisp texture. A common misstep is adding too much lemon at once, which can overwhelm the other flavors, so add modestly and taste as you go.
- Place a lid on the skillet and cook the green beans until tender, about 5 minutes: Covering the skillet traps steam and lets the beans cook through gently, softening the interior while the exterior retains snap. During this time you will notice a subtle steam rising and the beans will shift from sharply crisp to a pleasing crisp tender stage. Keep the heat moderate so the steam is gentle rather than violent, which prevents uneven cooking. The lid also helps the aromatics and lemon mingle with the beans, deepening the flavor. If you leave the lid on too long, the beans can become floppy, so check at around the five minute mark for your desired texture.
- Make sure you stir the beans at least once: Stirring once during the covered cooking interval prevents hot spots and ensures that all green beans receive even heat and seasoning. When you uncover and stir, you will see steam briefly billow out and the beans will glisten from redistributed oil and juice. This movement also helps prevent sticking to the pan and encourages those gentle blistered spots that add texture. A frequent mistake is neglecting this step, which can leave some beans undercooked and others overdone, so be intentional and gentle when you stir to preserve the shape and snap of the beans.
- Pour the green beans into a bowl or onto a serving platter: As you transfer the warm green beans , notice the savory steam and the intensified aroma from the cooked aromatics and lemon . Spreading them on a platter allows any excess pan juices to mingle rather than pool, and it prepares the beans for their finishing touch. Be mindful to transfer them while still warm, because that temperature helps the feta cheese settle slightly without melting completely, preserving contrasting textures. A common oversight is letting the beans cool too long before plating, which reduces the lively interplay of warm beans and cool cheese.
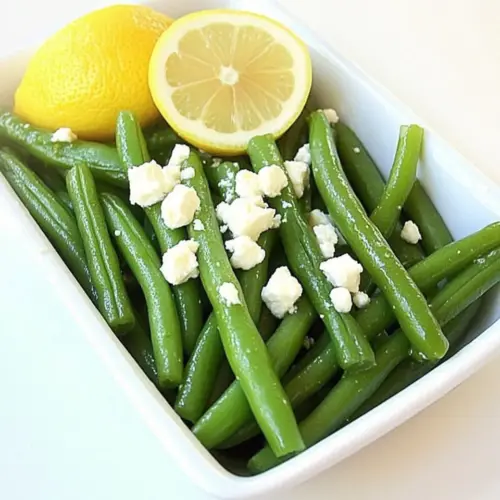
- Top with feta cheese and season with salt and pepper: Crumble the feta cheese evenly over the warm beans so each bite gets a hit of creamy, salty contrast. As the cheese meets the residual heat it will soften but retain texture, creating delightful pockets of flavor. Finish with a cautious sprinkle of salt and a few grinds of pepper , tasting as you go because the feta cheese already contributes saltiness. If you over salt at this stage, the dish can taste sharp, so add incrementally. The visual of white crumbles against vibrant green also makes the plate feel intentional and inviting.
- Serve warm: Serve the dish while the beans are still warm to enjoy the contrast between the tender heat of the vegetables and the cool, creamy feta cheese . The flavors feel most balanced when served promptly, with the lemon brightness at its peak and the aromatics fresh. If you wait too long, the textures and the aromatic lift subside, so aim to present it soon after finishing. Warm serving also helps meld the components on the plate, creating a cohesive taste experience.
- Note I always squeeze additional fresh lemon juice on the green beans right before serving: Adding an extra spritz of fresh lemon at service heightens the bright notes and refreshes the palate, especially if the beans sat briefly. The fresh scent lifts the whole dish and sharpens the flavors, giving a vibrant finish. This final touch personalizes the dish and is an easy way to tailor acidity to taste. Be careful not to overdo it, as too much acid can overpower the delicate balance you worked to build.
Notes
- Boost the crunch by briefly blanching and then shocking the green beans before sautéing, which preserves vivid color and adds crispness.
- Adjust the lemon to your taste, adding a touch more if you prefer a punchier citrus note or a touch less for subtler brightness.
- Make ahead by preparing the beans through the sauté stage, cooling, and finishing with feta cheese and fresh lemon just before serving.
- Scale easily for gatherings by multiplying proportions and using a wide skillet so the beans cook evenly without crowding.
- Keep it rustic by roughly chopping the red onion for more textural contrast if you like noticeable bits of softened onion.