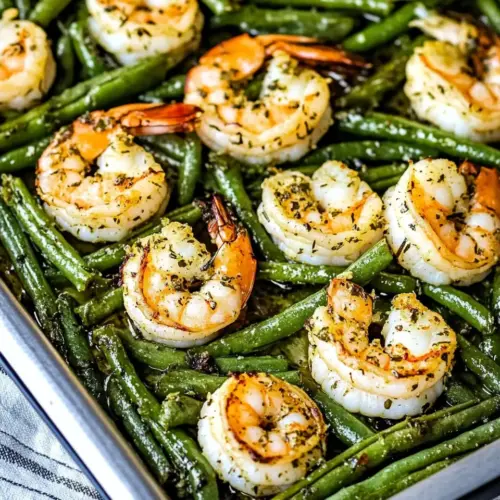
Green Beans and Shrimp Sheet Pan Meal
Green Beans and Shrimp Sheet Pan Meal is an easy weeknight dinner that pairs tender shrimp with blistered green beans, bright lemon zest, and warm spices for a crispy yet juicy result. This one pan roast is quick, satisfying, and perfect for spring evenings when fresh beans are available, making it a smart choice to add to your rotation.
Equipment
- Roasting Pan
- Ziploc bag
- Colander
- Microplane or grater
Ingredients
- 1 lb . extra-large frozen raw shrimp, thawed (see notes) Provide sweet, briny seafood flavor and lean protein that cooks quickly on a sheet pan; use thawed extra-large raw shrimp for even cooking and tender texture, and pat dry before seasoning to promote browning.
- zest from 2 lemons (see notes) Add bright citrus aroma and concentrated lemon oil from the zest to enhance overall flavor; sprinkle evenly over shrimp and green beans for fresh, zesty notes without adding extra liquid.
- 1 tsp . salt, divided (see notes) Season savory balance and bring out other flavors; divide the salt to use some for pre-salting the shrimp and beans and some for finishing so the dish isn't over- or under-salted.
- 1 tsp . fresh ground black pepper, divided Impart sharp, aromatic heat and help build overall seasoning; divide freshly ground black pepper between the shrimp and vegetables to layer flavor throughout the sheet pan.
- 1 lb . fresh thin green beans, ends trimmed Contribute crisp texture, fresh vegetal flavor, and a vibrant green element; trim ends so they cook evenly on the pan and arrange in a single layer for even roasting alongside the shrimp.
- 4 T olive oil, divided Provide cooking fat for roasting and flavor; divide the olive oil to toss with green beans and to drizzle over shrimp so both components develop a golden exterior and prevent sticking.
- 1/2 tsp . ground coriander Introduce warm, floral-citrus notes that complement shrimp and lemon; use ground coriander sparingly to add depth without overpowering the other spices.
- 1/2 tsp . ground cumin Add earthy, slightly smoky warmth that pairs well with coriander and shrimp; ground cumin should be used in small amounts to round out the spice profile and enhance savory taste.
- 1/8 tsp . Aleppo Pepper (see notes) Deliver mild heat and fruity, tangy chili flavor when used as a finishing or mixed-in spice; Aleppo pepper provides gentle warmth and a distinctive peppery-sweet background.
Instructions
- Preheat oven to 425 F/220 C.: The oven needs to be fully hot so the green beans begin to blister the moment they hit the pan, creating those desirable caramelized edges. You want a dry, hot environment so the vegetables roast instead of steam. If the oven is not fully preheated the beans will take longer and may turn out limp. A quick test is to feel the oven heat with an oven thermometer placed inside, and to allow at least 10 minutes for stabilization.
- If using frozen shrimp that have been thawed, place in colander in the sink and drain well.: Proper drainage is crucial because surface water will steam the shrimp instead of letting them roast. When well drained, the shrimp will make a soft sizzling sound when added to the pan and will develop a firm texture and pink color. A common mistake is to skip this step, which results in soggy shrimp and diluted flavors. For best results, press gently with paper towels if the thawed shrimp seem wet.
- Zest the lemons and then squeeze the juice and save for another use (or save the lemons to squeeze on at the table. DO NOT skip the lemon zest; that makes this recipe extra good.): Zesting first captures the fragrant oils without introducing the pithy bitterness from the white rind. That bright citrus oil is what lifts the whole plate, adding a lively aroma that hits immediately as you bring the pan to the table. Be careful not to grate the bitter pith. If you zest too deeply the taste will be unpleasant, so use a light hand and a fine grater for the best texture.
- Toss the shrimp with lemon zest, 2 tablespoons olive oil, 1/2 tsp. salt, and 1/2 tsp. pepper. Let shrimp marinate while you start to cook the beans.: The short marinade allows the zest and oil to cling to the surface, infusing the shrimp with citrus scent without overpowering their delicate taste. You will notice the shrimp take on a glossy sheen, which helps them brown evenly. Avoid marinating for too long, as acidic marinades can start to change the shrimp texture. Fifteen to twenty minutes is sufficient for flavor absorption without compromising texture.
- Trim ends of the green beans. We like the look of the whole green beans but you can cut into bite-sized pieces if you prefer.: Trimming yields a clean presentation and ensures uniform cooking. As you trim, look for any fibrous strings and remove them, which makes the beans easier to bite. The trimmed beans should look vibrant and even in size; when roasted they will darken slightly and show tiny blistered spots. Common error is leaving thick stems on, which remain tough after cooking, so trim neatly for best results.
- Whisk together other 2 tablespoons olive oil, ground coriander, ground cumin, other 1/2 tsp. salt, other 1/2 tsp. pepper, and hot pepper flakes.: This spice oil becomes the flavor vehicle for the green beans , coating every surface so the spices toast slightly in the oven and become fragrant. The mixture should look smooth and pourable, not clumpy. If the spices clump, whisk longer or warm lightly to help them dissolve. A typical misstep is adding too much oil, which leaves beans slick rather than roasted, so stick to the measured amount.
- Put beans into a Ziploc bag and toss with that mixture. (You can do this in a bowl, but we thought using the bag coated the beans with the mixture more.): Shaking the beans in a sealed bag ensures an even coat with minimal mess, and you will hear the beans rub together as they absorb the oil and spices. The oil will carry the flavors into the nooks of the beans, and the spices will cling uniformly, which promotes consistent browning. If you do not have a bag, toss in a bowl, but a heavy toss may bruise the beans, so be gentle. Overcrowding will prevent crisping, so ensure the beans have room to breathe later on the pan.
- Spread beans out in a single layer on the roasting pan and roast the beans for 10 minutes, turning once about halfway through if desired. (If you use thicker beans they may need a few minutes more.): Single layer roasting is key to even caramelization, you should see the edges begin to brown and audible faint sizzling when the pan is hot. Turning once helps expose different sides to direct heat and speeds even cooking. If you skip spreading them evenly, the crowded beans will steam and lose that pleasant bite. Pay attention to thickness, as thicker beans may need a few extra minutes for the same level of tenderness.
- After 10 minutes tuck shrimp between the beans and roast 6-8 minutes more, until shrimp are still slightly tender and have turned pink.: Nestling the shrimp among the beans lets them cook in the hot environment without overcrowding the pan. You want the shrimp to be just opaque and springy, with a slight give when pressed, which signals tenderness. Overcooking will make them rubbery and dry, so start checking at 6 minutes and watch for the pink color to spread through. If your shrimp are larger or thicker, they might need closer to 8 minutes; smaller shrimp will finish sooner.
- Serve hot, with more lemon juice squeezed on at the table if desired.: The final squeeze of lemon juice adds a fresh, acidic lift that brightens both the shrimp and the green beans . Serve directly from the pan while everything is steaming and fragrant, and the textures are at their peak contrast. A typical mistake is letting the pan cool too long before serving, which diminishes the sizzle and aroma, so plate promptly for the best experience.
Notes
- Mild citrus twist: Increase the lemon zest and finish with more fresh squeeze at the table for a brighter, livelier profile that emphasizes acidity over spice.
- Smoky warmth: Add a light pinch of smoked paprika to the spice mix to introduce a subtle smoky depth that complements the roasted beans without overwhelming the shrimp.
- Herbed finish: Toss finished pan with chopped fresh parsley or cilantro just before serving to add herbaceous freshness and a hint of green color contrast.
- Toasted seeds crunch: Scatter toasted sesame or sunflower seeds over the plated dish for added texture and nutty richness that plays well with the lemon and spices.
- Extra heat: Increase the Aleppo pepper slightly or add a pinch of cayenne if you prefer a more pronounced kick that still allows the lemon to shine.
- Oven rack trick: Roast the pan on the top rack for faster browning, but keep a close eye to prevent burning; swap racks mid roast for even color if needed.