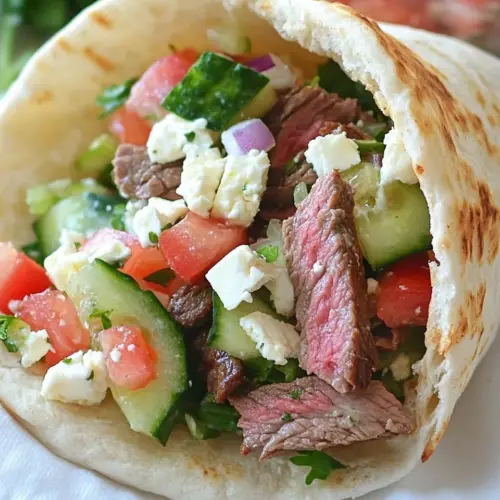
Greek Steak Salad Pita Pocket
Greek Steak Salad Pita Pocket combines tender, marinated steak with crisp cucumber, juicy tomato, and tangy feta for a creamy yet bright handheld meal. This easy weeknight dinner offers bold Mediterranean herbs, crunchy salad texture, and warm pita comfort, perfect for summer grilling or casual gatherings. Make it for a quick crowd pleasing dinner that tastes elevated but is simple to prepare.
Equipment
- Grill
- Large plastic food storage bag
- Large Bowl
- Small Bowl
- Knife
- Cutting Board
- Foil
Ingredients
- 1/2 cup light olive oil Combine and whisk to create a light, emulsified dressing that coats salad vegetables without overpowering flavors; provides a fruity, mellow base and helps distribute seasonings evenly throughout the dish.
- 2 tablespoons white vinegar Brighten and add acidity to the vinaigrette to balance the oil; cuts through richness of the steak and ties the salad components together with a crisp tang.
- 1 tablespoon balsamic vinegar Deepen flavor and add a slightly sweet, complex acidity to the dressing; complements the white vinegar and adds a subtle balsamic aroma to the marinade and salad dressing.
- 1 large clove garlic minced Mince finely to release pungent, aromatic oils that infuse the dressing and steak marinade; provides savory depth and a subtle garlic note when combined with oils and vinegars.
- salt & pepper to taste - I used about 1 tablespoon salt and 1/2 tablespoon pepper Season to taste to enhance all elements; provides necessary saltiness and a touch of heat from pepper to bring out the natural flavors of the meat and vegetables.
- 1 teaspoon ground thyme Add a warm, slightly floral herbal note to the marinade and dressing; helps complement Mediterranean flavors and pairs well with oregano and garlic.
- 2 teaspoons dried oregano Introduce classic Mediterranean herb flavor with a robust, slightly bitter and aromatic profile that works well in marinades, dressings, and sprinkled over the salad components.
- 2 bay leaves Infuse the marinade with a subtle, herbal and slightly floral background note during resting or cooking; remove before serving to avoid an overpowering bay leaf texture.
- 3 pounds sirloin steak or any other steak that is good for grilling Provide the main protein for the dish; grill or sear to develop a charred exterior and juicy interior, then slice thinly to add hearty, savory bites inside the pita pocket.
- 1 whole english cucumber diced Dice uniformly to provide cool, crisp, and hydrating crunch inside the pita; contributes a mild, refreshing flavor that balances the rich steak and tangy cheeses.
- 3 medium sized tomatoes diced Dice to add juicy texture and bright acidity to the salad filling; offers sweetness and body that pairs well with cucumbers, onions, and vinaigrette.
- 1/4 whole red onion sliced thinly Slice thinly to provide sharp, slightly sweet pungency that contrasts the creamy feta and hearty steak; distributes bite-sized bursts of flavor throughout the pita.
- 1/2 cup feta cheese crumbles Crumble to add salty, creamy, tangy notes that are characteristic of Greek salads; sprinkle throughout the filling to lend savory richness and a pleasant crumbly texture.
- 4 tablespoons light olive oil Use to finish dressings or to lightly sauté vegetables if desired; adds a subtle fruity olive note and helps moisten the pita filling for easier eating.
- 2 tablespoons white vinegar Brighten and slightly acidify the salad or dressing to reinforce the initial vinaigrette flavors; contributes a clean acidity that ties the filling together.
- 1/2 teaspoon dried oregano Season the dressing with a touch of Mediterranean herb for continuity with the other seasonings; adds a note of earthiness and oregano aroma to the salad.
- 1/4 teaspoon garlic powder Provide a mild, savory garlic undertone when combined into the dressing mix; offers convenience and consistent flavor without overpowering fresh garlic.
- 1/2 teaspoons sugar Add a small amount of sweetness to balance the acid in the dressing and to round out the overall flavor profile; helps moderate vinegars and ties flavors together.
- salt & pepper to taste Season the dressing and salad to personal preference to ensure balanced flavors; salt and pepper finish the dish and enhance the steak, vegetables, and cheese.
- 6 whole pita pockets Hold the assembled fillings and provide a convenient handheld serving option; warm slightly before filling to make the pita more pliable and enjoyable to eat.
- parsley for garnish Garnish the finished pita pockets with fresh, chopped herb to add color and a bright, herbaceous lift that complements the Mediterranean flavor profile.
Instructions
- In a large plastic food storage bag, combine all ingredients for the marinade. Place meat inside bag, seal and move around to coat meat in marinade. Refrigerate for at least 2 hours.: The moment you blend the olive oil, vinegars, minced garlic , herbs, and salt, the aroma lifts and you can already smell the herbal, tangy promise. Mixing in a bag allows every surface of the steak to be coated, which encourages even flavor penetration during refrigeration. You should notice the oil sheath the herbs and the garlic releasing its scent into the liquid, which is a good visual cue the marinade is integrated. The why here is simple, the marinade both seasons and tenderizes surface proteins, helping the meat develop flavor quickly during a relatively short marinate. A common mistake is using too little acid which leaves the flavors flat, so be sure to include the vinegars listed. Avoid overfilling the bag, which can prevent proper coating, and if the steak is thick consider scoring the surface lightly so the marinade can reach more deeply.
- An hour before grilling, remove meat from fridge.: As you massage the bag, listen for the soft rustle of the plastic and watch the marinade cling to the meat. This tactile step helps distribute marinade to every crevice and ensures the seasonings are not just pooled at the bottom. The reason this matters is surface contact equals flavor transfer when you grill, and an even coating gives the best crust when seared. One troubleshooting tip is to flip the bag periodically in the fridge to maintain even distribution if the marinade separates. Do not puncture the bag when handling, and confirm the seal to prevent leaks that can cross contaminate your fridge.
- Preheat grill to medium high heat.: During this resting time the vinegars start to gently work on the meat while the aromatics infuse in a subtle way. You will notice that the marinade darkens slightly and the meat takes on a glossier appearance, which are signs of absorption. The purpose is both flavor development and a mild tenderizing effect from the acidic components. A frequent mistake is under marinating, which can leave the steak tasting under seasoned. Conversely, do not marinate for excessively long periods with strong acids or the texture can begin to break down. Aim for the recommended time for best balance.
- Dice up veggies for salad and place into a large bowl. Toss in cheese. In a small bowl, stir all ingredients together for salad dressing. Pour dressing over veggies and stir to coat. Refrigerate until ready to serve.: Pulling the steak out ahead of time allows it to approach room temperature, which promotes more even cooking and a better sear. You should feel the meat come off the chill and loosen slightly, and the marinade may pool gently again as the temperature changes. Why this helps is that a cold center can overcook while the exterior reaches your desired crust, leading to uneven doneness. One common error is grilling directly from fridge cold, which can result in a tough exterior and undercooked middle, so give it this little patience window.
- Place meat on grill and cover. Cook about 7 minutes per side or until done to your liking. {My meat was thick so, I cooked mine a little bit longer.} While meat is cooking, wrap pitas in foil and place on the grill to warm. Remove meat from the grill to a clean plate and cover with foil to let meat rest. Slice meat thinly against the grain and place on serving platter. Remove salad from fridge. Remove pitas from the grill.: A properly heated grill will hiss when the steak hits the grates and create an immediate sear. Visual cues include a glowing grate and a light wisp of smoke from residual marinade oils. Preheating ensures the Maillard reaction occurs rapidly, building those deep, savory crust flavors. If the grill is not hot enough, the meat will cook slowly and fail to develop a flavorful crust, so wait until it is confidently hot. Also, clean the grates before heating to avoid sticking and uneven searing.
- To serve, cut pita in half and open up pocket. Place in slices of warm steak, greek salad and top with more feta cheese and parsley if desired.: As you chop the cucumber and tomato, notice the fresh fragrance and the bright color contrast that starts to form in the bowl. The texture of diced vegetables yields a pleasant bite inside the pita pocket and allows the dressing to cling more uniformly. This matters because bite size pieces are easier to eat without making a mess and they distribute flavors consistently. A common slip is cutting pieces too large which can overpower the pita or make assembly awkward, so keep sizes moderate and consistent. Use a sharp knife to keep the edges clean and prevent crushing the vegetables.
- Toss in cheese: Adding the crumbled feta cheese now lets its creamy, salty pockets settle among the vegetables. You will see the white flecks contrast with the reds and greens and smell a subtle tang that promises complexity. The cheese also adds a creamy texture which balances the crunchy vegetables and the meaty steak . Avoid over mixing which can break down the feta into smaller crumbs, losing those little bursts of flavor; gentle folding works best.
- In a small bowl, stir all ingredients together for salad dressing: When you whisk the olive oil, white vinegar, dried oregano, garlic powder, sugar, salt, and pepper you should see a glossy emulsion forming. The dressing will smell herbaceous and slightly sweet, which signals balance. This step matters because a well emulsified dressing clings to the vegetables, ensuring each bite is seasoned. A frequent mistake is adding the oil too quickly which can prevent proper blending; add oil slowly while stirring for the smoothest result.
- Pour dressing over veggies and stir to coat: As you combine the dressing with the diced vegetables, watch the colors become more vibrant and the pieces glisten with a light sheen. This coating locks in flavor and slightly softens the vegetables for easier eating in the pita . The why is that a properly dressed salad avoids dry pockets and keeps the assembly cohesive. One troubleshooting tip is to taste and adjust seasoning after tossing, because vegetables can absorb salt quickly; add a bit more salt or pepper if needed.
- Refrigerate until ready to serve: Chilling the salad for a short period lets flavors meld and keeps the filling cool against the warm steak . You will notice the salad takes on a slightly calmer, integrated aroma as the dressing soaks in. This resting step is important for harmony between heat and cool components at assembly. Avoid refrigerating too long which can waterlog some vegetables, and drain any excess liquid before stuffing the pitas to prevent sogginess.
- Place meat on grill and cover: When the steak hits the hot grill you should hear an immediate sizzle, and the smell of browning will be enticing. Covering the grill helps maintain even heat and speeds cooking through thicker cuts. Achieving a good sear while cooking through ensures both flavor and tenderness in the final slices. A common misstep is leaving the lid open the entire time, which can cause uneven cooking; monitor but keep the grill covered for best results.
- Cook about 7 minutes per side or until done to your liking: As the steak cooks you will see clear visual signals such as caramelized edges and juices rising to the surface. Timing depends on thickness and desired doneness, so rely on visual cues and a thermometer if precise doneness matters. This timing is important to develop crust while keeping the interior juicy. One trap is flipping too frequently which prevents a proper crust; aim for confident single flips rather than constant turning.
- While meat is cooking, wrap pitas in foil and place on the grill to warm: Warming the pita in foil lets them puff slightly and become flexible, which makes stuffing them easier. You will notice a subtle toasted scent and a more pliant texture when they are ready. This step makes assembling smoother because warm pitas are less likely to crack. Be careful not to overheat which can dry the bread, and avoid direct flame contact which can char them too much.
- Remove meat from the grill to a clean plate and cover with foil to let meat rest: Resting is when the juices redistribute into the meat, making slices juicier and more tender. Cover with foil to keep warm and let the internal temperature equilibrate. This pause is essential because cutting too soon causes juices to run out, leaving drier slices. A common mistake is skipping the rest, which sacrifices tenderness, so give it the recommended time before slicing.
- Slice meat thinly against the grain and place on serving platter: Slicing against the grain shortens muscle fibers and yields tender bites. You should see neat, thin ribbons of meat that are easy to bite and chew. The why here is structural, shorter fibers equal softer texture in the mouth. Avoid cutting with a dull knife which tears rather than slices cleanly, and if the meat is too cool it becomes harder to slice thinly, so slice while still slightly warm for best results.
- Remove salad from fridge: Bringing the salad out allows it to come to the perfect cool temperature that contrasts the warm steak . The visual of the chilled, glossy vegetables beside the sliced meat is appealing and signals readiness. This matters for balance in the assembled pita. If the salad released liquid while chilling, give it a quick toss and drain so the pitas do not become soggy.
- Remove pitas from the grill: Carefully unwrap the warmed pita pockets and check that they are pliable and warm through. Warm pitas will open easily and cradle the filling without tearing. This step makes final assembly straightforward and pleasant to eat. Avoid letting them stay wrapped on the hot grill too long, which can make them overly soft or steamed.
- To serve, cut pita in half and open up pocket: As you open each pocket you should feel the warmth and smell the herb scented meat and salad. Cutting in half makes portioning easy and creates tidy boats for filling. This serving approach is practical and visually appealing at the table. A quick tip is to warm the cut edge briefly if the pita feels stiff, making the pocket easier to open and fill without ripping.
- Place in slices of warm steak, greek salad and top with more feta cheese and parsley if desired: Layer the warm, thinly sliced steak first so the pocket retains heat, then add the chilled salad for a delightful contrast. Finish with extra crumbled feta cheese and a sprinkle of parsley for color and brightness. The assembled pocket should offer warm, cool, salty, and herbal notes in every bite, which is what makes this dish feel complete. One last mistake to avoid is overfilling which can make the pocket difficult to eat; leave a little room so it holds together.
Notes
- Marinade coverage: Make sure the steak is fully coated in the marinade by massaging it in the sealed bag, this ensures even flavor and better surface browning when grilled.
- Temperature patience: Let the steak come up off the chill for about an hour so it cooks more evenly and sears cleanly without overcooking the center.
- Salad dressing balance: Whisk the olive oil and vinegar slowly to create a light emulsion that clings to the veggies rather than pooling at the bottom of the bowl.
- Pita warming: Wrap the pita in foil and warm on the grill for a few minutes so they are pliable and less likely to tear when stuffed.
- Feta finishing: Add a bit more crumbled feta cheese on top when assembling for salty pockets of flavor that elevate each bite.