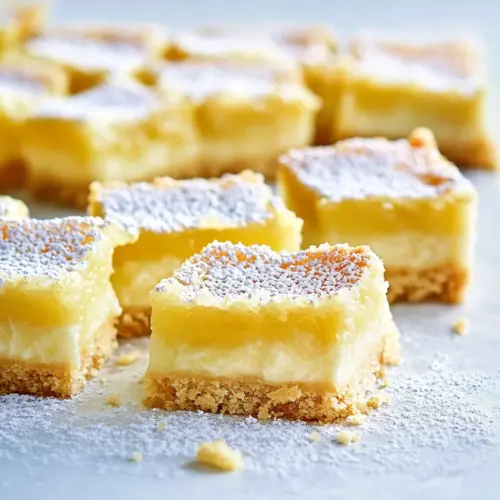
Gluten Free Lemon Bars
Gluten Free Lemon Bars are bright, tangy, and satisfyingly tender with a delicate gluten free crust and a glossy lemon filling. This easy to love treat is creamy yet light, perfect for spring gatherings and simple enough for an easy weeknight dessert. Make them ahead to chill and slice for neat serving, and you will have a crowd pleasing citrusy dessert to share.
Equipment
- 8 inch square pan
- Parchment Paper
- Mixing Bowls
- Whisk
- Measuring Cups
Ingredients
- 1 cup gluten-free all-purpose flour blend gum-free Provide structure and a tender crumb to the crust while remaining gluten-free; use a gum-free all-purpose blend to mimic wheat flour textures. Measure precisely to ensure the shortbread base sets properly and holds the lemon filling without becoming dense.
- 1/3 cup confectioners’ sugar plus extra for dusting Add fine sweetness and contribute to the crust's delicate texture; confectioners’ sugar dissolves smoothly into the dough. Reserve a little extra for dusting the finished bars to create a classic, attractive finish.
- 1/4 teaspoons salt Enhance and balance sweetness while strengthening dough proteins slightly; a small amount of salt brightens the flavors. Sprinkle evenly into the dry ingredients to ensure even seasoning throughout the crust.
- 2 teaspoons lemon zest Deliver intense citrus aroma and concentrated lemon flavor without adding extra liquid; zest brings essential oils that lift the entire recipe. Microplane or finely grate just the yellow outer peel to avoid bitter pith.
- 1/2 cup unsalted butter melted and cooled Bind ingredients and add richness to the crust while contributing to a tender, melt-in-mouth texture; using melted, cooled unsalted butter helps the dough come together smoothly. Choose unsalted butter to control overall salt level and cool it so it doesn't cook other ingredients prematurely.
- 4 large eggs at room temperature Provide structure, leavening, and richness to the lemon filling through proteins and emulsification; room-temperature eggs incorporate more uniformly. Beat thoroughly to create a smooth, custardy filling that sets properly when baked.
- 1 cup granulated sugar Sweeten the filling and contribute to the classic lemon bar balance between tart and sweet; granulated sugar also affects the filling's texture and set. Dissolve into the egg mixture for an even, glossy custard.
- 1 teaspoon baking powder Offer lift and a slight lightening to the filling's texture; baking powder helps the custard set with a soft, pleasant structure. Measure carefully to avoid an overly aerated or cake-like result in the bars.
- 2/3 cup lemon juice freshly squeezed, juice of about 4 lemons Provide the primary tart, acidic component that defines lemon bars; freshly squeezed lemon juice gives the brightest, most natural flavor. Use freshly squeezed juice for optimal taste and to react properly with sugar and eggs during baking.
- 1/2 cup gluten-free all-purpose flour blend Help thicken the lemon filling and ensure a smooth, stable set; adding extra gluten-free all-purpose flour blend absorbs liquids and prevents a runny center. Fold in gently to avoid overworking while ensuring even distribution for a firm finish.
Instructions
- Preheat oven to 325°F. Grease an 8-inch square pan and line with parchment, leaving an overhang.: As you bring the oven up to temperature you will notice a warm, drying air that helps bake the crust evenly, and getting the oven hot first ensures consistent rising and browning. The steady heat encourages the crust to set and start to take on a light golden hue. A common mistake is not preheating long enough, which can lead to an underbaked center. Use an oven thermometer if your appliance runs cool, and avoid opening the door during this stage since heat loss changes the bake.
- Whisk together the gluten-free flour, confectioners’ sugar, salt, and lemon zest in a bowl. Stir in the melted butter. If it's too dry, add more butter until it can be pressed into the pan evenly. Pack the mixture into the pan.: The aroma of freshly grated lemon zest will become pronounced as the dry ingredients mingle, releasing citrus oils into the mixture. Whisking distributes the confectioners’ sugar and salt evenly so every bite is balanced. If the mixture feels unevenly textured, rub a small handful between your fingers to check for uniformity. A typical pitfall here is under mixing, which leaves pockets of sugar that do not integrate well when butter is added.
- Put the pan in the oven and bake the crust until it firms up and just begins to set, about 15-20 minutes. Take the pan out of the oven and let it cool for a short while.: When you add the slightly cooled melted butter , the mixture should come together and feel damp enough to press. The butter coats the flour particles, creating a sandy texture that compacts into a cohesive crust. If the mix seems too dry, add a teaspoon of additional melted butter at a time until it presses together. Avoid adding too much, as an oily crust will spread and not crisp properly.
- In another bowl, whisk together the eggs, granulated sugar, baking powder, lemon juice, and the gluten-free flour until smooth and well combined.: Pressing the crust firmly into an 8 inch square pan creates an even base that bakes uniformly. I like to use the bottom of a measuring cup to get an even, compact surface, which helps achieve a crisp edge and sturdy foundation. Uneven packing causes thin spots that can brown faster and lead to an irregular bake. Make sure the crust reaches the corners for neat slices later.
- Pour the lemon filling evenly onto the warm crust.: While baking you will smell butter and a toasty note from the flour, and the crust will shift from loose crumbs to a set, slightly golden surface. This step is crucial because a fully set crust prevents the filling from seeping through. A common error is leaving the crust in too long which can lead to overly hard edges. Keep a close eye toward the end of the time window and look for a pale golden hint rather than deep brown.
- Place the pan back in the oven and bake until the filling is just set and has a slight jiggle in the center when you gently move the pan, around 22 to 27 minutes.: Allowing the hot crust to rest briefly stabilizes its structure and prevents the filling from melting into a piping hot base. The cooling period gives you time to prepare the filling and reduces the risk of the eggs cooking prematurely. Rushing to pour hot filling on a piping hot crust can change texture, so wait until the surface is warm rather than scorching.
- Remove the pan from the oven and allow the bars to cool in the pan for about 20 minutes. Then, transfer the pan to the refrigerator and chill for at least 2 hours to firm up the bars.: As you whisk, the mixture becomes glossy and slightly thickened, with the citrus scent becoming dominant. Whisking fully dissolves the granulated sugar into the eggs for a silky filling, and integrating the baking powder ensures even lift. A common mistake is under whisking which leaves sugar grit or pockets of flour; whisk until completely smooth for a uniform set.
- Once chilled, run a knife along the edges of the parchment paper to release the bars. Lift them out using the overhang and dust lightly with extra confectioners’ sugar. Cut into 12 squares. Serve cold.: When the filling meets the warm crust you hear a subtle settling as the liquid levels out across the surface. Pour slowly to avoid disturbing the crust, and if you notice any gaps, gently nudge the filling toward the edges with a spatula. Pouring while the crust is too hot can cause the filling to start cooking at the interface, so pour onto a warm not hot base for best results.
- Place the pan back in the oven and bake until the filling is just set and has a slight jiggle in the center when you gently move the pan, around 22 to 27 minutes: During this bake the filling will firm from the edges inward and develop a glossy, custard like top. You want the center to wobble slightly not be liquid, because it will continue to set as it cools. Overbaking results in a rubbery texture, while underbaking leaves a runny center. Aim for a gentle jiggle that indicates perfect doneness.
- Remove the pan from the oven and allow the bars to cool in the pan for about 20 minutes: Cooling on the counter lets residual heat finish the setting process gently, and you will notice the surface lose some sheen as it stabilizes. This rest prevents a collapsed center when the bars are chilled. A frequent slip up is cutting too soon which yields messy slices, so be patient and let them rest before refrigeration.
- Transfer the pan to the refrigerator and chill for at least 2 hours to firm up the bars: Chilling transforms the filling from soft to sliceable, tightening the texture and concentrating flavors so the lemon tastes brighter against the buttery base. The cold also helps create clean edges when you cut squares. Not chilling long enough is a common mistake, producing bars that crumble or smear when sliced, so give them the full chill time.
- Once chilled, run a knife along the edges of the parchment paper to release the bars: The parchment overhang makes it easy to lift the slab out cleanly, and running a knife around the pan ensures the bars separate from the sides without tearing. The chilled surface will be firm and cool to the touch. If your knife drags, wipe it clean and warm it briefly for neater cuts, then re chill if needed.
- Lift them out using the overhang and dust lightly with extra confectioners’ sugar: Dusting adds a delicate, sweet finish and a pretty contrast against the pale yellow filling, and it also softens the first bite. Use a fine mesh sieve for an even coating, and dust just before serving to keep the sugar bright. Applying too much sugar can overwhelm the lemon, so a light dusting is all you need.
- Cut into 12 squares and serve cold: Cutting chilled bars yields crisp edges and tidy squares that present beautifully. Serve straight from the fridge for the best texture, and you will notice clean layers and a refreshingly tart flavor. Cutting while warm often leads to uneven slices, so patience here results in a professional looking tray of bars.
Notes
- Bring eggs to room temperature before you start to help the filling emulsify smoothly and set evenly during baking. Cold eggs can cause the filling to bake unevenly and may give a denser texture.
- Measure flour correctly by spooning it into the measuring cup and leveling it off, rather than scooping, so the crust does not become dry or dense. Too much flour will make the crust crumbly rather than cohesive.
- Use an 8 inch square pan for the intended thickness and bake times, because a larger pan thins the bars and shortens baking time which affects set and texture. If you change pan size, adjust baking times carefully and watch the jiggle test.
- Cool the butter slightly after melting so it does not dissolve the sugar into a syrup when mixed, which can change the crumb and mouthfeel of the crust. Warm not hot butter is ideal.
- Sift the gluten free flour if lumpy to prevent pockets in the filling and to help incorporate it smoothly when whisking with the eggs and sugar. Lumps can bake into gritty spots in the filling.
- Chill thoroughly for at least two hours to allow the filling to firm properly, making slicing cleaner and the texture more satisfying. Skipping this step often leads to messy pieces and a softer center.