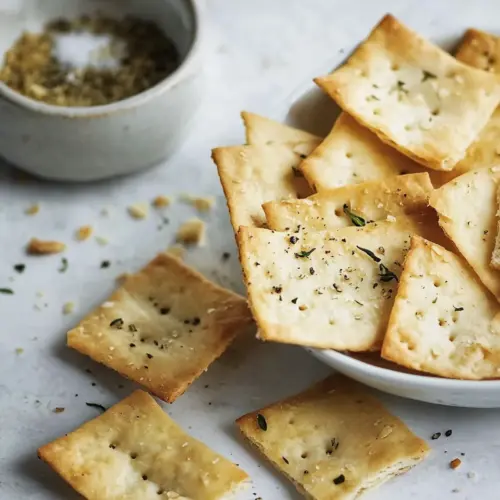
Gluten Free Crackers
Gluten Free Crackers are a crispy, easy snack that bakes up golden and satisfying. Lightly savory with a hint of sweetness, these crackers are perfect for easy weeknight nibbling or party platters. They rely on pantry staples and come together quickly, making them an ideal choice when you want a tasty gluten free option to share with friends and family.
Equipment
- Mixing Bowl
- Baking Sheet
- Parchment Paper
- Rolling Pin
- Sharp Knife
Ingredients
- 1 teaspoon olive oil Coat a mixing bowl with a thin layer to prevent dough from sticking and help distribute fats evenly; olive oil adds subtle richness and aids handling while contributing a light crispness to the crackers when baked.
- 1 tablespoon vegan butter spread melted Melted vegan butter spread enriches the dough with fat for flakiness and flavor; it helps bind dry ingredients and improves mouthfeel while promoting browning during baking.
- 1/2 teaspoon honey or agave nectar Provide mild sweetness and browning by incorporating honey or agave nectar; a small amount enhances flavor complexity and helps with dough cohesion and texture.
- 1 cup gluten-free flour blend Form the base structure by combining a gluten-free flour blend to create the cracker matrix; choose a blend that balances starches and flours to ensure proper texture and prevent crumbliness.
- 1/2 teaspoons ea salt Season evenly with salt to enhance overall flavor and balance sweetness; a measured amount also strengthens dough taste and ensures the crackers aren't flat-tasting.
- 1/4 to 1/2 cup water as needed Adjust dough consistency by adding water as needed to bring ingredients together; incremental additions allow control so the dough is pliable but not sticky for rolling thin.
- Extra sea salt or seasoned salt for topping Sprinkle extra sea salt or seasoned salt on top to finish the crackers with a crunchy, savory burst; toppings elevate visual appeal and provide a contrasting pop of flavor in each bite.
Instructions
- Preheat your oven to 400 degrees Fahrenheit. In a mixing bowl, combine olive oil, vegan butter spread, and honey or agave nectar. Stir in gluten-free flour blend and sea salt. Add 1/4 cup of water to start, mixing to form a dough.: When the oven reaches 400 degrees Fahrenheit you will notice a subtle heat that changes how the air moves inside, and that immediate high heat helps the crackers set quickly and dry out. The sound is minimal at this stage, but you may hear a faint hum as the element cycles. Preheating ensures even baking across the sheet, and skipping it can cause uneven texture. A common mistake is not waiting for the true temperature, which results in soft, underbaked crackers.
- If the dough is too dry, add more water, 1 tablespoon at a time, until it forms a cohesive ball. Be cautious not to add too much water.: As you stir the olive oil , melted vegan butter spread , and sweetener together, the mixture should look glossy and slightly viscous, and you may detect a gentle aroma of fat and a faint sweetness. This blend coats the flour later, which helps with browning and mouthfeel. Mixing these wet ingredients first prevents clumping when you add the flour. Avoid over mixing at this stage, because incorporating too much air can make the dough hard to roll evenly.
- Sandwich the dough between 2 sheets of parchment paper. Roll out to approximately 1/8-inch thick, ensuring evenness to prevent uneven baking.: When the gluten free flour blend and sea salt join the wet mix, the texture will move from slick to crumbly, then to a shaggy mass. Use a wooden spoon or spatula so you can feel the transformation in your hands, and watch for any large pockets of dry flour. This step is crucial because flour hydration determines final crispness. A frequent error here is failing to break up lumps, which leads to uneven spots in the crackers.
- Peel away the top parchment layer. Transfer the bottom layer with the dough onto a baking sheet. Score the dough into 1 1/2-inch squares with a sharp knife, but do not separate them.: As you pour 1/4 cup of water into the bowl, the flour will soften and the dough will begin to cohere, taking on a matte sheen. Work the dough gently until it holds together; it should be pliable but not sticky. The sensory cue is a smooth surface that still yields slightly to pressure. If you add the water too quickly you can overshoot and end up with a slack dough that will not roll thinly.
- Dampen the dough lightly with water, smoothing it with your fingers. Sprinkle with sea salt or seasoned salt.: When the dough resists gathering, add more water slowly, one tablespoon at a time. Each small addition will change the feel noticeably, from crumbly to tacky to pliable. Stop once the dough forms a cohesive ball that holds its shape. The why is simple: too dry and the crackers will be crumbly, too wet and they will spread while baking. A common pitfall is adding large amounts at once which makes corrections harder.
- Bake for 15-20 minutes, until crisp, rotating the baking sheet halfway through. Watch closely to avoid overbaking.: If you overshoot with water , the dough can become sticky and difficult to handle, leading to thicker rolling and softer crackers. If that happens, fold in a dusting of more gluten free flour blend and rest the dough briefly to firm up. The sensory clue of excess moisture is a glossy, tacky surface that sticks to your fingers. Avoid the urge to keep adding flour; incremental fixes work best.
- Allow the crackers to cool completely on the baking sheet before breaking them apart.: Placing the dough between parchment creates a barrier that prevents sticking and allows you to roll very thinly, producing an even surface. The sound of the rolling pin on paper is faint and steady, and you will see the dough flatten to an even sheet. This technique reduces cleanup and helps you transfer the dough without tearing. A mistake is skipping the parchment which often results in tearing or uneven thickness.
- Roll out to approximately 1/8-inch thick, ensuring evenness to prevent uneven baking: Rolling to about 1/8 inch creates crackers that crisp without burning quickly. Watch the edges as an indicator; if they are thinner than the center, the sheet will brown unevenly. Aim for uniform pressure so the whole sheet bakes at the same rate. Many people apply uneven pressure, which causes some pieces to be overdone while others remain soft.
- Peel away the top parchment layer: As you remove the top parchment, the dough should remain on the bottom paper. The exposed surface will show a smooth, slightly matte finish. If the dough tears, it was likely rolled too thin or stuck because the parchment had shifted. Peeling slowly and at a low angle minimizes stress on the dough.
- Transfer the bottom layer with the dough onto a baking sheet: Sliding the bottom parchment with the dough onto a tray keeps everything intact and allows you to move the crackers to the oven without disturbing the scored lines. The baking sheet should be room temperature and flat to ensure even contact. A warped sheet can lead to uneven baking and bowing, which is a common issue people encounter.
- Score the dough into 1 1/2-inch squares with a sharp knife, but do not separate them: Scoring gives you neat breaks after cooling and guides the crackers as they expand and dry. Use a very sharp knife so the cut is clean; a dull blade drags and distorts the dough. The visual cue is a clear, shallow line that does not cut through. Cutting too deeply will make the crackers separate and cook differently along the edges.
- Dampen the dough lightly with water, smoothing it with your fingers: Lightly wetting the surface gives a slight sheen and helps any topping adhere. Gently running damp fingers over the sheet will also smooth small imperfections. The tactile feedback should be minimal moisture, not sogginess. Over wetting causes the seed or salt toppings to sink and may create pockets that do not crisp.
- Sprinkle with sea salt or seasoned salt: A final dusting of sea salt adds contrast and a bright finish. The salt crystals glint on the surface and pop pleasingly when you bite into the cracker. Use sparingly, because salt amplifies every other flavor. Heavy salting is the most common complaint I hear after tasting homemade crackers.
- Bake for 15-20 minutes, until crisp, rotating the baking sheet halfway through: During baking you will notice a warm, toasty aroma as moisture leaves the dough and the surface begins to color. Rotating halfway ensures even browning across your oven. Listen for the faint sound of moisture escaping and watch the edges for gentle golden tones. Remove them just as the centers feel dry, because they will continue to firm up as they cool. Overbaking leads to a bitter, burnt flavor.
- Watch closely to avoid overbaking: The window between perfectly crisp and overly dark can be small, so stay attentive in the final minutes. The visual sign is a uniform, light golden tint and a dry surface. If you step away and they darken, they will taste overly toasty. A good tip is to set a timer for the minimum time and check often.
- Allow the crackers to cool completely on the baking sheet before breaking them apart: Cooling on the tray lets the crackers finish drying and snap firmly. As they cool you will hear gentle snaps as edges set. Breaking them too soon often yields pieces that crumble instead of cleanly separating. Wait until they are room temperature for the best texture and clean break.
Notes
- Measure fats carefully The balance between olive oil and melted vegan butter spread affects texture more than you might expect. Too much fat produces a soft, greasy cracker; too little results in a sandier mouthfeel. Use an accurate spoon or scale for consistent outcomes.
- Hydrate slowly With variable gluten free flour blend absorption, add water incrementally. I add one tablespoon at a time after the initial 1 4 cup to hit the sweet spot. This avoids a sticky mess and gives you control over the final dough consistency.
- Roll evenly Rolling to an even thickness is crucial. I check thickness by eye and press extra gently along the center if needed. Uneven sheets lead to some crackers burning while others stay soft, so take the extra minute to perfect the sheet.
- Score but don’t separate Scoring helps break the crackers after cooling, but leaving them joined while baking prevents edges from browning prematurely. Use a very sharp knife and shallow scoring strokes for clean lines.
- Use a light hand with toppings Whether you choose extra sea salt or a seasoned salt, a little goes a long way. Tap off excess crystals before baking to prevent overly salty bites and to keep the surface texture delicate.